


MadCap Flare allows you to import Microsoft Word .doc or .docx files into a project to convert legacy print-based documentation into a modern help system, or as a pipeline for updating information in your documentation from contributors who are comfortable writing in Word. The world of WYSIWYG print-based authoring in Microsoft Word is quite different from XML topic-based authoring in Flare, so there will be important considerations while undergoing the import process.
This guide will walk you through the process of importing Microsoft Word content into Flare, and what steps to take to ensure that the migration is seamless and painless:
Getting Started: What to Do Before Importing Microsoft Word Content
Word documents may be imported into a new Flare project or an existing Flare project. You can start the import process with the options listed below.
Importing Word Content Into a New Project
Option 1: Select File > New Project > MS Word Documents.
Option 2: Go to the Project ribbon > Import > MS Word Documents, then select the radio button for "Import into a new project" in the Import Microsoft Word Wizard.
Importing Into an Existing Project
Option 1: Use the Wizard - select Project ribbon > Import > MS Word Documents.
Option 2: Use an Import File.
But before you begin importing into Flare, it is a very good idea to prepare your source Word documents so that they will be best handled by the Word importer, resulting in less post-import work on your end.
1. Clean the Word Documents
“Cleaning” a Word document involves any of the following tasks, and is not limited to them:
Use Heading Styles
Make sure your Word document uses heading styles (Heading 1, Heading 2, and so on) to organize the content into sections and subsections. During import, you will be able to use the heading styles to choose where to split up the Word document into separate topics.
To apply a style in Word, place your cursor in the text and select a style from Home > Styles, or right-click and select Styles > [word style].
If your source document includes “headings” that are actually normal body text styled to look like headings, consider converting them to real headings and you will reduce the chances of headaches and extra work later on.
Replace Inline Styles with Word Styles
It is good practice to create styles for any set of visual properties you apply to multiple elements, whether you are working in a Word document or with HTML and CSS. Flare can try to convert inline styles to CSS classes upon import, but it could result in several duplicate rules in your stylesheet.
To prevent this and to allow you to map the Word style to one CSS class, you can convert inline styles to Word styles in the source document. Then you can use Word’s Advanced Find & Replace to apply the style to all text that uses those inline styles.
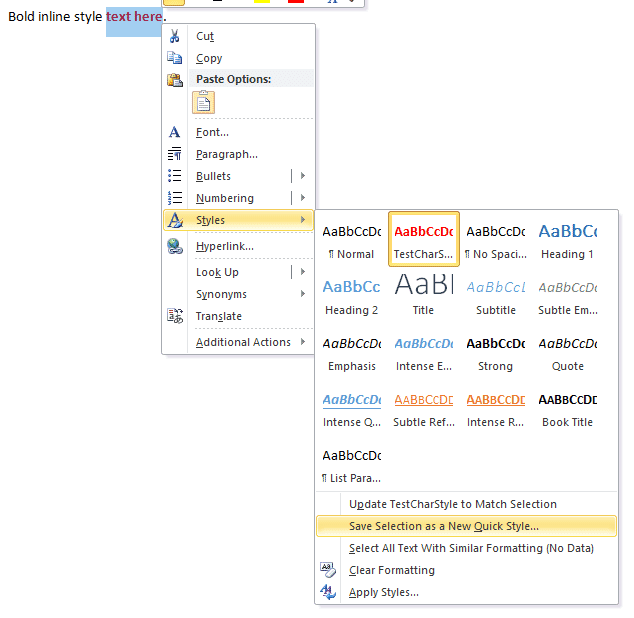
In Word, convert an inline style to a Word style with these steps:
- Highlight the text.
- Right-click > select Styles.
- Select Save Selection as New Quick Style.
When the style is created, apply the style to the rest of the document:
- Select Home > Find > Advanced Find.
- Place your cursor in the “Find what” field.
- Reveal more options in the dialog by clicking the “More >>” button.
- Select Format > Font.
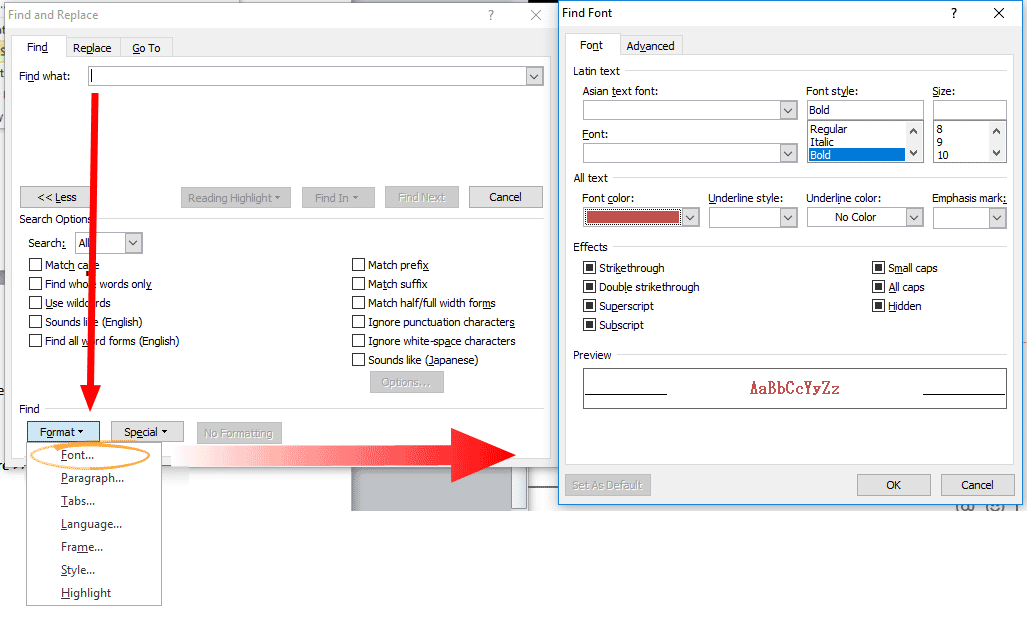
- Select the relevant font properties in the Find Font dialog and click OK.
- Back in the Find and Replace window, open the Replace tab.
- Select Format > Style to select the style you would like to apply to the text styled with the properties set below the Find field.
- Select Replace if you would like to verify each replacement individually, or Replace All.
Use Style Inspector to Clean Existing Styles
Sometimes the requisite styles are applied to the contents of your source document, but they do not import properly or cleanly because of some “extra” properties that are part of the style. For example, a source document might have normal body text formatted so that what should be imported as paragraph <p> elements actually come in as unordered list elements <ul>, and so the entire contents turns into a giant list!
Use Word’s Style Inspector to resolve these kinds of issues:
- Open the source document in Word, and select the affected text, or possibly all text (Ctrl+A).
- Go to the Home ribbon > Styles section > click on the small arrow in the lower right to open the Styles window.
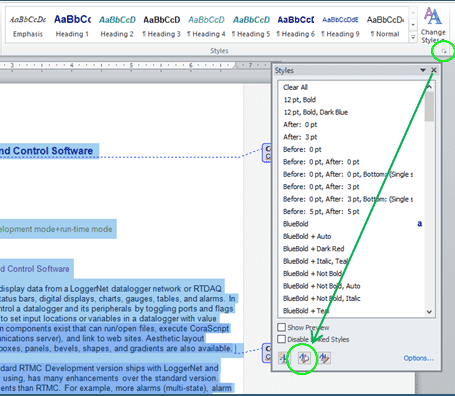
- Select the button in the middle of the row on the bottom of the Styles window for “Style Inspector.”
- In the Style Inspector, press the Clear Formatting button with the eraser on it to clear the (plus) formatting for Paragraph formatting and Text level formatting. Only press the Clear Formatting button by the (plus) sections and leave the others.
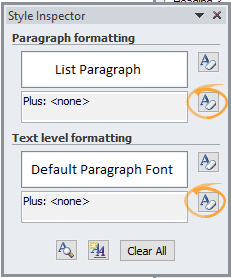
If it says <none> in the dialog like in the screenshot above, there are no extraneous styles in effect.
2. Set Import Options
Here are some important things to know about the additional options in the Word Import file or wizard.
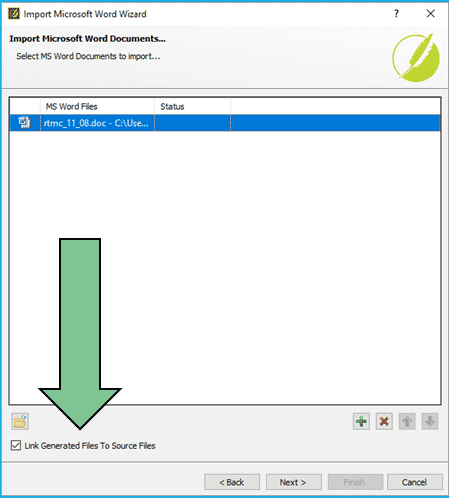
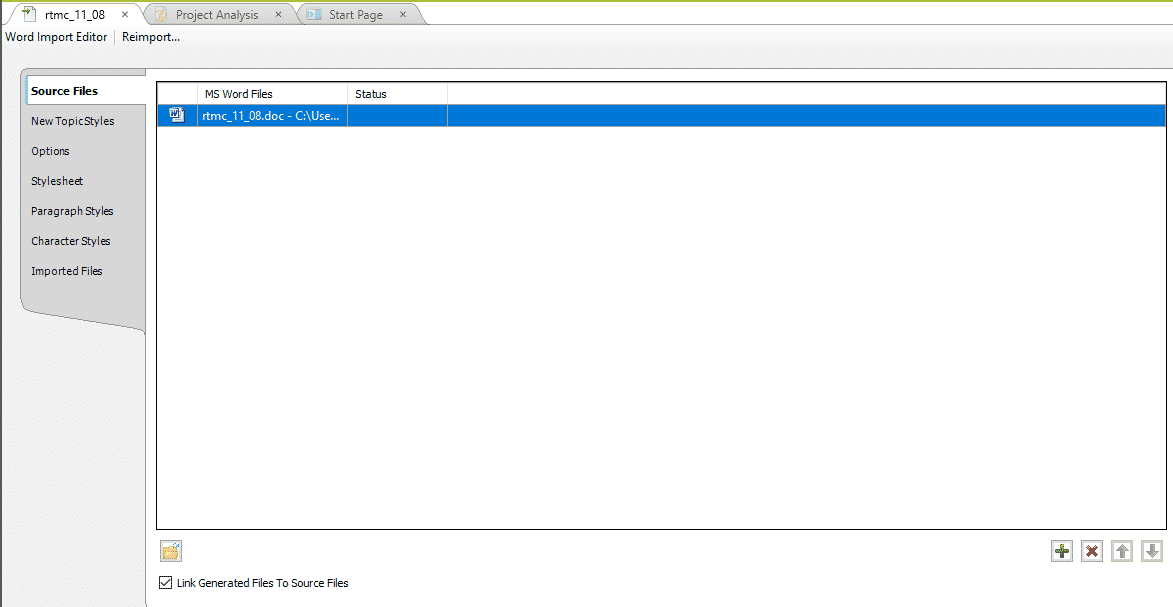
Link Generated Files to Source Files
You can create a connection between the original files and the files created in the Flare project from the import. This allows any contributor to edit the contents using Microsoft Word. In Flare, files will be marked with a linked icon.
With this enabled, Flare will scan the source Word document for changes whenever you build a target or open the Word Import file in the Import Editor in Flare and select Reimport from the local toolbar. This is the mechanism that allows for you to store content in external Word documents that will synchronize with the Flare project for updates.
Convert All Tables to “Auto-Fit to Contents”
If column widths have a set value in Word, those are imported unless you select this option, which discards the column widths from Word and allows the tables to be sized to fit their contents automatically.
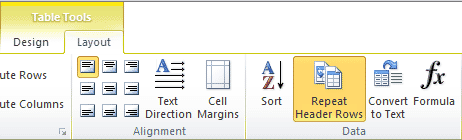
Set First Row of Each Table as a Header Row
This option can make configuring styles in the Flare project more efficient, saving you time and work. Enable this option if you are using a Table Stylesheet configured with a header row, and you would like this header row in all tables that you import. This will let you make the same changes to all table headers using the Table Stylesheet.
If you do not select this option, tables that have headers rows in the source document will have their header rows imported, while other tables without header rows will be imported as-is.
In order for header rows to be imported from the source document, Repeat Header Rows must be selected from the table Layout ribbon in Word.
Create a Page Layout for Each Section Header/Footer
This will create new page layouts whenever there is a section break, header, and footer in the source Word document.
You might want to insert section breaks, headers, and footers to the source Word document wherever you would like Flare to import a unique page layout if you have this option selected.
To add a section break, use the Layout (Word 2016) or Page Layout (Word 2010) ribbon, then select one from the Breaks drop-down.
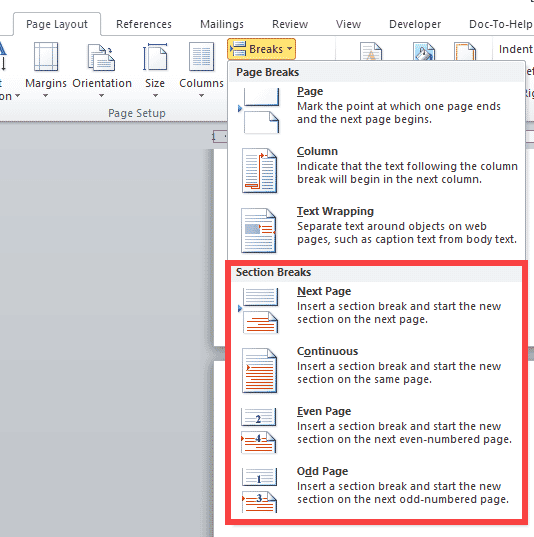
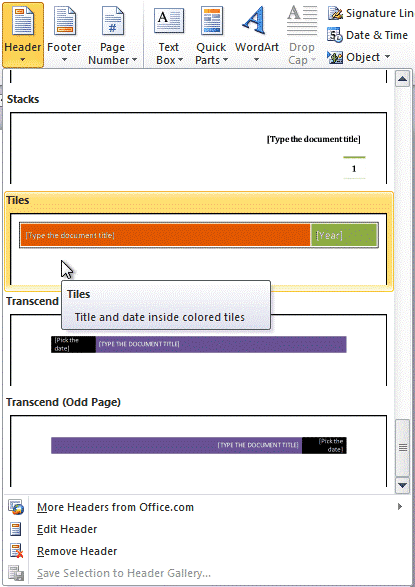
To add a header and footer, use the Insert ribbon > select Header or Footer.
Automatically Set Topic Title
When this option is enabled, the imported topic will have a blank Topic Title value in the Topic Properties, allowing any system variables for topic titles elsewhere in the project to automatically use the first heading in the topic. The Topic Title represents the value of the string in the <title> tag in the <head> tag of the XHTML topic file. The following screenshot shows the Topic Properties dialog after an import with this option enabled.

When the option is disabled, the imported topic will add the heading text as the value of the Topic Title in the Topic Properties, i.e. the <title> tag. This means changes to the first heading within the topic will not change the Title that is expressed by system variables elsewhere in the project; the Topic Title would have to be changed manually and not just the heading. The following screenshot shows the Topic Properties dialog of the same import above with this option disabled.

3. Set Up Styles
Flare gives you the option to either Preserve MS Word Styles or Don't Preserve MS Word Styles. Many users will want to follow their instinct and keep the default setting to preserve Word styles, here’s more details on what each of these options entails.
Preserve MS Word Styles
When you use this option, the Word styles will be added as classes in the stylesheet. For example, the “Heading 1” style from Word will be imported into Flare as “h1.Heading 1.”
When this option is selected, you can choose to Convert inline formatting to CSS styles. If you enable this, any inline formatting in the source document will be imported as span styles with generic names, i.e. span.span1, span.span2...
This option is one of the reasons why it is recommended to clean up any inline formatting in the source document by converting them to character styles. If the import creates several span classes with non-descriptive names, the stylesheet can become difficult to edit and navigate.
This option should probably not be considered if the source document does not use a lot of custom formatting. It is often better to import without styles and then let the Flare stylesheet style the imported topic files, with you customizing it the way you want.
Don’t Preserve MS Word Styles
You can map Word styles from the source to existing Flare styles instead of importing them as new style classes. The import will still give you the option to add new style classes like h1.Heading 1, but any custom formatting from the Word style is not imported. It will use the default style declarations that come with Flare’s template stylesheet.
What’s notable about this option is that it allows you to map Word styles to generic/global CSS selectors instead of always creating a new class. For example, you can map “Heading 1” from Word to h1 instead of necessarily creating a new class “h1.Heading 1.”
Note that Flare will not import any custom style properties that were configured in the Word document with this option selected. However, you will be able to style the imported files with the stylesheet more easily.
Most of the time, it is recommended to not to import MS Word styles because of the flexibility that comes with customizing the CSS in Flare.
Mapping Styles
The next stage of Word imports allows you to map paragraph and character styles from the Word document to Flare CSS styles.
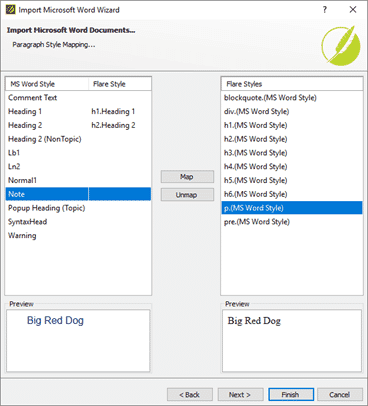
The above screenshot shows a selection of Flare styles available when you select Preserve MS Word Styles. If you select Don't Preserve MS Word Styles, this list will display the standard CSS global styles as well as style classes, as shown in the screenshot below.
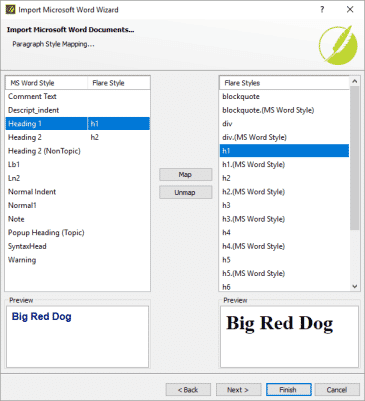
If you selected Don't Preserve MS Word Styles, it is recommended to map styles to the global style whenever you can, e.g. map Word's Heading 1 to Flare's h1, not to h1.Heading 1.
To map a style, select the Word style on the left list, then select the Flare global style or style class in the right list, then click the Map button between the two lists.
After mapping paragraph styles, we are taken to the screen where we map character styles, which works the same way.
When the Flare project loads, you will see content that used a certain style in the Word document will be wrapped by the tag to which it was mapped in the imported topic files.
Import Files
If you recall the Getting Started section at the beginning of this guide, there are two main ways to introduce a Word import to a Flare project: adding an import file, or using the Import Microsoft Word Wizard. The import file contains all the same settings as the Wizard. You can add a new Word import file to any project from File > New, or right-click on the Imports folder in the Project Organizer and select Add MS Word Import File.
When you use the wizard to import Word documents into a Flare project, an import file is automatically added to the Project Organizer > Imports folder.
You can re-import the Word document to update the contents in the Flare project at any time by selecting Reimport from the local toolbar of the Word Import Editor.
Miscellaneous Points
- Word does not need to be installed for Flare to perform Word import. To do this, open File > Options > General and check the box for the option Import/Export Word Files Without MS Office.
- Linked images (images inserted in the Word doc but stored externally) in the source Word document will be imported with the original file names. Embedded images will be imported into Resources > Images in the Content Explorer, and their file names will be based on the topic name where the image is inserted.
- Sometimes, artwork or special effects do not come in through the Word import. For information about potential workarounds for this, see the note in the help topic Importing Word Files.
Conclusion
Ultimately, you will get the best results if you perform a few tests with different options selected in the Wizard or import file, and possibly make changes to the source document to clean it up. Import a document a few different times in a test or sandbox project until you are able to get the results you want.
Please let us know in the comments below if you have any further tips or observations that were not included in this post.


