You work long and hard to provide your customers with the information they need, when they need it. Do not sour that experience by letting your documentation get stale and outdated.
When it comes to how to keep documentation up to date, it can be a challenge for every technical writer. Luckily, there are several strategies and techniques that you can use to stay on top of things to maintain your technical documentation. We will look at two of those strategies here, private date tracking and public (reader viewable) date tracking.
Content Expiration/Review Dates That Only Content AuthorsCan See
At some companies, you may not want a publicly viewable indicator showing the age of a piece of content. It is information for you, the author, and you alone, so that you can manage and maintain your content. That is reasonable and there are multiple ways this can be achieved. I will list two here, one using MadCap Central, the cloud component and backbone of the MadCap Authoring & Management System and another that can be implemented using MadCap Flare by itself.
Using MadCap Central
Using the MadCap Central will be the fastest and easiest method for any technical writer. If you are not familiar with MadCap Central it is a cloud platform with several different areas of functionality, including source control database project storage, team and task management, web hosting, web analytics, an integrated review process, and more. It is the task management functionality that we will use here.
My scenario is that whenever I create a new topic (page) of content I want to make sure to set a mechanism for that topic to be flagged for review at a certain time in the future. That technical document review could be next month, next quarter, next year, or even two years from now. The process I would follow would be:
- Create the new MadCap Flare Topic (using a custom topic template of my own creation).
- Log in to MadCap Central.
- Go to the Task tab.
- Create a “Review” task with a future due date for this topic and assign it to a staff member.
It is that easy to fix a technical document. Now, when that future date comes around, the person assigned to review the topic will automatically be alerted, preventing that topic from going out of date or “going stale”.
BEST PRACTICE: It is possible that the author assigned this task might transfer to another department or perhaps even leave the company before the assigned date comes due. If that is a worry, just assign the task to yourself. That way, a year from now, when this review task is due you will be reminded. You can then create a secondary review task and assign it to another technical writer or team member.
Using MadCap Flare by Itself
If you do not have access to MadCap Central there are still good documentation practices that can be followed to achieve similar results. Here’s an overview of how to write effective technical documentation with MadCap Flare.
It will be a bit more manual, but we can use the MadCap Flare “File Tags” feature for this. If you are not familiar with File Tags they are a form of administrative metadata that can be added to topics for any purpose or reason that you might have. They are often used to assign topics to individual authors or to assign due dates to indicate when a topic should be completed. You can use these File Tags to determine when individual topics are due for review.
In my experience, this technique works best and is easiest if you manage topics by calendar quarter rather than individual dates. The process would look something like this:
- In MadCap Flare, create a new file of the type File Tag Set using the generic MyFileTagSet template.
- Name this new file whatever you want, perhaps “Review Date”.
- In your new File Tag Set file edit and add additional lines using the New Item icon and in the Tag Name column name them for your review periods. Perhaps “2023-Q1”, “2023-Q2”, etc.
- Now that you have these File Tags defined, they can be applied to topics individually, or to topic groups.
- To assign a File Tag to a single topic, right-click on the topic and select Topic Properties. In the Topic Properties dialog select the File Tags tab. Select your Tag Type from the drop-down (Review Date in this case) and simply place a check in the box next to the tag (Review Date) you want to be applied to this one topic.
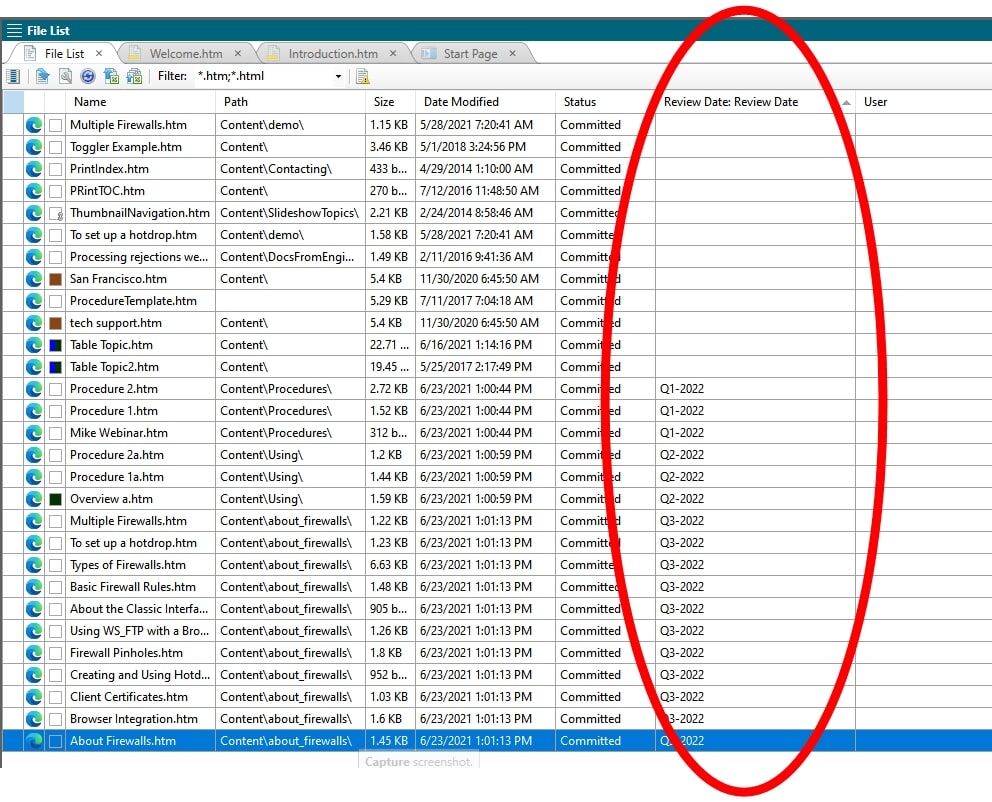
- To assign a File Tag to a large group of topics go to the Flare View ribbon and click on File List. Once the File List is open you can multi-select as many topics as necessary, right-click, and select Topic Properties. After that, it is the same process as in the step above.
OK, great, all my topics have review File Tags assigned, but what good does that do for me? Ahhh, here is the good part. Once again, go to the View ribbon in Flare and open the File List. If you scroll to the right, you should find a new column showing your Review Date metadata. Just like in a spreadsheet you can click on that header and Flare will sort the entire File List grouping all the topics with the same review dates making them easy to track in the future.
Content Date and/or Time Stamps That Everyone Can See
If you want the date information to be more public and visible to the reader, that can be achieved as well. The MadCap Flare technique we will use for this is a Variable. Wait…a Variable?! Those are used for text that might change like business partner names for rebranding or for product names so that generic topics can feel less generic. That is all true, but those are author defined variables. Flare also supports the use of a Date/Time variable.
If you are not familiar with the Flare Date/Time variable it is very flexible depending on how you want your content to be stamped. You might want to use the Date/Time variable to date stamp every topic that you create so that you can know its age at any time. On the other hand, you may not want to mark every single topic, but instead, you want a “Date Published” on the cover of your PDF. Both are easily achieved so let’s look at the process for each of those goals.
Adding a Date Created Stamp on Every Topic
The key to this technique is your own custom new topic template. When you first install MadCap Flare it comes with several “factory” topic templates. Those are great for when you are first beginning and learning Flare, however, once you get more comfortable with Flare you should really look at creating your own topic templates that match the look and feel of your corporate style guide. During the process of creating your custom topic template we can integrate a Date/Time Variable.
- Before we start, we need to create the Date/Time variable that we plan to use.
- In your Flare project go to the Project Organizer and open the Variables folder. Double-click and open your Variable file.
- In the VariableSet editor click on the second icon in the local toolbar to create the Date/Time Variable.
- This will add a new line item to your variable file with the Name field of NewDateTimeVariable. Update that default name to something such as DateTopicCreated and then click in the Definition field to the right of that name.
- The Edit Format dialog will open. This is where you define what your variable should look like. The key to defining the look of your variable is:
- hh = Hour
- mm = Minute
- ss = Second
- tt = am/pm
- dd = Calendar day
- MMMM = Calendar month
- yyyy = Calendar year
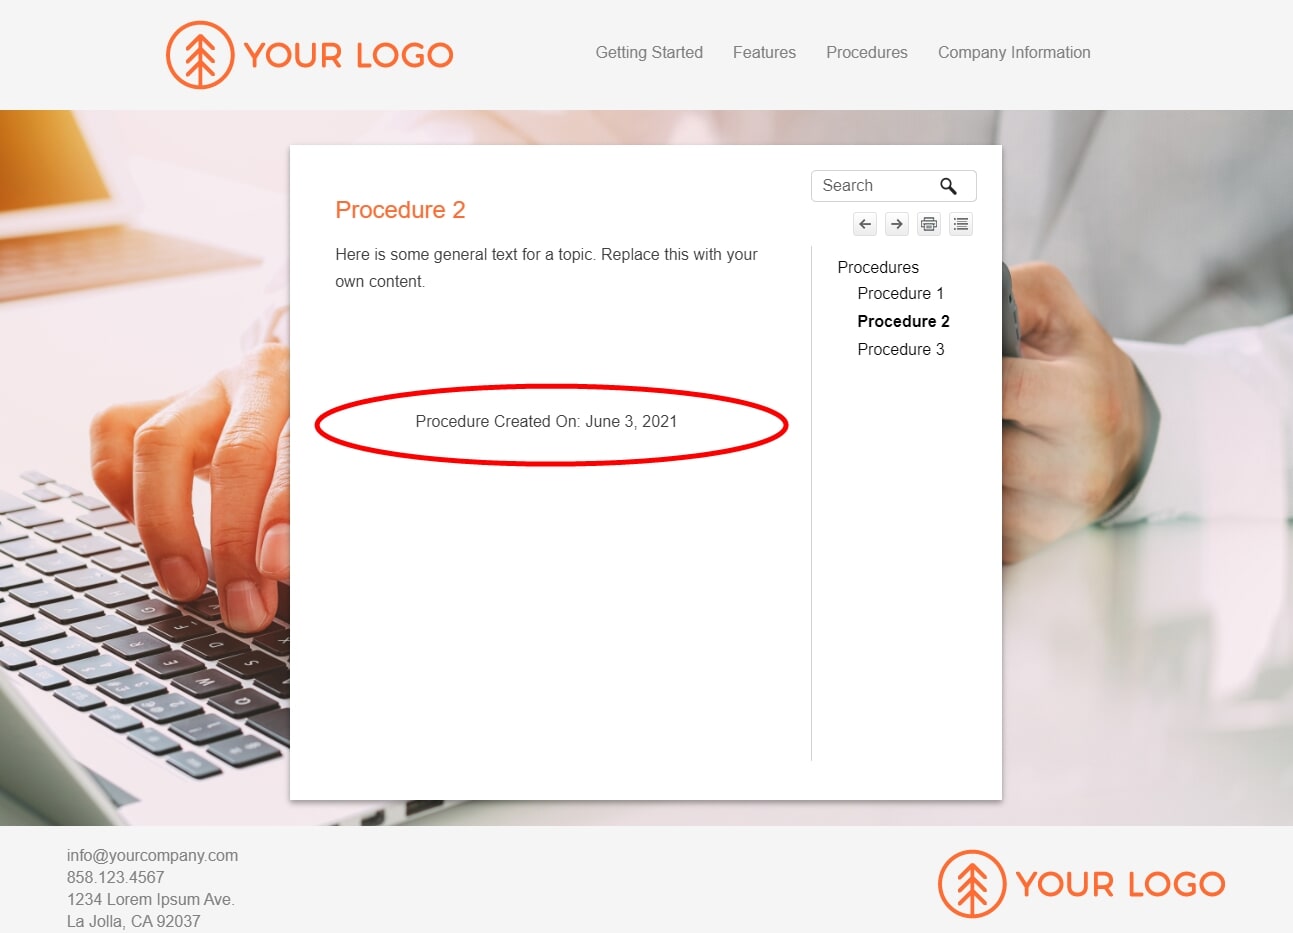
- Based on the values in step 5 above, if you wanted the date, such as “June 11, 2021” to automatically be added at the bottom of every new topic you would define the Edit Format dialog as MMMM dd, yyyy.
- The final step in the Edit Format dialog is to define just when your new variable will update. You have several choices. Manually, On File Creation, On File Save, On Project Save, and On Build, for our situation, we will select On File Creation. Then save. The new variable is ready to use.
- Now we will create the new topic template. Add a new topic in Flare using the generic NewTopic.htm factory template.
- In this example, we will do a Task or Procedure template. Mockup your new topic to conform to what a Task or Procedure should look like at your company or organization. Add the headings and subheadings, add descriptive text below each of the headings instructing future content contributors as to what and how content should be added. Pre-apply appropriate styles from your style sheet.
- Once you have your new procedure topic all mocked up, go down to the bottom and using the Insert ribbon insert your new Date/Time variable at the very bottom of your new mockup.
- Now for the final key. Instead of simply clicking Save, go to the File tab, and under the Save group select Save as Template.
You will now have a new, custom, procedure topic template and whenever you use it to create a new topic the date of the topic creation will be stamped in the footer area automatically. To demonstrate what this might look like I downloaded the Del Mar Flare project template from the MadCap Software web site and added a “created on” variable to a few topics. Now, when published it will look like this:
Adding a Date Published Field on Your PDF
This will be similar, but a little bit easier, than the previous example. Rather than describe the entire process I will simply point out the differences from the topic template example. For this technique when creating the Date/Time variable select the On Build option. Then, instead of adding it to all topics add it to the topic for your PDF cover page or you can add your On Build variable to a header or footer area of a Page Layout template. Other than those two minor changes, the process would be the same as the previous example.
Summary
I hope that you found this helpful! There are many useful documentation practices to monitor content, but hopefully these examples have provided something for you to think about in your own Flare projects.
This blog post was originally published on June 28, 2021, and has since been updated on February 2, 2022.