


.png?format=avif&q=60&w=600&h=427)
MadCap Flare is great for general Help and for context-sensitive Help. But you may not know that you can build general Help, page-level CSH, AND field-level CSH.
.png)
There are a few steps (some optional) that are involved with creating field-level Help. Once completed, your developers can easily hook content from your help system into your application or website as field-level help.
You can have an entire Flare project dedicated to field-level help, or you can continue to deploy your existing Flare project for this purpose so you can leverage existing variables, topics, snippets, and resources.
This example will assume that the field-level topics are going to live in an existing Help system.
What to Consider for the Existing Site
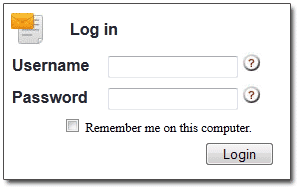
- Identify the fields where you will be applying Help. A good rule would be to only add tags to fields that are not quite self-explanatory such as a username field on a login screen
- Once you've identified the field, suggest to the users that there is Help for the field. Usually, an image icon such as a question mark indicates that there is help available.
For the Flare Project
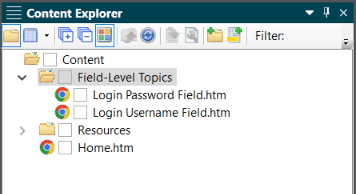
- Create content to be used for the field-level Help. It may be useful to keep these topics separate from existing topics or other field-level topics by storing them in a separate folder. You can style them differently than the rest of your content, exclude them from the search database so they do not appear in search results, etc.
- You can also create field-level help with micro content. Micro content is intended to be short bits of information (text, images, multimedia, etc) so it's ideal to use for field level help and context sensitive help. It may also be useful to keep these micro content phrases in a separate micro content file than your existing micro content phrases if you already have micro content in your Flare project.

After creating the micro content phrase and response, right-click on the Phrase and select Properties. Then give the micro content phrase a Phrase ID. This ID is used when you create a CSH ID for the phrase in the Alias Editor, which we will discuss in further detail later in this article. The phrase ID displays in the File and Path cells, after the #.
You can also prevent the micro content phrase from appearing in searches. You’ll likely want to select this option since field-level help typically isn’t content that should appear in the search of your other help systems built from this project.

.png)
If you are using template pages, you may not want the field-level topics to have elements such as breadcrumbs, headers, footers, or topics toolbars that would appear on your HTML5 outputs. It is a good idea to create a new template page and apply it to just these field-level help topics.
- Create a new template page and name it something meaningful: Project > Add Template Page > Choose ‘TemplatePage.flmsp’. In this sample it was named FieldLevelTopics.
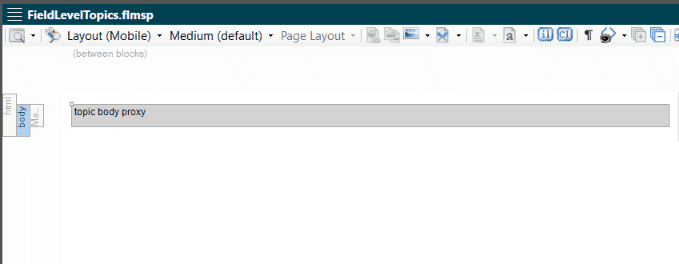
- In the Template page editor, remove every proxy except the “topic body proxy”. Save.
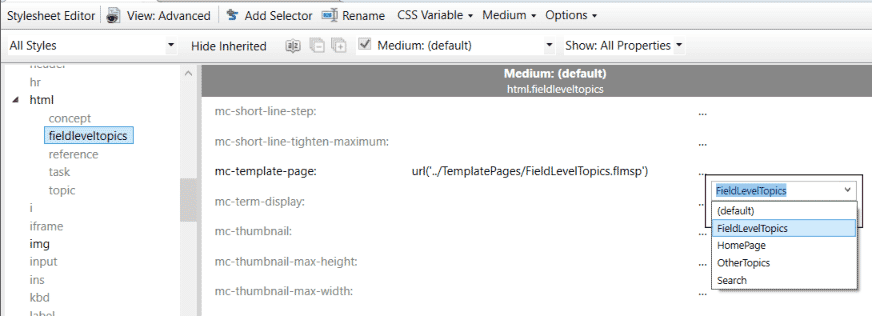
Open the stylesheet from the Content Explorer and find the HTML style, select it. Right-click it and create a class called fieldleveltopics. In the Unclassified section, find mc-template-page and select the new template page (FieldLevelTopics) from the drop-down. Save.
Now you can apply the FieldLevelTopics html class to field-level topics. At this point you can also remove them from the search database.
- Open the File List: View > File List
- Select all of the topics that are in the Field-Level Topics folder, right-click and select Properties.
- In the Properties dialog set the Topic Style Class to the html style that you created, called fieldleveltopic.
- Set the Template Page field to the FieldLevelTopics template page that was created.
- You can also remove the topics from the search database by deselecting the option Include topic when full-text search database is generated. Press OK once you set the desired options.
Optional: You can customize the appearance of the topic window by creating a HTML5 skin for these CSH calls. Adding a skin file will allow you to add a header and navigation items to surround your topic content. Alternatively, you can display the topic without a skin if you only want the field-level content to display in the help window by building a skinless HTML output.
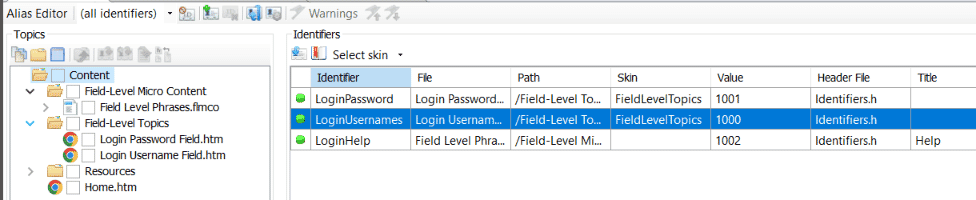
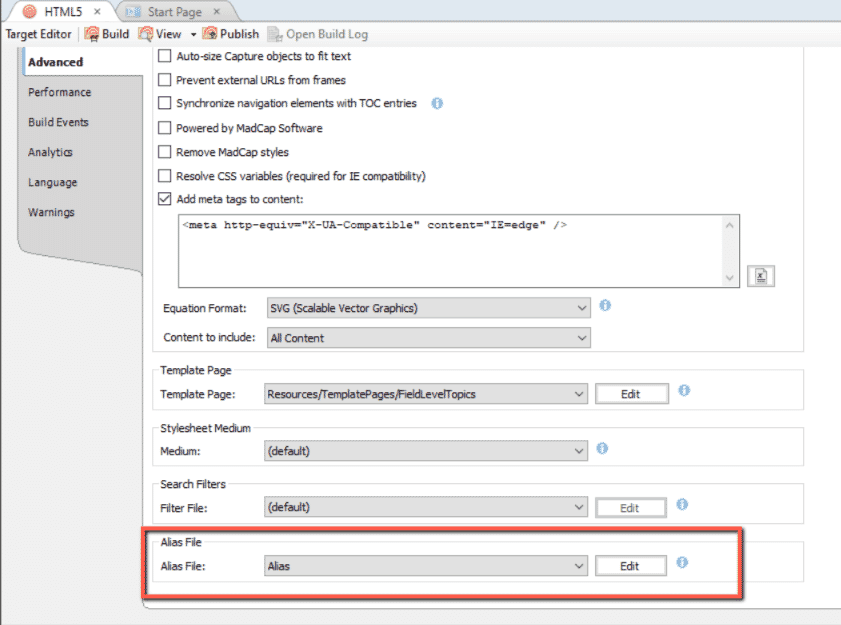
Now set up the Alias file so the developer can link the fields to topics in the Help system. If you don’t have an alias file, go to the Project Organizer, right-click on the Advanced Folder, select Add Alias File.
- Once you have an alias file, add your field-level topics and micro content, then assign unique Identifiers. If you created a skin, make sure that you apply the FieldLevelTopics skin to the Identifiers.
Note: You'll also want to create a header file to go along with the alias file. This file works in conjunction with the alias file and stores information on the IDs that is necessary to call the topic or micro content help. To learn more about the Header file, see our documentation in our Flare online help: https://help.madcapsoftware.com/flare2021r3/Content/Flare/CSH/General-Information/Header-Files.htm#microcontent1
Test your CSH Call
After setting up the Alias file, you can test the identifiers to verify that they call the right topic.
- First, build the CSH output with a HTML5Target. Make sure you add the alias file to your Target on the Advanced tab of the Target Editor before you build.
- After you build the target, go to the Tools ribbon and select Test CSH API Calls.
This window will then open:
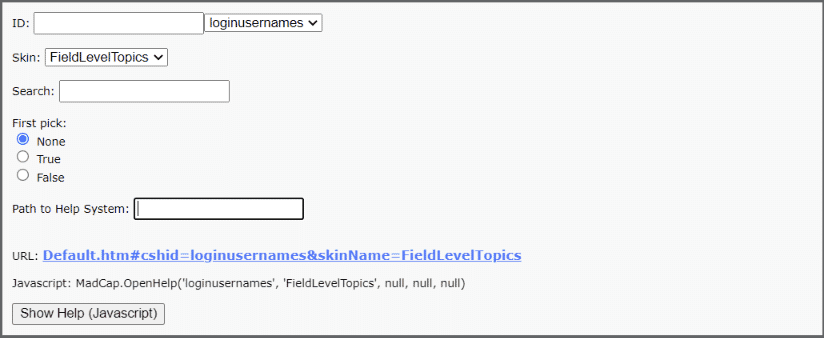
Select an identifier in the ID field, select a Skin and click Show Help (Javascript).
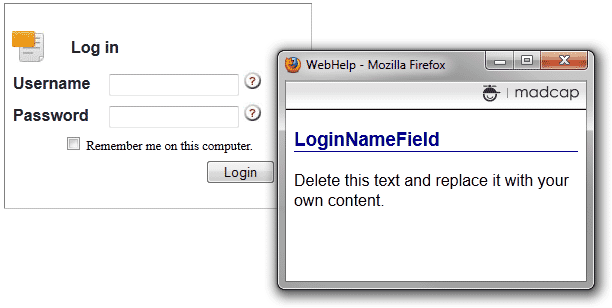
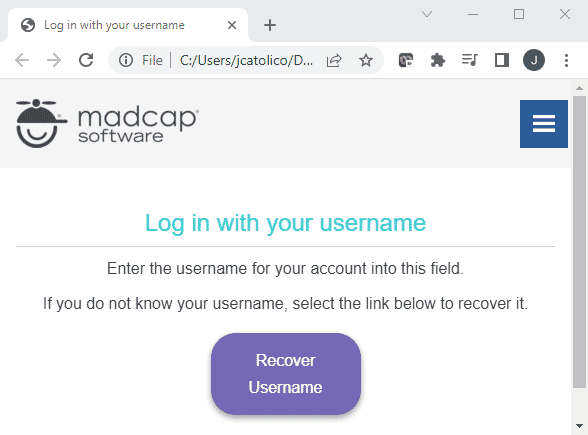
Your new field-level CSH call will open in the browser:
For the Developers
You will need to provide them with a list of the identifiers so they know which ones to use and for which fields. This is done by supplying them with the header file: Tools ribbon > Export Header File(s)...

- They will need to write a link to call the popup code and the CSH Identifier. This sample is a JavaScript popup:
<a href=”#” onclick=”return pop(‘MyWebHelp/Default_CSH.htm#TL_Name’)”> <img src=”Help.jpg” border=”0″></a>
For more examples of CSH calls, see our online help: https://help.madcapsoftware.com/flare2021r3/Content/Flare/CSH/Process/CSH-Calls/CSH-Calls-HTML5-Developers.htm?
For more examples of CSH calls, see our online help: https://help.madcapsoftware.com/flare2021r3/Content/Flare/CSH/Process/CSH-Calls/CSH-Calls-HTML5-Developers.htm?
When you click on the "?" image, a popup with the field-level Help topic will appear.
Developers can change the look and feel of the popup framework depending on their code and development language used for the application. The above image just uses simple JavaScript to open a new browser window (a little more code is needed but not shown).
The following link is a sample project that contains the files and settings outlined in this blog post: FieldLevelHelp.
This blog post was originally Jose Sermeno and Laura Johnson on January 9, 2012, and further updated by Jorgeo Catolico on May 10, 2022.


