


As the products we document at Kollmorgen become more varied, it becomes more complex to document them. Procedures might vary slightly between variants of a product, and you may need to explain the differences between one product variant versus another. This is not too bad if you have two options to explain, but what if you have 10 or 20 product variant combinations? Do you use conditions to produce 20 PDFs or WebHelp sites and make the user search for the output they need? Do you produce a single output with all explanations, and make the reader find the content that applies to them?
This is where live filtering comes in. Live filtering allows you to produce a single WebHelp output for all your variants. The user selects which variant they have, and conditions are applied on-the-fly to only display information that applies to the user’ variant of choice.
What’s Live Filtering?
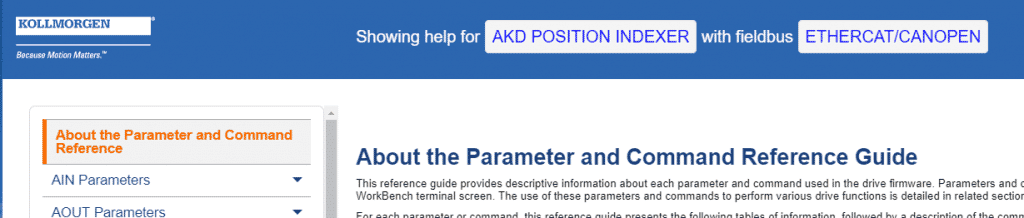
Live filtering involves setting MadCap conditions on content, but instead of having the target exclude content during a build, the user is presented with an interface to select product options when they open the help system. The conditions are then used to filter the content live. This allows a user to switch between variants of a product in a single WebHelp site, and only see content that applies to the product they’ve selected.
What Can Live Filtering Do?
The live filtering framework is capable of the following:
Advanced filtering based on user selections. With live filtering, you can filter out anything that you can apply a condition to: paragraphs, headings, snippets, TOC items, topics, etc. It will also use this information to filter out search results.
Host in an online environment. Any help system can be hosted online.
Integrate into a piece of software’s offline help. The software I document connects directly to pieces of hardware. If the software knows about the device it’s connected to, it can pass the WebHelp this information so that the live filtering preselects the correct options when a user hits F1. Our software renders the offline help using Internet Explorer as well, and there are special behavioral considerations needed when creating a live filtering framework.
Before You Start
I recently implemented live filtering into a MadCap Flare project for a new product line, AKD2G. This product currently has around 9 variants, and over the course of product development, it is expected to grow to 144 variants. The project was built using MadCap Flare 2018 and a HTML5 Side Navigation (frameless) skin. While live filtering can be made to work with other skins, it would require more customization than the examples below.
To implement live filtering, the following components were used:
- Flare Master page for including user interface
- CSS file for interface
- JavaScript file
- Condition tags for your content
- Pre-build event command (runs a Python script)
User Interface
The user interface is built into the Flare master page which is an XHTML file where you define content that shows up on every page. Adding the interface HTML to the master page allows it to be accessible from any page, should a user want to change their product selections later.
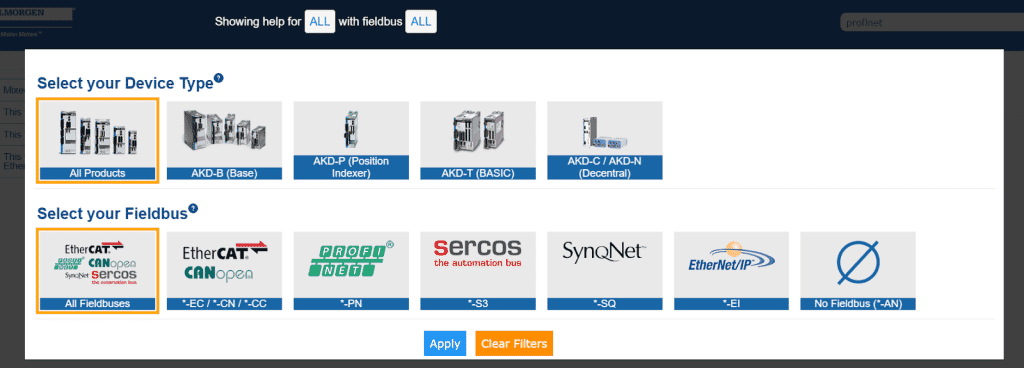
The interface was built with simple hand-typed HTML. I used my favorite text editor (Sublime Text 3) and tested how it rendered by building a small temporary target that would compile quickly.
Each option seen in the screenshot above (taken from an early test version) is “mapped” to a condition, which will be covered later.
CSS for Interface
I chose to write a separate CSS file for the interface, just to keep things organized. This way, I have one CSS file that’s used by the Flare UI for the Style Window and that CSS controls the way all my content looks, and one CSS file that only defines how the interface looks.
The master stylesheet is defined in the target, and defines the main stylesheet for help content.
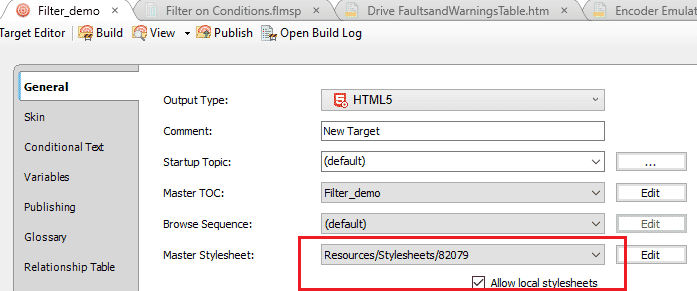
Below this option, there is an Allow local stylesheets option. Checking this allows you to include the interface CSS file inside the <head> of the master page:
<head>
        <link rel="Stylesheet" href="../Stylesheets/filter.css" />
</head>
JavaScript Behavior
This is the meat of what is actually happening. Like our interface CSS, we include the .js file in the <head> of the master page. This was also written with the jQuery library, which is included by default when Flare builds an HTML5 Side Nav output.
<head>
         <link rel="Stylesheet" href="../Stylesheets/filter.css" />
         <script type="text/javascript" src="../Scripts/remember.js"></script>
 </head>
Every time a page is loaded, the following logic is run in the .js file, where filterMain() is a function that handles all the actions required for applying a user’s selected filters:
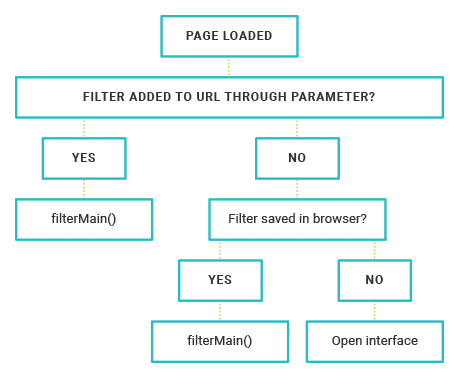
Once a user selects options from the interface, this runs filterMain(). Essentially, this crawls the content and hides anything that doesn’t belong to user’s selections.
Conditioning your Content
Conditions make it easy to mark all levels of content through Flare. Leveraging this part of Flare is crucial to maintaining a correct data source.
Each group of filters is represented by a condition set. For example, all the Fieldbus filters are represented by the following set of conditions.

Interface
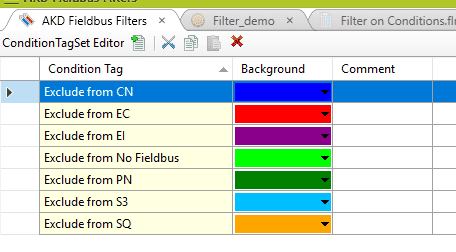
Condition Tags
All conditions are set using an exclusion logic only. This means that all content in the help is shown by default. Content is only marked when it should be hidden from a given selection.
The filter options shown in the user interface are matched to their appropriate Condition Tag, and when clicked, find all content that has been marked to exclude, and hide it.
Pre-build Event Command (Python Script)
Filtering the TOC and Search is where things start getting a bit trickier. If we look at the HTML output of a Side Nav skin, you can see that each item in the TOC is an <a> tag inside an <li>. However, there is no condition data available about this item:
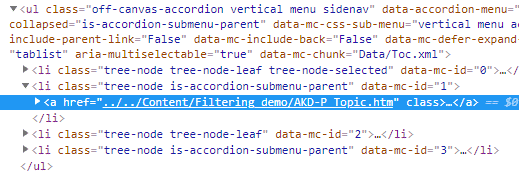
In order to know whether “AKD-P Topic.htm” should be hidden from the TOC or not, we need a way of gathering condition information about the topic before we build.
I chose to do this in Python - a scripting language that is great for this type of thing. The Python script reads a TOC, finds all the links to topics that are in it, and retrieves the conditions that are associated with those topics. It then writes out those associations as an array at the top of the JavaScript file:

Now the information is saved and can be retrieved to figure out what each item is conditioned as. Another function in the JavaScript crawls all the <a>s that are in the output TOC, retrieves the filename, and checks whether they should be hidden or not. This same array of data is used to filter out search items.
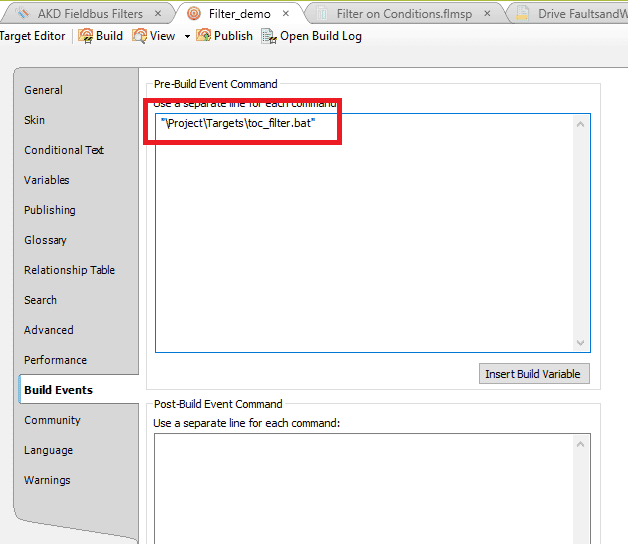
Flare has a convenient Build Events tab in targets that can be used to execute external commands before or after a target is built. I’ve written a .bat file that runs the Python script every time the target is built. This ensures that the conditional data that’s written into the .js file is always up-to-date at the time of build.
Conclusion
This is a high level explanation of the necessary components. With live filtering, we’re able to customize the user’s experience, providing content that’s relevant to their specific use case. We have been testing this system internally, and so far it has performed well. We are close to it being production ready, and aim to release a customer-facing version in mid-2019.


