


A few years back, I was interviewed by an organisation with a specific task of creating developer documentation for a data warehouse project. They have never had a Technical Writer in the organisation before, so anything I recommended would mean the starting point for any such conversation in the future. During the first few weeks of research and scoping the documentation needs, I realised the content had the potential of being used and re-used across various other avenues.
As I had some prior experience working with single-sourcing; I had no hesitation in recommending a single-sourcing strategy to work with this content.
Notes:
For the purposes of this case study:
- I use the word “content” for a collection of text, screens, diagrams, videos, and other relevant pieces of information.
- I do not cover all aspects of single-sourcing; instead just explore the key criteria that helped me recommend this strategy.
What is Single Sourcing?
Single-sourcing refers to the concept of creating content once, but reusing this content across various outputs/media and more than one time.
This concept may not mean a great deal for the user, but for the writer, it is productivity defined. Writers often have to create different pieces of documentation, adapting to the client requirements and user needs. In doing so, many a time the writer is often looking at the same content, but modifying this to fit the client needs. A number of tools in the market currently take this concept a level higher by allowing the writer to keep all their content in a single place, but empowering them to use and reuse this content across different outputs.
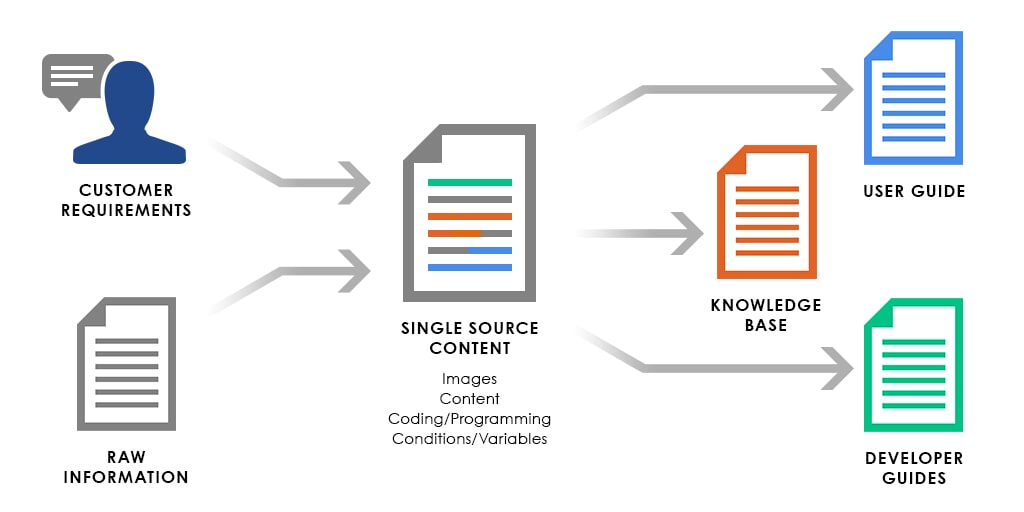
Create Once, Publish Many Times
The very concept of single sourcing revolves around creating content once. This base content can take any form, but XML is being increasingly used these days, given its powerful advantage of separating content from the presentation aspect. Using XML-based help authoring tools, you can easily use the same content for an online help, as for a printed manual.
- You can reuse parts of, or the whole content for a mobile output.
- You need to plan the content carefully so that these content chunks can be reused to publish them to different outputs.
Once the writer has created this content, it is then a matter of publishing this content across multiple outputs.
How was it relevant to my project?
Once I had a fair idea of the number and types of documents that could potentially be created in the future, I opted for a single source authoring tool that I had used before and was comfortable with – Madcap Flare. I could have just as easily picked up any other help authoring tool such as Adobe® RoboHelp®, or AuthorIT®. The idea was to use an application that would allow me to create content in one place, but also give me the flexibility to publish in different formats.
Relevant content
Once you embark on the single-sourcing journey, you realise the apparent benefits of this concept. Not only does it make it easier for you to create and store all content in one place, you can also review content for its relevance. This leads to a more efficient approach not only in the creation process, but also makes the review workflow efficient, reducing errors and redundancy in the documentation.
In my case, I found out that some of the content I collected from the developers could be useful for the other staff equally. That prompted me to take a different approach in creating these particular documents. Although I kept the style consistent across all documents, I ensured the language for these documents stayed as simple as possible for the non-developer staff to read. Using conditional text in Flare, I could customise the same page, so that it appears differently to different users.
Conditions and Variables
Single-sourcing allows you to build on the concept of “create once, publish many times”, by introducing concepts such as conditional text (different help authoring tools may have different names for this concept) and variables.
You may be familiar with conditional formatting in Microsoft® products, especially MS Excel, where cell contents/rows/columns may behave differently, depending on a specified condition. This behaviour is controlled by conditional formatting.
Similarly, in help authoring tools, you can mark or flag parts of the entire text or entire documents/images as conditional. This content is displayed, hidden or behaves differently, based on the pre-defined conditions.
With single sourcing, you will also find that you end up using and changing many repetitive elements, such as company names, product names etc. In such cases, you can include this information in a variable. Variables allow you to change a particular element across the entire content dynamically. You can achieve the same result with a global find-and-replace, but including a variable makes this very efficient and error-free.
How did I apply this to my project?
I organised all my content based on a table of contents I drew up at the start of the project, as part of the Information Plan. While it is not necessary to use the same structure, I could easily use conditional text to flag relevant topics and/or content wherever they are in the file/folder structure. Alternatively, based on how the user viewed the content, I could organise the content using the conditions/flags I assigned to the content.
While I was working on the developer guide, my Manager asked me to assist another team in the organisation with their user help documentation. I could have easily created another project for that team; instead I included all their content in the same project as the developer guide. I just had to include the relevant variables, as applicable to the other team’s documentation throughout the content. Once I completed documenting their user guide, I could reuse some of the content from my developer guide and publish to a separate format and medium from the same project using Flare.
Images
Single sourcing also allows you to reuse images across multiple outputs. Help authoring tools have features built in, that help you specify image properties such that they appear relevant to that medium. If you are outputting to an online medium, you can specify how you want the image to display. Similarly, if you are using the image in a printed format, you can specify how you want the image to be included (mostly high-quality, but smallest size as possible).
You can also use external tools such as SnagIT to edit/annotate screenshots and other diagrams (process flows etc.), but I found MadCap Capture was sufficient for my needs, especially given how well it integrated with Flare. Most of the help authoring tools also have some sort of an image capture and processing feature built in, which allows you to integrate these images directly into your content.
Coding/Programming
This is optional, though most help authoring tools allow you to include programming snippets (Javascript, JQuery etc) in your content, to make content more interactive. The beauty of single sourcing is that you can store all your code and their libraries in one place, but can use it across your project and it will work (if you have referenced it correctly).
Outputs
Once you have created the content, the next important element of single-sourcing is to be able to reuse the content to be published across a range of outputs and formats. Most of the help authoring tools will allow you to publish your content to formats such as Word, HTML or PDF. You can publish your content to a printed output, to an online help, embed it within the software or to a mobile device output. Help authoring tools can automatically deploy outputs to relevant hosting locations. For example, online help to a website, printed outputs to printing or a shared location.
How did I include this in my project?
A lot of developers I worked with were technologically savvy, so they don’t mind looking at images in the documentation and clicking on relevant sections of the image to read about more technical information on that topic. I included a lot of clickable images that linked to relevant content in the output. Most of my images had properties set so that they displayed and printed differently based on the output format.
I also included JavaScript code in the content, to make the documentation more interactive for the users. Depending on the user selections, the content was dynamically altered in the output, leading to a more engaging experience for the user.
All my content was published online, to a shared location or document repositories within a content management system. On the odd occasion, a user requested a printed copy of the developer guide, and I could easily publish the content in a printed format.
Summary
The single-sourcing strategy worked for the following reasons:
- Avoided issues with duplication of content. All my content resided in one location, reducing inconsistencies.
- Set a consistent look and feel across all the documentation projects.
- Was published for different audiences with different information requirements.
- Allowed me to adapt quickly to changing requirements or ad-hoc requests.
- Had complete control over content as well as output format and design.


