
Have you ever tried to highlight and copy a specific selection of text using a phone or tablet device? Even today, as mobile technology changes and moves forward, this basic task can be an exercise in patience and dexterity.
Fortunately, authors and developers of HTML5 help systems can incorporate a clipboard button that makes copying text easier for all users, whether they are using a mobile device or a desktop computer. As an example, your organization may have users who regularly need to copy text strings that make up specific commands for an application. You can add a button to copy any string of text – URLs, commands, code, templates, and more.
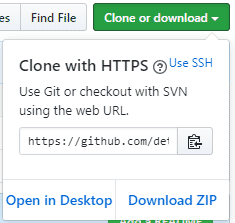
While browsing through the web, you may have come across buttons that let you copy a string of text. For example, GitHub displays the clone URL of a repository with a button that allows you to copy the Git command to your clipboard with one click.
In this guide, we will discuss how to add this useful feature to HTML5 outputs that you generate from your own MadCap Flare project. Your users will benefit from copying the text they need with the click of a button, rather than manually highlighting and copying text.
Try It Yourself
Let’s start with the most basic possible implementation, just to demonstrate how you can integrate the Clipboard.js scripts into a Flare project.
Add the Script File to the Project
To begin, visit the clipboard.js site at https://clipboardjs.com/ and download the zip file: https://github.com/zenorocha/clipboard.js/archive/master.zip.
Once the zip archive has finished downloading, extract its contents to a folder. Then, open Flare and click File > New Project. Then, create a new project by selecting the Empty template. When the project is open in Flare, create a new folder that will hold the script files:
- Open the Content Explorer.
- Right-click the Resources folder and select New > Folder.
- Name the new folder Scripts.
- Open the clipboard.js-master folder you extracted from the clipboard.js archive you downloaded.
- Copy the file clipboard.min.js from the dist folder into the Resources > Scripts folder of the Flare project.
After adding this script file, you will need to add a link to the script file in the head tag of topics that will use the script, and elements that will contain text and the button need to be added to the body of these topics.
Add Scripts to the Topic
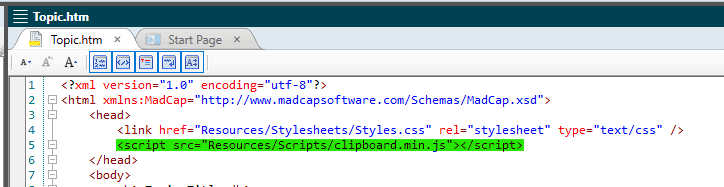
Once clipboard.min.js is added to your Resources > Scripts folder, a link needs to be added to any topic file where the “copy to clipboard” button will be featured. The link goes within the head tag of the source code using a relative path.
In this example, the Empty template includes a topic file called Topic.htm at the root of the Content folder. Use these steps to add the script link:
- From Content Explorer, right-click on Topic.htm and select Open with > Internal Text Editor.
- Inside the <head> tag, add a <script> tag with the relative path to clipboard.min.js as the value of the src attribute.
You can also load the script from a third-party CDN provider using an absolute URL, but would have no control over changes to the script and no assurance that it would continue to be hosted by the CDN. The method we are using will avoid this risk because a copy of the script will be uploaded to your own web server.
3. With the topic still open in the Text Editor, scroll to the bottom and add the following script to the end of the <body> tag so that it is the last element in the body for your clipboard button:
<script>new ClipboardJS('.btn');</script>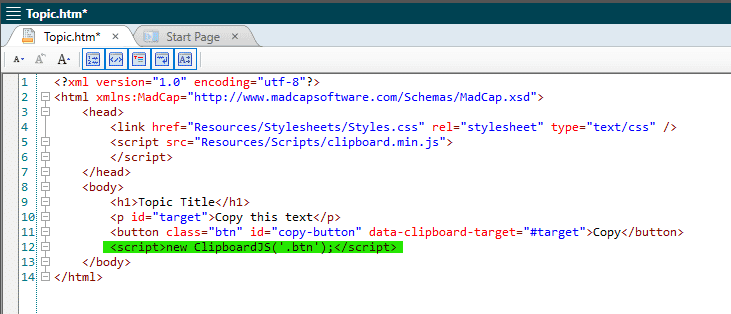
This instantiates the script you added to your project by passing the DOM class selector (.btn). You could also use an HTML element or a list of HTML elements.
Add Elements to the Topic
Now we can add elements that contain the content to be copied and the clickable button.
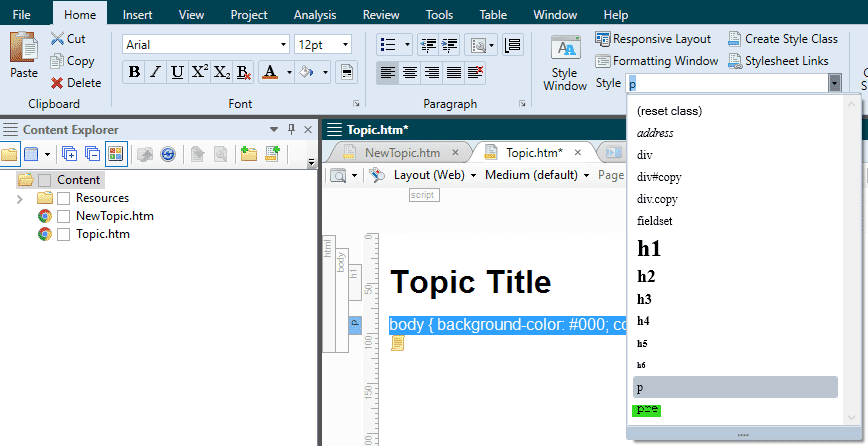
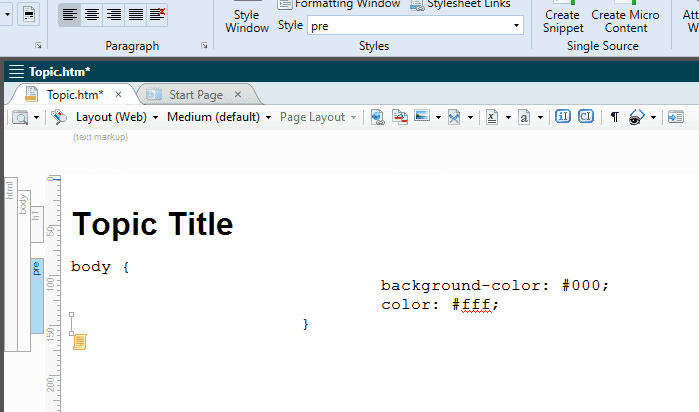
This functionality is commonly used for pieces of computer code, so we’ll use the <pre> tag for the text, which displays text in a fixed-width font and preserves spaces and line breaks in order to reflect the code’s original formatting. To change the tag of an element to the <pre> tag, highlight the element in the XML Editor. Then, open the Home ribbon, select the Style drop-down, and select pre.
As a <pre> tag, the CSS rule-set is displayed in a fixed-width font, with indentation.
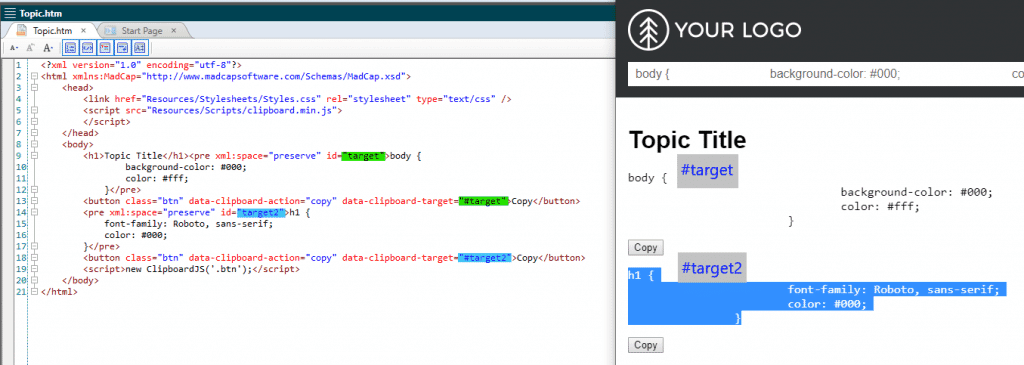
Next, you need to assign an ID attribute to this element.
- Right-click the bar for the pre tag on the left side of the XML Editor.
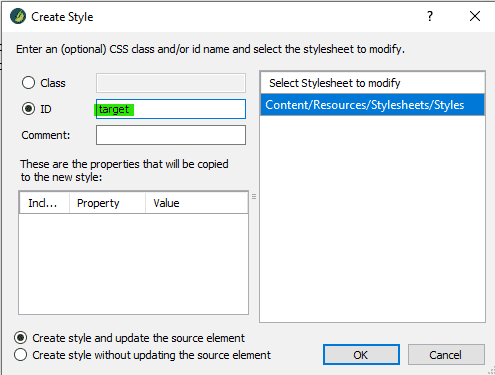
- Select Style ID > Create Style ID.
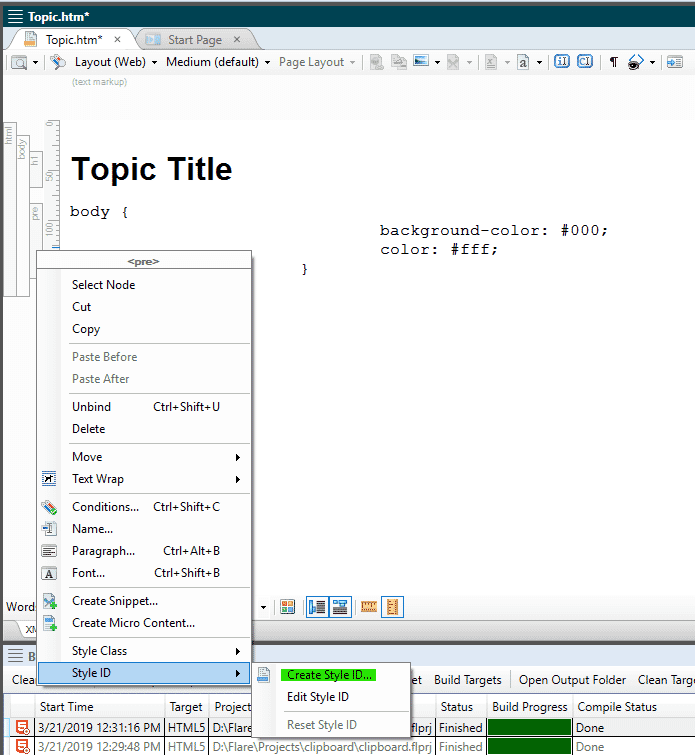
- Give the element the ID value “target” and click OK. You can customize this value later.
The ID attribute with the value “target” should be added to the start <pre> tag of the element. This is all you need to do with this element for now.
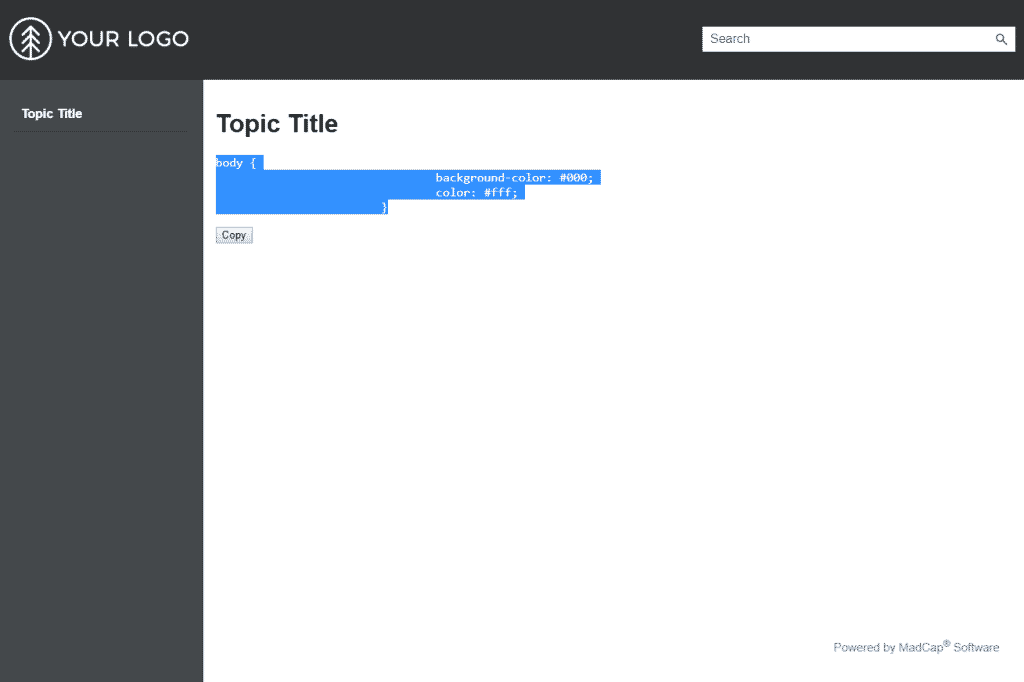
The next thing you need to add is the button the user clicks to use the copy function in the text field. You can open the Text Editor view of the topic and paste the following example button code after the <pre> element
<button class="btn" data-clipboard-action="copy" data-clipboard-target="#target">Copy</button>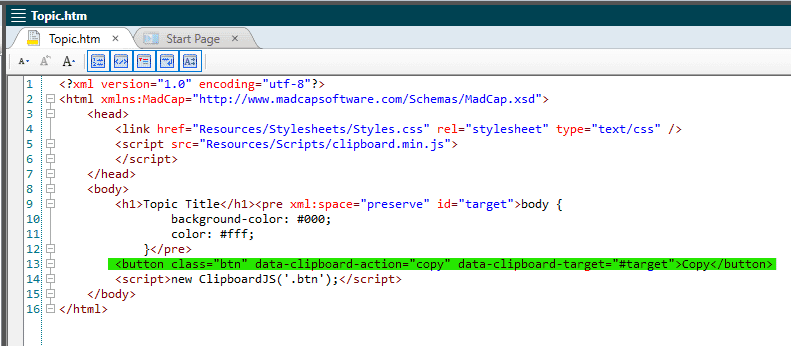
The class assigned to the button should match the class selector passed through the script at the bottom of the <body>, which is .btn in this example. The value of the attribute data-clipboard-target should match the value of the Style ID that is applied to the <pre> element; in the example below, we are using the value #target in the text field.
Now build the HTML5 target element and view the output in a web browser. You should see the contents you added to the <pre> tag and a button to copy it below. When you click the Copy button, the text will be highlighted and copied to your clipboard. Test out the functionality by pasting the text into Notepad or even the search bar on this page.
To add multiple copy-able elements, apply unique Style IDs to each element and the associated button. For example, a second <pre> element can have the style id “button2,” and the value of the data-clipboard-target attribute of the <button> would be set to “#button2”.
If clicking the buttons in the output successfully copies the text to your clipboard, then congratulations! You have successfully set up the foundation for this functionality in your Flare projects.
Refine the Appearance
You have created a basic demo, but you may want to add styles and reposition the Copy button so that it is more intuitive to use.
To start, wrap each <pre> element and their <button> in a <div> with a new class. Wrapping the pre text and button in a single block element makes it easier to style the position of the text and the button relative to each other. In this screenshot, I have added wrapped div.code around each <pre> example and <button>.
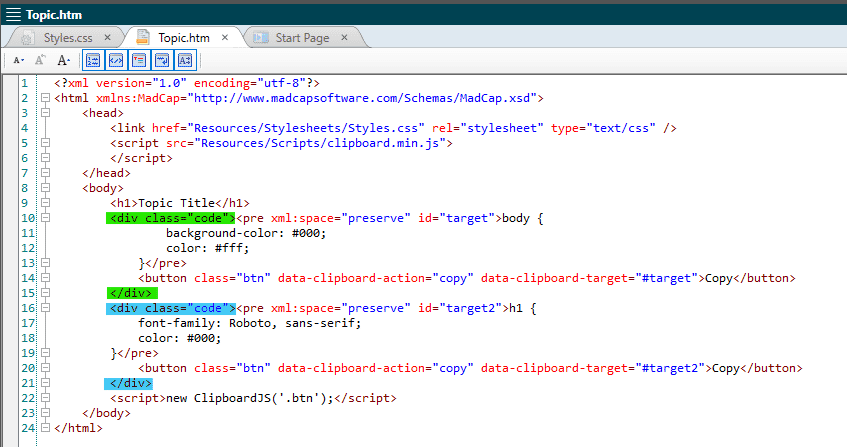
Normally, you can highlight content in the WYSIWYG XML Editor and press Tab to open the Group dialog to wrap elements in a div, but we are using the Text Editor because it makes it easier to see where the <button> elements are in the source code.
Creating this div allows us to add styles to the stylesheet that will apply a background color, padding, margin, and gives us the ability to position the buttons in the top-right corner of each code text box in the output. The example below gives you the steps to set up some initial styles, which can then be customized further.
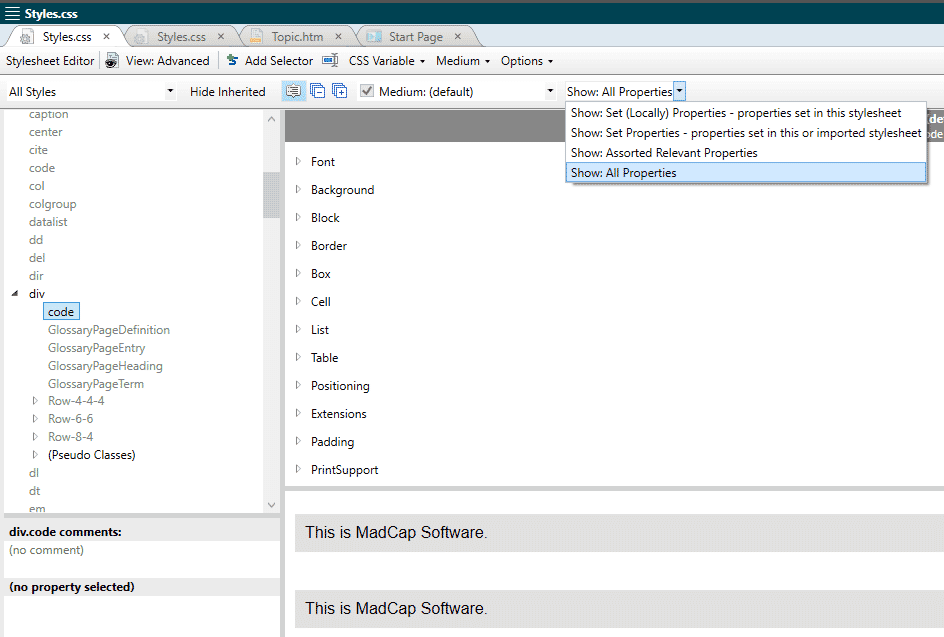
- In Content Explorer, go to Resources > Stylesheets.
- Open Styles.css in the Stylesheet Editor (Advanced view).
- Scroll to div in the list on the left.
- Right-click on div and select Add Selector.
- Name it “code” or a class name matches the div class you added to the topic.
- Expand div on the left and select the new class.
- Change the filter in the local toolbar to Show: All Properties.
- Expand Background, find the background-color property and set a color value e.g. #e0e0e0.
- Expand Box and apply values to margin-bottom, margin-top, and padding e.g. 10px.
- Expand Positioning, then set position: relative.
- Switch the filter in the local toolbar to Show: Set Properties.
- In the Add Property field, type “overflow-x” and press Enter.
- Apply the value “auto” to the property overflow-x.
Now, apply styles to the <pre> selector.
- Scroll down to pre in the list on the left.
- In the local toolbar set the filter Show: All Properties.
- Expand Positioning and set position: absolute, top: 0, and right: 0.
Note: If you want to add some space between the top edge or right edge and the button, increase the value of top and right.
As an alternative to the steps above, you can open Styles.css in the Text Editor (right-click > Open with > Internal Text Editor), scroll to the bottom, and paste these rule-sets in:
div.code
{
	background-color: #e0e0e0;
	padding: 10px;
	margin: 10px auto;
	position: relative;
	overflow-x: auto;
}

pre + button
{
	position: absolute;
	top: 0;
	right: 0;
}
When you build the HTML5 target element and view it in a web browser, here is what you should see:
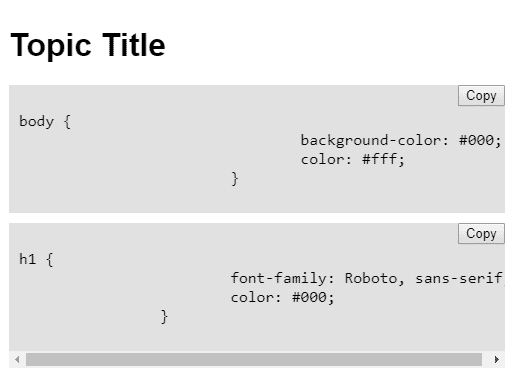
With the styles above, you can customize background color, padding, margin, and overflow-x (for horizontal scroll bar support) for the div. The style rules also apply relative positioning to the div, which allows the Copy buttons to use absolute positioning to be placed in the top right corner of each div container. Here is an article with more information about CSS positioning.
Conclusion
Thanks to clipboard.js, there’s an elegant, relatively simple way to add “copy to clipboard” functionality to your HTML5 outputs. On top of this, there are more possibilities to zhuzh up your HTML5 output even further, like combining this copy button with syntax highlighting using PrismJS. If you have used clipboard.js or similar projects in creative ways to expand the functionality of your MadCap Flare output, let us know in the comments below!
References
Editor's Note: Originally published on April 18, 2019 and updated on August 9, 2021.