
This guest post was written by Scott DeLoach, a certified Flare consultant, and trainer. Scott has provided consulting and training for over 100 companies and government agencies around the world. He is the author of MadCap Flare: The Definitive Guide, HTML5 to the Point, and CSS to the Point, and he manages the MAD for Flare certification program. Scott holds a master’s degree in Technical and Scientific Communication from Miami University (Ohio), is a Certified Talent Development Professional (CTDP), and an STC Fellow. You can email Scott at scott@clickstart.net.
In this blog post, I will walkthrough setting up and formatting a chapter-level table of contents (TOC) for print targets. In a previous blog post, I shared options and techniques for formatting a table of contents for an entire document.
Design Goals
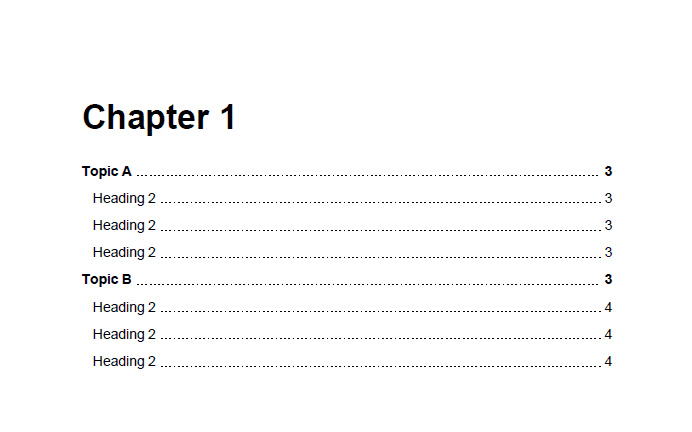
Our chapter-level design is below.
To setup and design this TOC, we will need to:
- Create a “chapter” topic
- Auto-number the chapter topic’s heading
- Remove the default border above the chapter-level (“mini”) TOC
- Add the chapter topic to the TOC
- Setup the print targets to change the heading levels to match the TOC levels
Creating a “Chapter” Topic With a Mini-TOC
In MadCap Flare, a Mini-TOC proxy is used to create a chapter-level TOC. We can create a “chapter” topic that contains a Mini-TOC proxy and use it as the first page of each chapter.
To Create a “Chapter” Topic:
- Select File > New. The Add File dialog box appears.
- For File Type, select Topic.
- For Source, select the TopicForMiniTOC template. The new topic will include a Mini-TOC proxy.
- Type a File Name and click OK.
- Right-click the Mini-TOC proxy and select Edit Mini-TOC Proxy. The Mini-TOC Proxy dialog box appears.
- Set the TOC Depth. For our design, we want to set the depth to 3.
Auto Numbering the “Chapter” Heading
The chapter topic’s heading should include the word “Chapter” followed by the current chapter’s number. We will create a new class of the h1 tag for chapter headings. Then, we can setup this new class to add both the word “Chapter” and the number using the mc-auto-number-format style property.
To Create a Style Class for the “Chapter” Heading:
- Open your stylesheet. If the stylesheet opens in the Simplified View, click View: Simplified.
- In the list of styles, highlight h1.
- In the Stylesheet Editor toolbar, click Add Selector. The New Selector dialog box appears.
- The HTML Element should be set to h1. If not, select h1.
- For Class Name, type Chapter.
- Click OK.
To Auto-number the “Chapter” Heading:
- Open the stylesheet.
- In the list of styles, select h1.Chapter.
- Set the mc-auto-number-format property to GH:Chapter {n+} (including a space at the end).
The “GH” prefix means that the auto-numbering will be a global series (“G”) that will be used for headings (“H”). By default, auto-numbers restart with each new topic. In addition to global numbers, which increment through an entire target, you can create a series that renumbers based on sections (“S”) or chapters (“C”). The label can be used to setup up to 26 numbering sequences (A-Z). For example, you could create an “T” series for tables.
Removing the Default Border Above the TOC
The Mini-TOC proxy is formatted using the MadCap|miniTOCProxy style. By default, it includes a solid black 1px top border. Our design does not include a border, so we need to remove it.
To Remove the Mini-TOC’s Default Top Border:
- Open the stylesheet.
- In the list of styles, select MadCap|miniTOCProxy.
- Since our TOC proxy will only be used in print targets, set the Medium to print. Setting the medium will organize our print-specific formatting together in the stylesheet.
- Set the border-top-style property to none.
Adding the “Chapter” Topic to the TOC
We can use the same chapter topic for each chapter. The mc-auto-number-format property will increment the chapter number. If we add a chapter break for each chapter, the Mini-TOC will update to include the headings within the current chapter.
To Add the “Chapter” Topic to the TOC:
- Open a TOC.
- Drag the “Chapter” topic into the TOC.
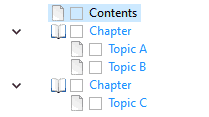
- Move the chapter’s sub-topics into the Chapter’s book. For example:
To Add a Chapter Break for Each Chapter:
- Using Ctrl-click, select each chapter book in the TOC.
- Right-click one of the chapter books and select Properties. The Properties dialog box appears.
- Select the Printed Output tab.
- Set the Break Type to Chapter Break.
- Click OK.
Setting a Print Target to Change the Headings to Match the TOC Levels
All of our topics start with an h1. However, our goal is for the TOC and chapter topics to use the highest heading level, and the topics should be one heading level lower:
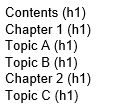
Actual organization based on the heading (h1-h6) tags used in topics
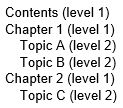
Goal organization (matches the TOC)
We don’t want to change all of the topics to start with an h2. It would be too much to plan and manage, and it would severely limit how we reuse topics in different TOCs. Instead, we will tell Flare to automatically change the heading tags based on the TOC. In our example, Flare will change the h1s in Topic A, Topic B, and Topic C to h2s since these topics are used at the second level of our TOC.
To Set a Print Target to Change the Heading Tags to Natch the TOC Levels:
- Open a print target.
- Select the Advanced tab.
- Enable the Use TOC depth for heading levels option.
Sample Project
You can download a sample project at https://bit.ly/MadBlogFormatChapterTOC.