


This guest post was written by Jay Slagle, an independent consultant and certified MadCap Software Advanced Developer who is passionate about using CSS to enhance the power of MadCap Flare. After discovering MadCap Software tools over a decade ago while working as a technical writer in Seattle, he has designed and implemented Flare projects for clients in government, law, education, healthcare, and technology. When he’s not occupied with all things Flare, Jay writes fiction under the pen name JB Strand.
In this article, I will pass along some simple techniques for managing your stylesheet in MadCap Flare. I will discuss CSS generic classes, cover the shorthand for setting margins and padding, and show you how to keep the Flare interface free from style classes that you don't commonly use.
Generic Style Classes
Generic classes are CSS styles that you can apply to any element, such as a heading, a standard paragraph or a div container. They are handy for modifying the function of an element on a case-by-case. In the stylesheet, a generic class starts with a period, omitting any element designation such as p or div. The following generic classes align text in the center of and to the right of the text column, respectively:
.CenterText {
text-align: center;
}
.RightText {
text-align: right;
}
If, for example, you sometimes need to center the text in a paragraph or heading that has no other class assigned to it, you can easily apply a generic class. For instance, the .CenterText class above can replace the following set of classes and eliminate the temptation to resort to the "Align Center" button on the Home ribbon:
p.CenterText, div.CenterText, h1.CenterText, h2.CenterText, h3.CenterText, h4.CenterText, h5.CenterText, h6.CenterText {
text-align: center;
}
Tip: As with any CSS class, a generic class can have any class name you want, so choose something that clearly indicates the function of the class.
Generic Classes for Print Outputs
Generic classes work for print outputs, and they are quite handy for tweaking PDF layouts. Here are examples of generic classes that force page breaks in printed outputs. You would apply this first one to the element before the desired page break:
.PageBreakAfter {
page-break-after: always;
}
The next class has the same effect, but you would use it with the element that comes after the desired page break:
.PageBreakBefore {
page-break-before: always;
}
You can also use generic classes to avoid page breaks in certain spots when possible:
.NoPageBreakAfter {
page-break-after: avoid; }
.NoPageBreakBefore {
page-break-before: avoid;
}
Tips for Using Page Break Classes
- Defining two classes that do the same thing is not necessary, but sometimes it's useful to have a choice. In some cases, it's easier to apply the style to either the element that precedes the page break or the element that follows it. This can happen if one of the elements already has a style class assigned to it. See below for more about this.
- In elements where a preceding or a following page break should always be avoided or required, add the attribute to the element style itself. Examples of these elements include headings and paragraph elements used for figure captions.
Heading Level Example
A generic class can also be useful for removing a specific heading from the PDF table of contents and bookmark pane. Suppose that you define h1 and h2 headings to appear in the PDF TOC like the following (these are the Flare default values, but there's no harm in setting them explicitly in the stylesheet):
h1 {
mc-heading-level: 1;
}
h2 {
mc-heading-level: 2;
}
Now suppose that you have an acknowledgments page with <h1> and <h2> headings that you do not want to appear in the TOC. You could apply a generic class to these headings to screen them out:
.NoTOC {
mc-heading-level: 0;
}
Assigning a Generic Class to an Element
In the Flare GUI, you can assign a generic class by right-clicking the element structure block and choosing the class:
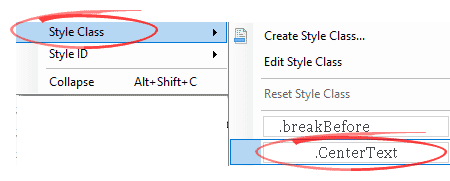
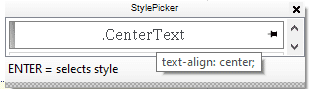
You can also assign a generic class using the Style Window (F12) or Style Picker (Ctrl+Shift+H):
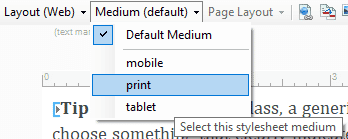
If you define generic classes in the stylesheet's print section, you will need to switch to the print medium to apply a generic class through the GUI:
Assigning Multiple Classes to an Element
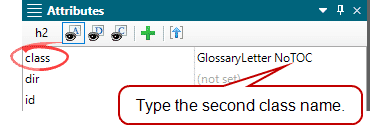
Flare's GUI style pickers can assign only one class to each element, but you can add a second class by selecting the element, opening the Attributes Window from the Home ribbon (Shift+F12), and typing the second class into the class field:
You can also add a second class manually using the Text Editor. First, find the paragraph element tag:
<h2 class="GlossaryLetter">
Then add the second class name within the quotation marks:
<h2 class="GlossaryLetter NoTOC">
Notes on Assigning Multiple Classes to Elements
- You can assign more than two classes to an element, though the order of the classes matters because of CSS inheritance.
- If you change the main style class using the Flare GUI, Flare will eliminate all classes except the one assigned through the GUI. You will need to add the additional classes again.
Margin and Padding Values
CSS shorthand makes working directly with the stylesheet markup easier. A highly useful bit of shorthand applies to an element's margins and padding.
What is the Difference Between Margin and Padding?
If you are unclear about the difference between margin and padding, here's a quick review:
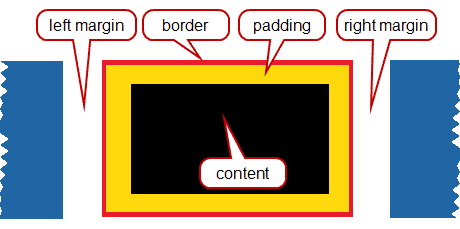
- An element's margin values define the distance between the element and the other elements that are above it, below it, or beside it (or the element that contains it).
- The padding sets the distance between the element's contents (typically text or images) and its optional borders. The padding area will display the background color whether or not the borders are visible.
CSS Margin and Padding Longhand
With CSS longhand, you specify margin and padding values like this:
p {
margin-top: 16px;
margin-right: 14px;
margin-bottom: 12px;
margin-left: 10px;
padding-top: 8px;
padding-right: 6px;
padding-bottom: 4px;
padding-left: 2px;
}
These values can appear in any order and they can be interspersed with other element attributes, which can make finding and changing them more complicated when you work with a stylesheet in a text editor.
CSS Margin and Padding Shorthand
CSS shorthand greatly simplifies the margin and padding markup. The values shown above can be rendered like this:
p {
margin: 16px 14px 12px 10px;
padding: 8px 6px 4px 2px;
}
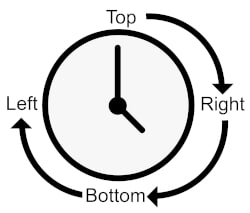
When I need to recall how the values are applied, I imagine an analog clock. (Remember those?) I start at the top and proceed clockwise. This tells me that the four values are: top, right, bottom, left.
You can also specify two values, which doubles-up the four values. Here, the top and bottom margins are set to 16 pixels. The right and left margins are 10 pixels:
p {
margin: 16px 10px;
}
You can also specify a single value to make all four values the same:
p {
padding: 6px;
}
A single zero eliminates the margin or padding:
p {
margin: 0;
padding: 0;
}
You can also set three values, though I'll let you look up what each value means in this case because I can never remember!
Hiding Elements in the Flare GUI
Often you do not need to have certain div or paragraph elements accessible through the Flare GUI because writers do not apply these styles to content under development. For example, you might have div or p elements used only in boilerplate such as copyright snippets or PDF page footers. In this case, it's not necessary to display these classes in a GUI style picker:
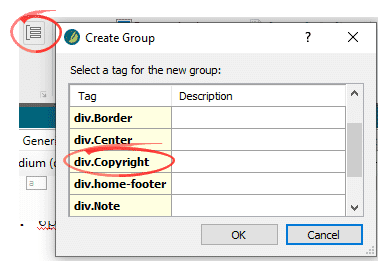
In your style stylesheet, you can use the Flare-specific attribute mc-hidden to change this:
div.Copyright {
mc-hidden: hidden;
}
The div class then no longer appears in the GUI:
Notes About the MC-Hidden Attribute
- The
mc-hiddenattribute does not affect generic classes, so you have to specify the element (typicallydivorp) as well as the class within the stylesheet for mc-hidden to work. - In the Flare GUI Stylesheet Editor, you can find
mc-hiddenin theUnclassifiedcategory of an element's properties. SelectView: AdvancedandShow: All Properties, then scroll down tomc-hiddenand apply the valuehidden. - When an element class is hidden from the GUI, you can still add the class to the topic markup manually using the Text Editor.
- The
mc-hiddenattribute does not affect the output in any way.
Summary
CSS is full of shortcuts and handy features. As you begin to pick up these tricks, you'll become a better CSS designer and a more efficient Flare user. You'll be able to keep your stylesheet tidy, maximizing your flexibility while minimizing the number of style classes you need to define.


