


I wanted to take this post and highlight a feature in MadCap Flare that makes it easy to quickly develop the print elements that normally go into something like a PDF user guide.
The idea behind the new print target options is that now you don't have to include a specific TOC, Index, and Glossary topic (with the embedded proxy) to create these print specific elements.
The examples below walk you through setting up a auto-generated TOC, but the steps are the same for the Index and Glossary as well.
The Old Way
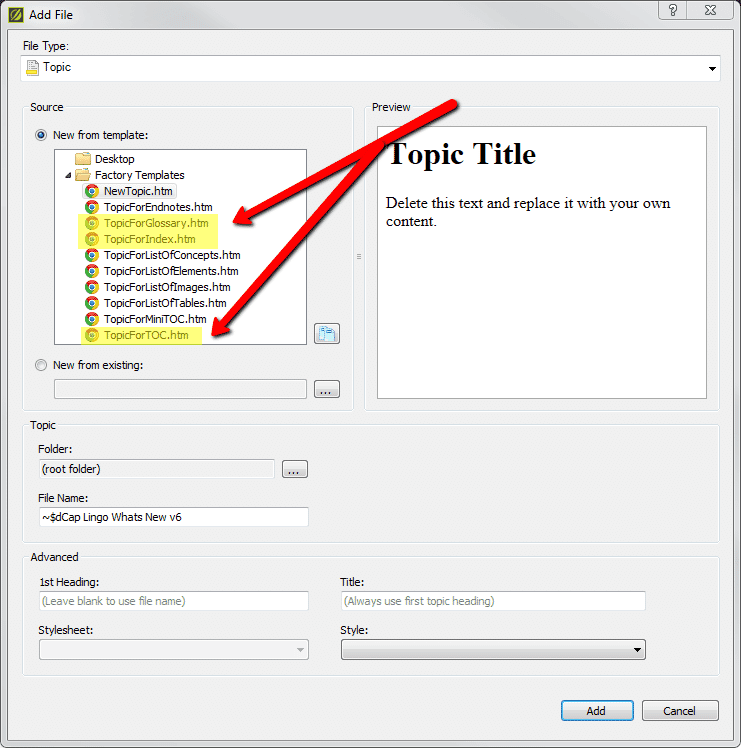
In the past, if you could quickly add TOC, Index, and a Glossary to a target by including each as a proxy in a placeholder topic (FYI - Flare's "create new topic" dialog lists these available as topic template types).
Following these steps:
- Add a new topic.
- At the top of the topic, enter a title for your TOC (e.g., "Contents").
- Remove any unnecessary text after the topic title.
- Select the Insert ribbon. In the Proxy section select Proxy>TOC Proxy.
- The TOC Proxy dialog opens.
- (Optional) From the Stylesheet class field, you can select a style for the TOC. For example, you might create and use style classes if you want to generate multiple TOCs with different looks for each output. Otherwise, the generated TOC in the output will use the style settings from the parent <MadCap|tocProxy> style. You can create a style class for this purpose in the Stylesheet Editor. To do this, select the MadCap|tocProxy style and click Add Class to create a class. The class will then be available from this field.
- Click OK. The proxy is added to the topic.
- Add your new TOC topic that contains the TOC proxy to the where you'd like it to appear in the TOC configured to be used by your Print target.
- Save your work.
More information on the manual method of creating proxies can be found in our documentation here.
The New Way
The following explains how to auto-generate a TOC using Flare's print target options (MadCap Flare version 10.0 and higher).
- Create a print target in your Flare project (the auto-generate TOC option works with all print outputs (Adobe FrameMaker, Adobe PDF, Microsoft Word, Microsoft XPS, XHTML Books).
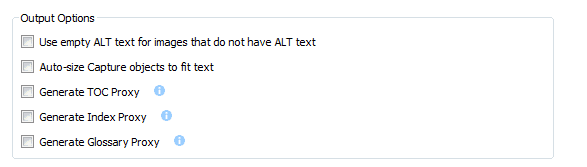
- On the Advanced tab of the Target Editor, select Generate TOC Proxy. Note: This option is disabled by default for existing print targets of your Flare project, but enabled for new targets. If a TOC proxy is already present in a topic or snippet that is being included in the output, this auto-generate option has no effect.
- Save your work.
When you generate the target, a TOC will be created and inserted at the beginning of the output. If your targets' page layout includes a Title page type, the TOC is added after the title page in the output.
We've designed the auto-generate method to be quicker and easier than the manual method. While the manual method is more flexible, it requires you to perform a number of extra steps, such as creating topics, inserting proxies, and adding files to the outline TOC. So if you simply want to quickly create print output with generated TOCs, glossaries, or indexes, the auto-generate option might be best for you - but if you want more control over the placement and look of the generated TOCs, glossaries, and indexes, you should use the manual method. Review the linked articles above for specifics on modifying the TOC Label, as well as the Styles used for the auto-generated TOC.


