


Recently a client wanted to include some customizations to create a text pop-up when you hover your mouse over an image. This type of dynamic effect is an example of what can be done using jQuery.
First, from the example project, let's add the jQuery UI assets, as well as the tooltipInit.js file to your Flare project.
- Download the example project here
- Open the Resources folder, then copy the Scripts folder from this location
- Navigate to the Content Explorer of your Flare project
- Right-click the Resources folder and select Open Folder in Windows
- Paste the Scripts folder in this location
Implementing the jQuery Plug-in
Next, we will need to add a reference to the CSS file, as well as the JS files within the master page of the project. Follow these steps:
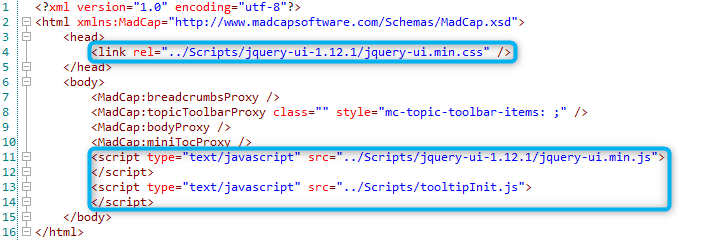
- Go to Resources > MasterPages. Open the master page and switch to the Text Editor.
- Inside the <head> tags, add a <link /> tag with the relative path to the jquery-ui.min.css file as the value of the src attribute, for example:
<link rel="../Scripts/jquery-ui-1.12.1/jquery-ui.min.css">- Just before the closing </body> tag, add the following <script> tags:
Now that we have implemented the plug-in, let's put it to work.
The tooltipInit.js file located in the Scripts folder is where we can set rules for how we would like to use the custom tooltips. The script in this file was designed to pull the value of the title attribute of any HTML element that has the style class "imageTooltip" applied to it. The script will then generate a div element that displays this value as text in the output. However, you could replace the class selector in this script with a style class or ID that you are currently using in your project. You could also replace this selector with the image tag. For example, if you would like all of the images in your project that have a title attribute to display with a custom tooltip, you could replace the code in tooltipInit.js with the following code:
$(document).ready(function(){ $(“img”).each(function() { var title = $(this).attr(‘title’); $(this).tooltip({ ‘content’: function(){ return ‘
‘ + title + ‘
‘; }, close: function(event, ui) { $(“.tooltipText”).remove(); } }); }); });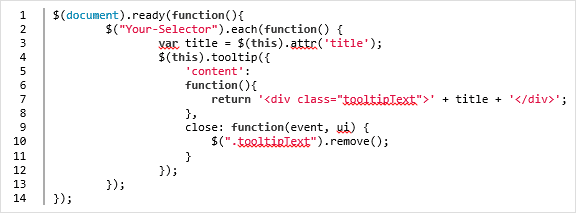
Adding the Necessary Styles
In this blog, we'll walk you through how to implement custom tooltips to create a text pop-up when hovering over an image in your HTML5 output. This type of dynamic effect is an example of what can be done using jQuery.
When the div is generated, it will have the style class "tooltipText". This way we can control the formatting of the custom tooltips by applying style properties to this class in your stylesheet. To do this, right-click the stylesheet in the example project (Styles.css) and select Open with Internal Text Editor and copy the CSS declarations that I have inserted at the bottom of the stylesheet (I included comments to show which declarations). Then, paste them into the Internal Text Editor at the bottom of your stylesheet. Here we can set the formatting rules for our custom tooltips (fonts, colors, positioning, etc.).
If you would like to add custom tooltips to multiple images and control the formatting/positioning of that image separately from the style class, you can create and apply an ID to the images. I have included an example of this in the stylesheet of the example project.
Adding Tooltip Text to an Image
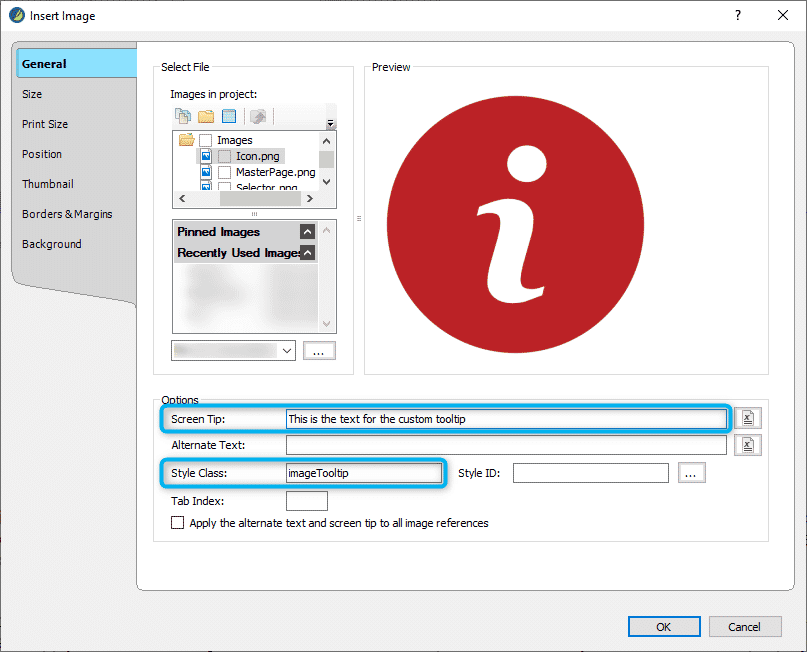
When inserting an image (Insert ribbon > Image), the Insert Image dialog will display. In the General tab, you can type the text for your custom tooltips in the Screen Tip field (this will be written as the title attribute in the source code of the image). You can also apply the "imageTooltip" style class in the Style Class field to enable the custom tooltip.
Build your HTML5 target and see your new custom tooltip text!


