


This guest blog post was written by Casey Schroeder. As 84.51°’s lead technical writer, Casey developed an array of self-serve Learning Centers that blend help and learning together for a seamless user experience.
At 84.51°, we take a blended approach to help and learning. To facilitate this approach, we host a training calendar in our Learning Center where clients can view and register for upcoming training sessions.
This training calendar is powered by Caleander.js, a powerful, highly customizable, and free (!!) JavaScript library.
In this blog post, I’ll walk you through how to embed this in your project. You can also download my sample project here, which is already set up using the process below.
Add the Script Files to Your Project
Go to https://github.com/jackducasse/caleandar and download the zip file of the Caleander.js repository.

Extract the contents of the zip file, then transfer them to your MadCap Flare project.
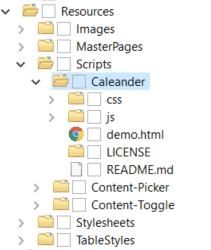
I typically store my scripts in the Resources folder (Content > Resources > Scripts > ScriptName)
Add the Script to a Topic
Start by opening the topic where you want the calendar.
Note: I’ll show you how to complete these steps through the Flare UI where possible, but you can also edit the code directly if you are comfortable doing so.
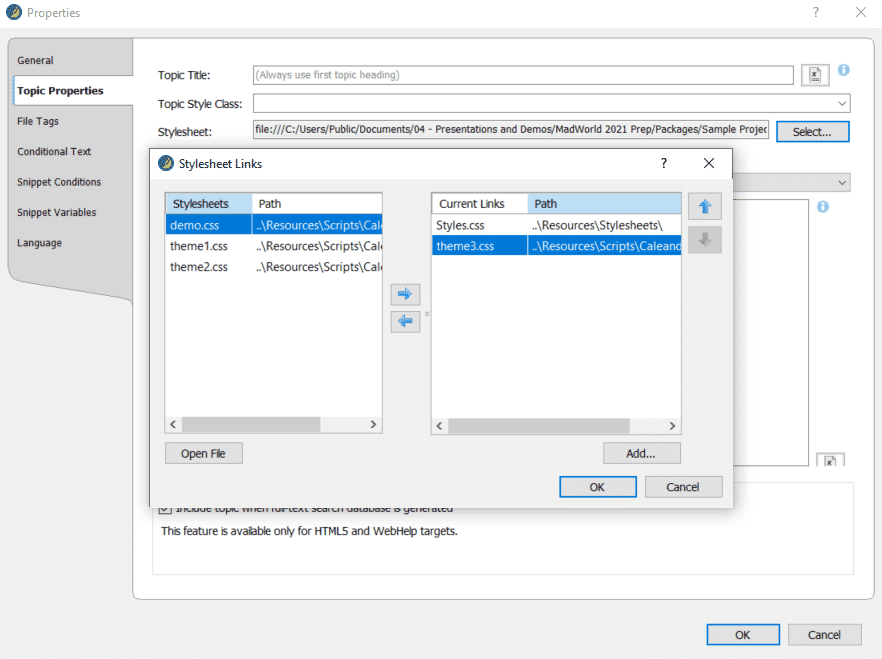
Step 1: Link One of the CSS Files to Style the Calendar
While in the topic, press Ctrl+Shift+P to open the Topic Properties.
Then add one of the themed stylesheets. We use theme3.css (with a few customizations).
Step 2: Add the Scripts That Display and Populate the Calendar
At the bottom of the topic, add a script (Insert > Script from the toolbar).

Choose text/javascript and link to the caleander.js script. Repeat this process for the demo.js script.
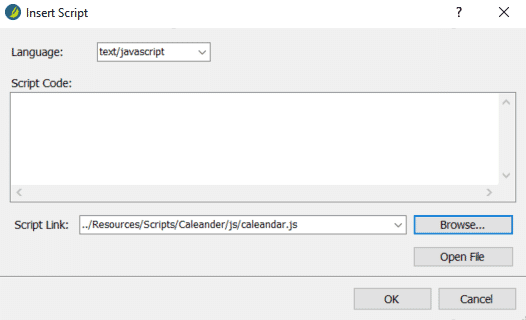
Note: Order is important. Make sure the first script referenced is caleander.js, followed by demo.js.
Step 3: Add a Placeholder for the Calendar
Switch to the Text Editor view for the topic.
Inside the <body> tag, determine where your calendar will appear, then add an empty div with the ID caleander to that location:
<div id="caleandar"></div>Step 4: Double-Check Your Work
Save your changes. From the text editor, your topic should look something like this:
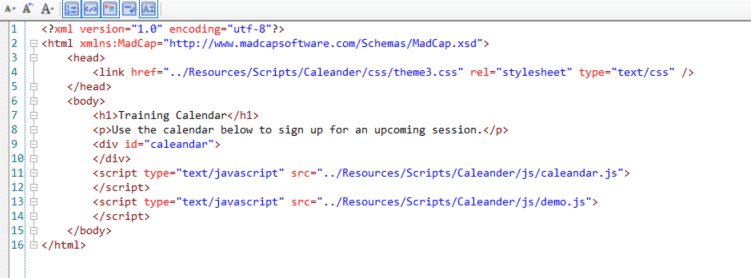
Key things to check:
- Theme stylesheet linked in the <head> tag.
- Caleandar div inside the <body> tag
- Scripts before the close of the <body> tag (caleander.js, then demo.js)

Add Dates to the Calendar
In the Content Explorer, find the demo.js file and right-click > Open with > Internal Text Editor.
You’ll see a few examples from the creator of the script:

Step 1: Make sure your calendar is working
To establish a proof of concept, change the dates to present-day.
One important callout here is that the months are offset by 1. So 0 = January, 1 = February, 2 = March, and so on.
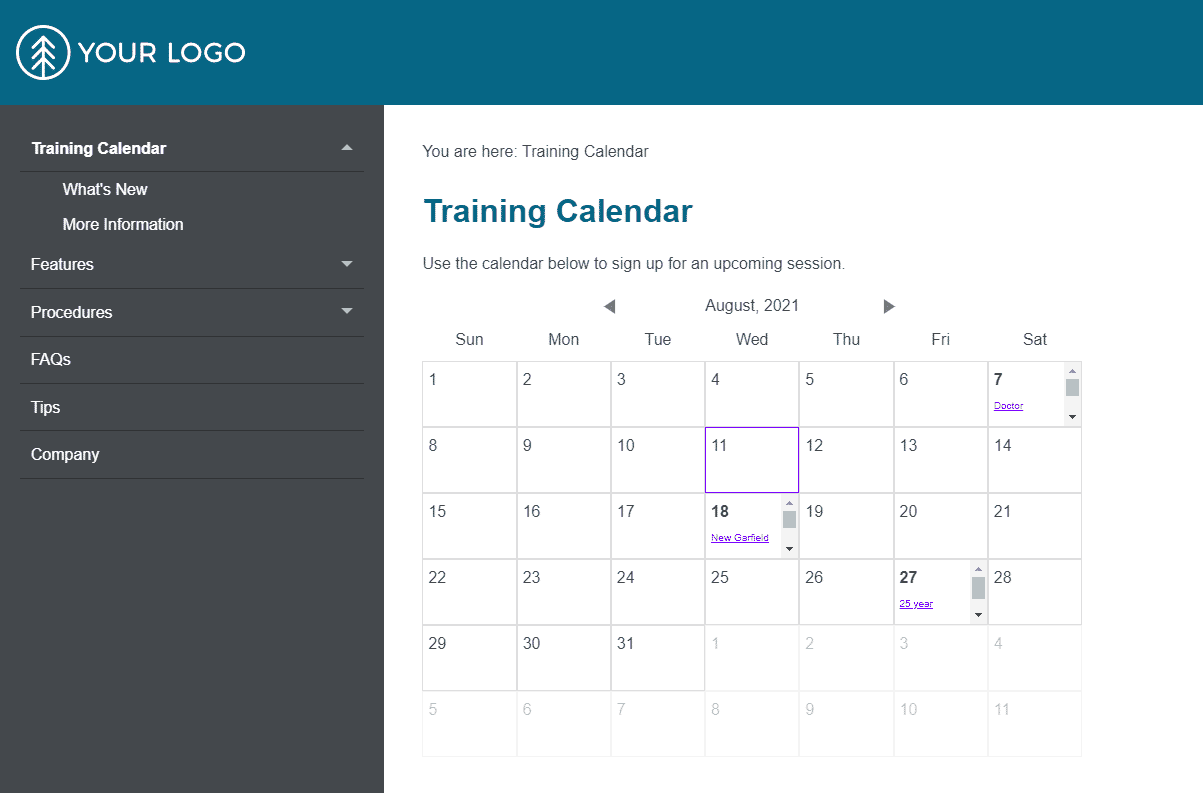
For this example, I’m changing my year to 2021 and my month to August (but August = 7).

Then save the file and build your HTML5 output. If your calendar is embedded correctly, you’ll see something like this:
Step 2: Customize the Content of the Calendar
Now, you can make additional edits to the demo.js file. Each entry should be on new line, and formatted like this:
{'Date': new Date(YYYY, MM, DD), 'Title': 'YOUR EVENT', 'Link': 'YOUR LINK' },
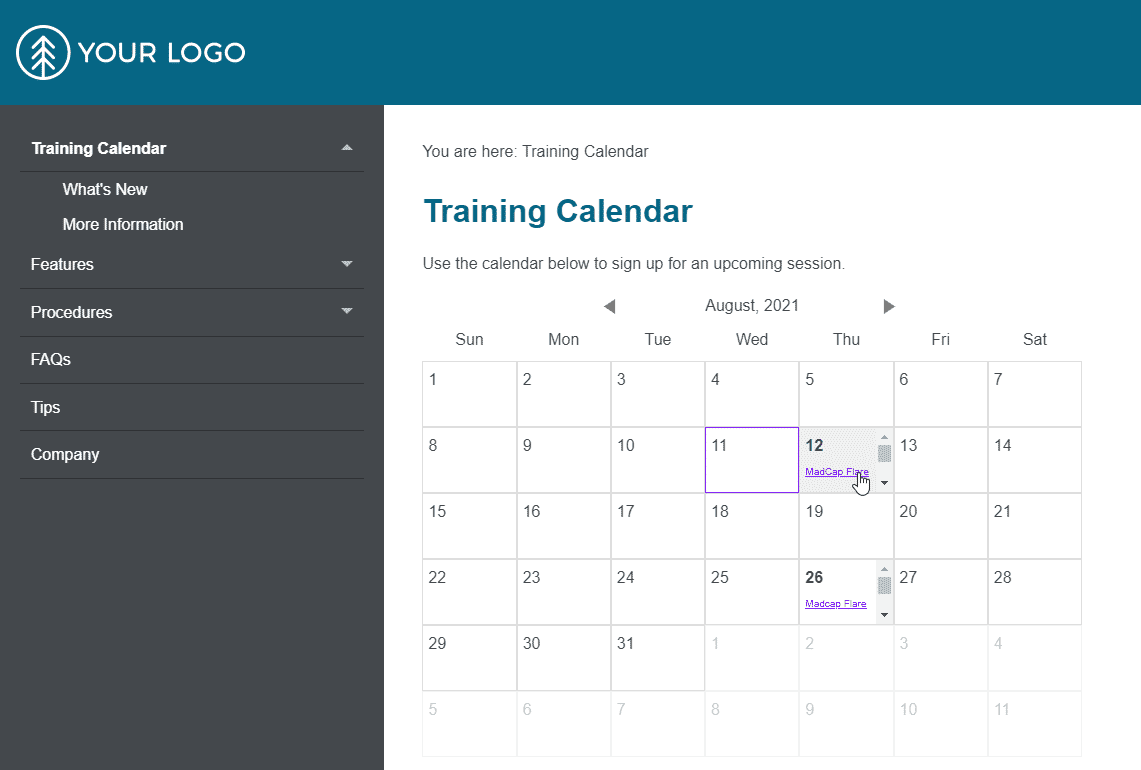
Let’s say I want to add upcoming MadCap Training Courses to my calendar. I’ll update these values according to the latest available dates:

Note: Remember, months are offset by one since January = 0. So in this example, August = 7, September = 8, etc.
When I build my output, I’ll see the August dates with working links:
And I can click the arrow at the top to view September links as well.
Now, this formatting isn’t spectacular, especially since I have to scroll to view the entire title of the course. We’ll talk about this more in the section below about styling the calendar.
Step 3: Identify a Maintenance Plan
When you think about the components of the calendar, every file you’ve linked so far is static, except for demo.js. This file will evolve over time as you add and remove dates.
You can keep this file in your Flare project and make updates as needed. Or, you can upload it to an external location (such as a cloud provider or company-hosted server), which prevents you from having to rebuild and publish your output for each update.
We host our file in an external location that it is easily accessible to our trainers and instructional designers. That way, anyone on our team can add or remove dates and links as needed. If you do this, you’ll just need to update the demo.js link in your topic to reflect the new script location.
Style the Calendar
Now, let’s customize the look and feel of the calendar. You can do any, all, or none of these steps – it’s completely up to you.
Stylesheet Overview
You can do just about anything to the theme CSS files that are included in the package, but one word of warning: any changes you make to the CSS files will be applied to the entire topic.
For example, if you change the color of the p style to white, all other p tags on this page will also become white.
To get around this, you can use the specific classes in the calendar, and/or use complex selectors to ensure only the contents of the calendar are modified.
For my calendar, I’m going to modify the theme3.css file, since that’s what I’m already using and it’s most similar to what I want to do.
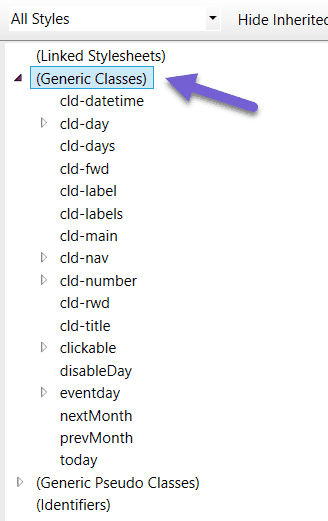
To modify the stylesheet in the stylesheet editor, you’ll need to expand the (Generic Classes) section.
However, since this stylesheet uses complex selectors, I highly recommend opening the stylesheet in a text editor and making your changes directly to the code. This requires a basic knowledge of CSS, but I’ll give you a few ideas to get started.
Key Styles
Here are a few important styles, as well as the exact properties I’m applying to make my calendar more visually appealing.
- .cld-main controls the total width of the calendar, and also styles the top section (for example, background-color or padding).
.cld-main
{
width: 90%;
background-color: #efefef;
padding-top: 10px;
}- .cld-main a controls the appearance of links in the calendar (for example, color, font-family, and/or font-size).
.cld-main a
{
color: #076685;
font-size: 12px;
font-family: Arial, sans-serif;
}- .cld-day controls the appearance of each cell in the calendar (for example, border or height).
.cld-day
{
display: block;
float: left;
position: relative;
margin: 0;
padding: 5px;
height: 100px;
border: 1px solid #efefef;
overflow-y: auto;
}- .cld-day.today controls the appearance of the current day’s cell (for example, border or background-color).
.cld-day.today
{
border: 2px solid #076685;
background-color: #efefef;
}
Note: You can also remove this style if you don’t want to highlight the current date.
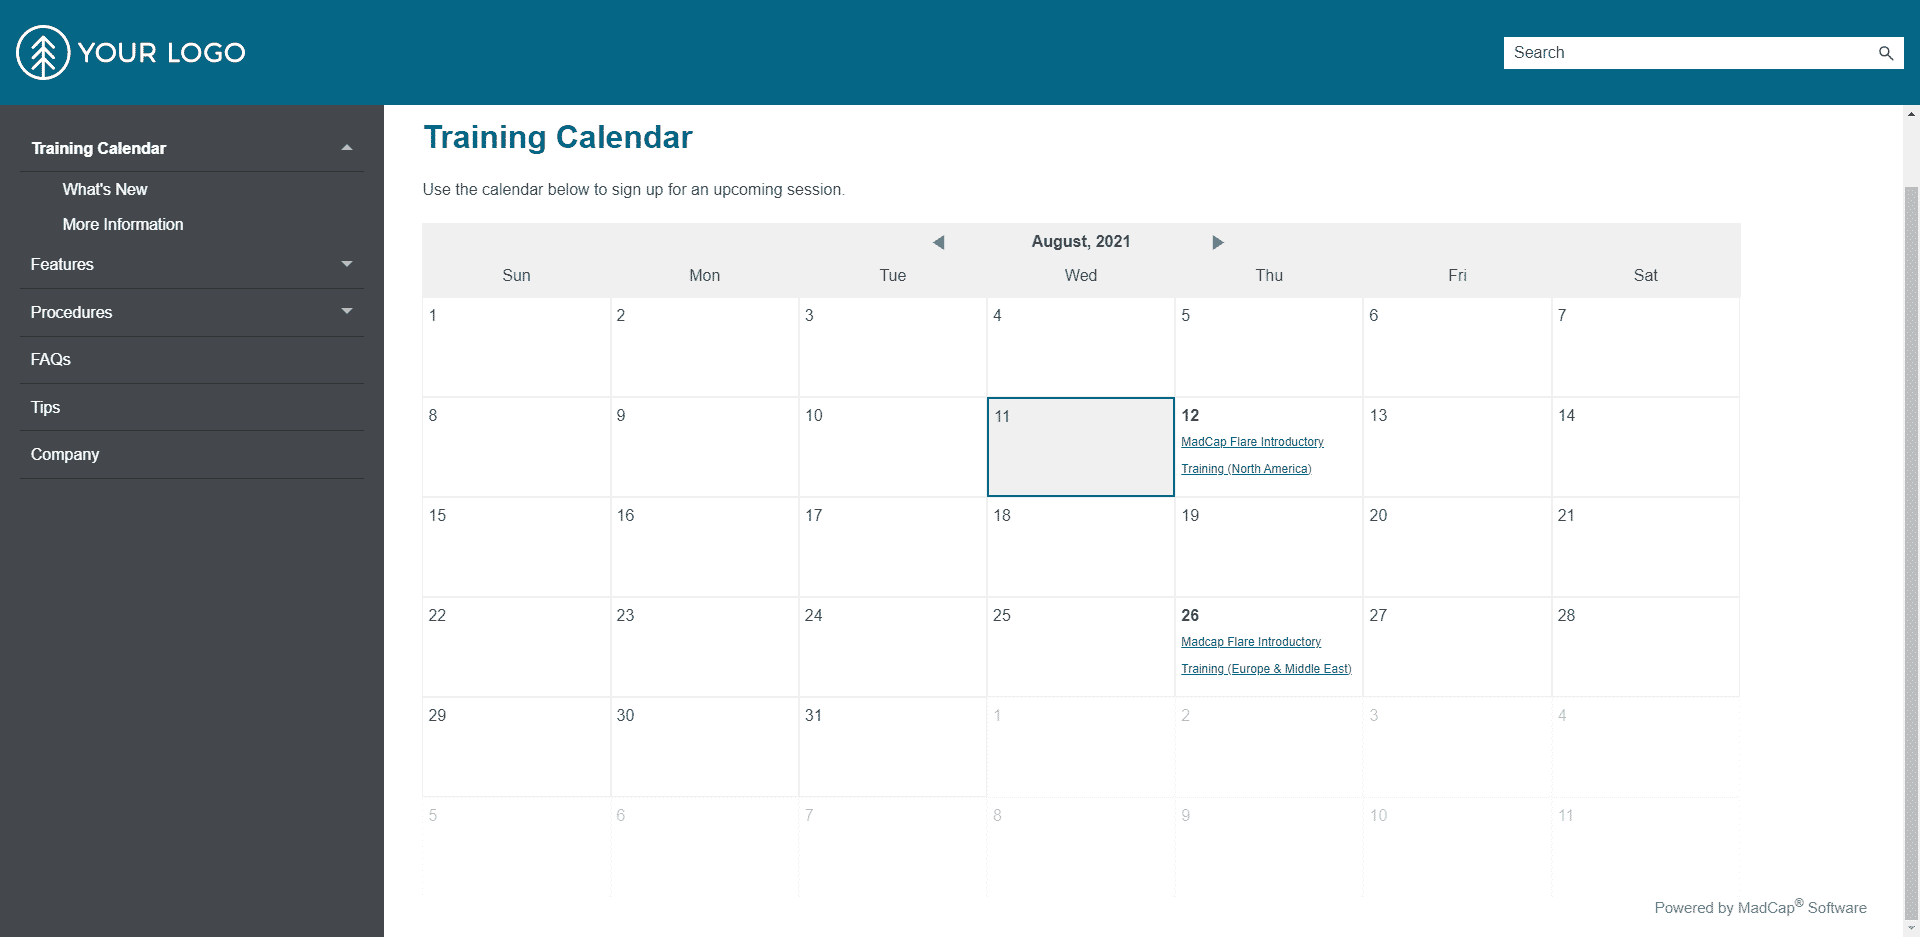
Here’s an updated screenshot of my calendar after applying the above updates:
Need More Help?
There are plenty of other ways to customize this calendar. You can change how your links look and work, you can hide specific days of the week, and more. To learn more, check out the README.md file included with the Caleander.js package.


