


This guest blog post was written by Chris Pitt, a technical writer at Dimensional Insight. With 8 years of experience in software development and technical writing, Chris strives to make help systems that are accessible and understandable for every user.
Most products, be they physical or software, have many versions or varieties available to a user. For a user, those differing versions can be confusing, and it can be very easy for a user to navigate to the wrong product or the wrong version when viewing documentation. Alternatively, some users may be using multiple versions of software or may own multiple products in the same product line. In these cases, having the ability to switch with ease between versions helps users to avoid confusion and get to where they need to go in the documentation. Plus, it never hurts for users to be able to easily get a peek at a newer version of something and see what improvements that newer version offers.
What this “quick switch” solution offers is an extendable method for letting users quickly navigate between MadCap Flare topics that share a source file and are built across multiple targets. Once implemented, users can see each version or product that features the topic they are currently viewing. For example:
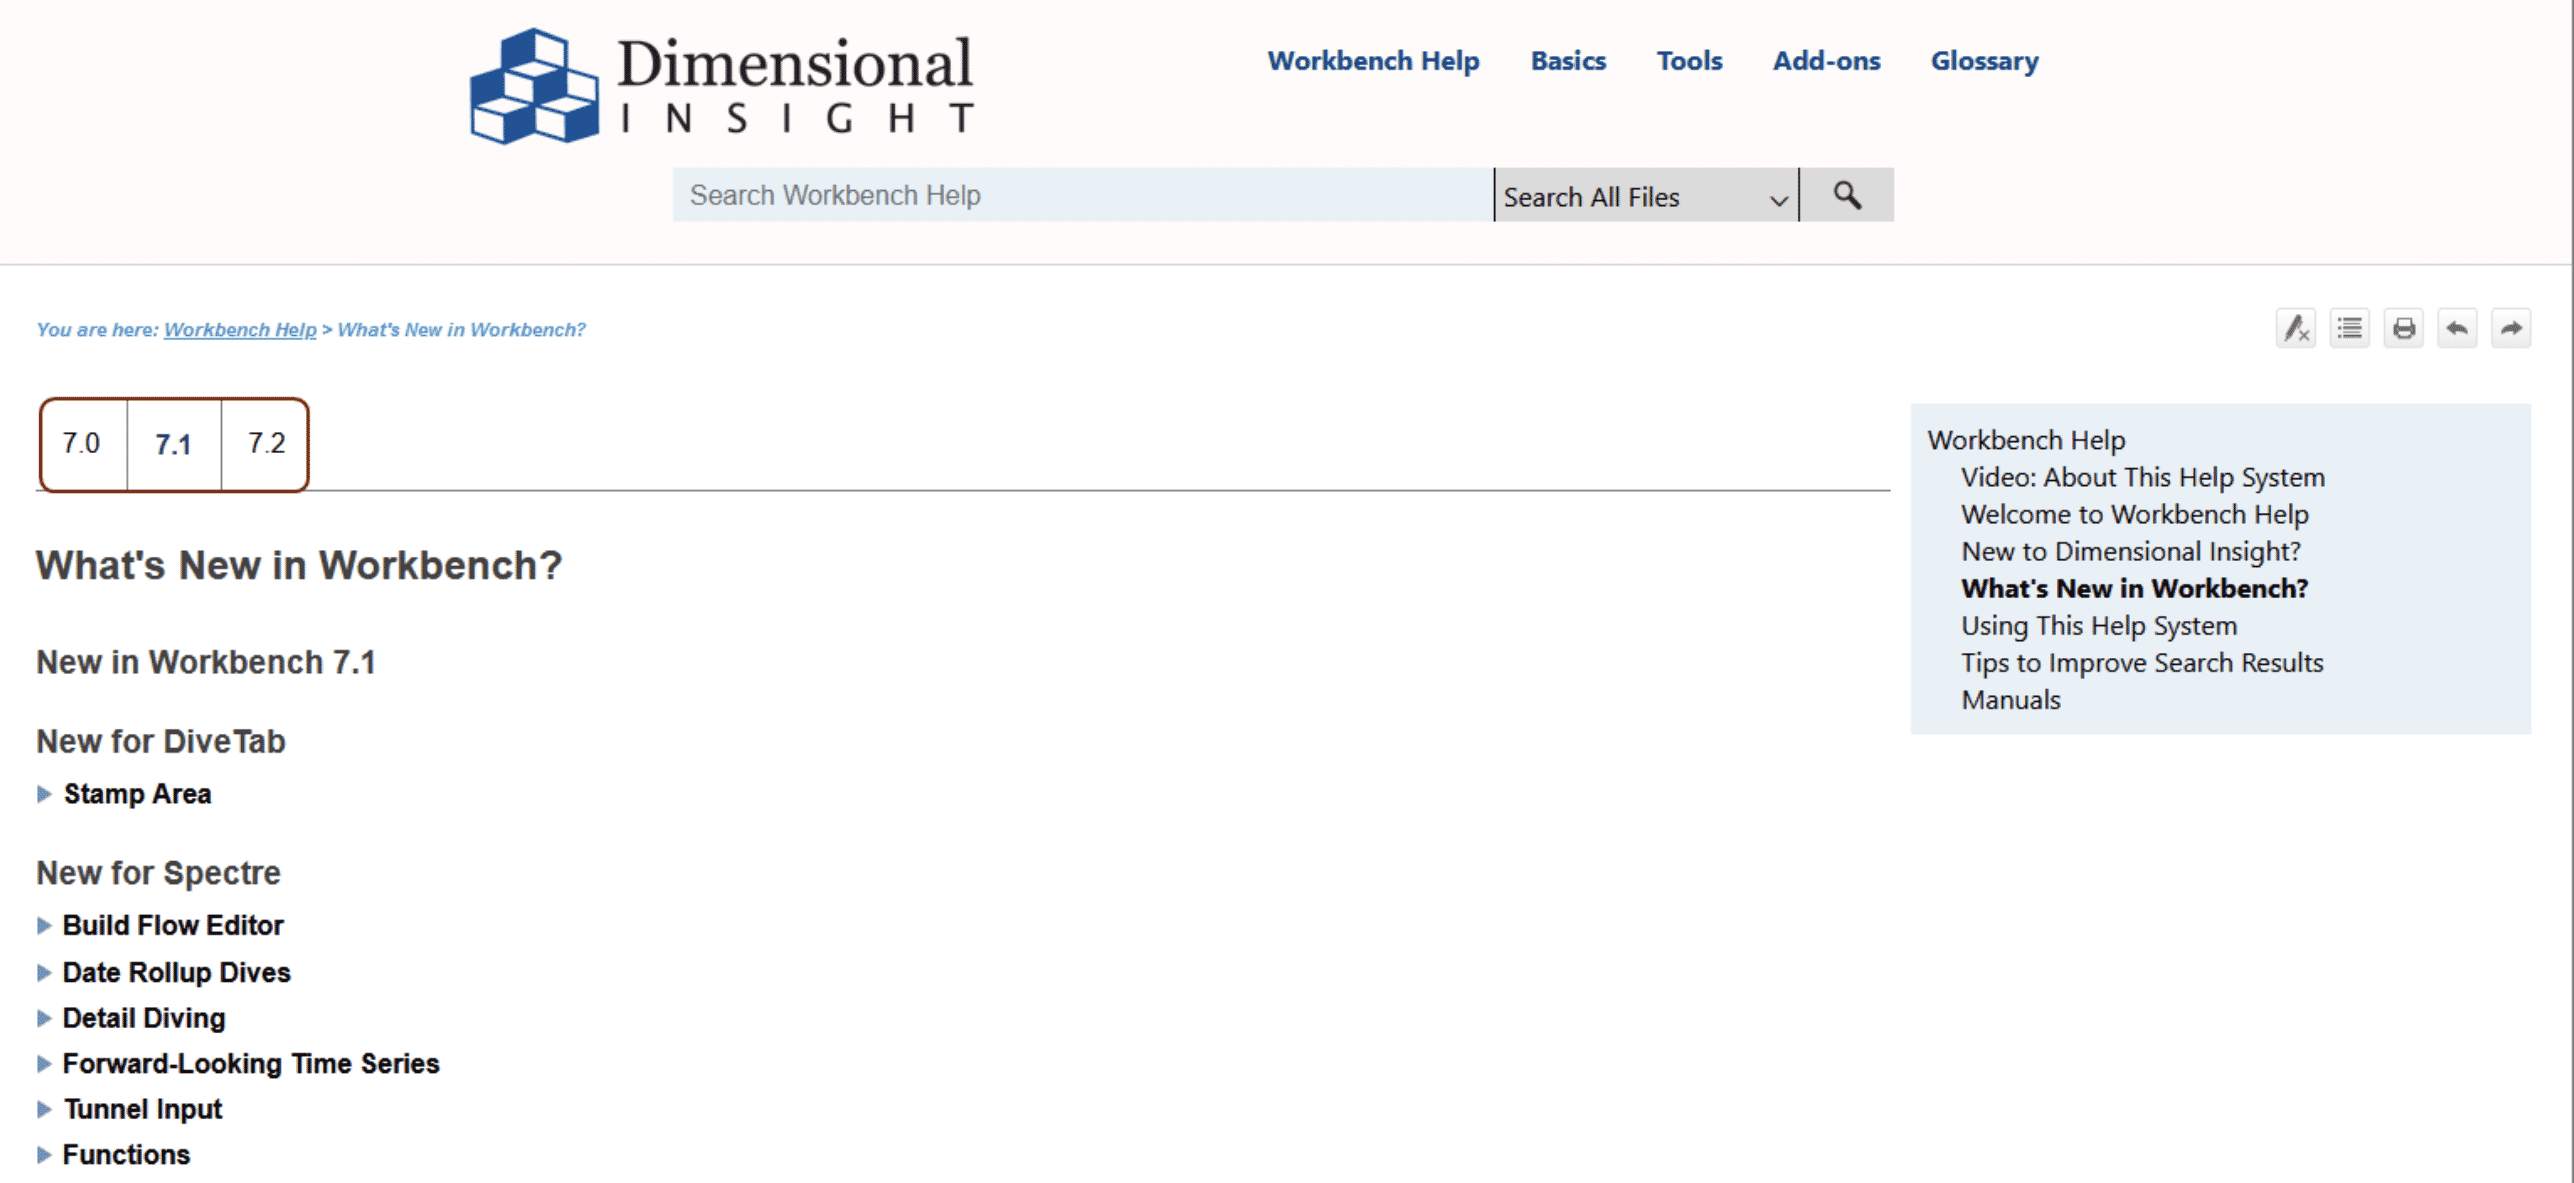
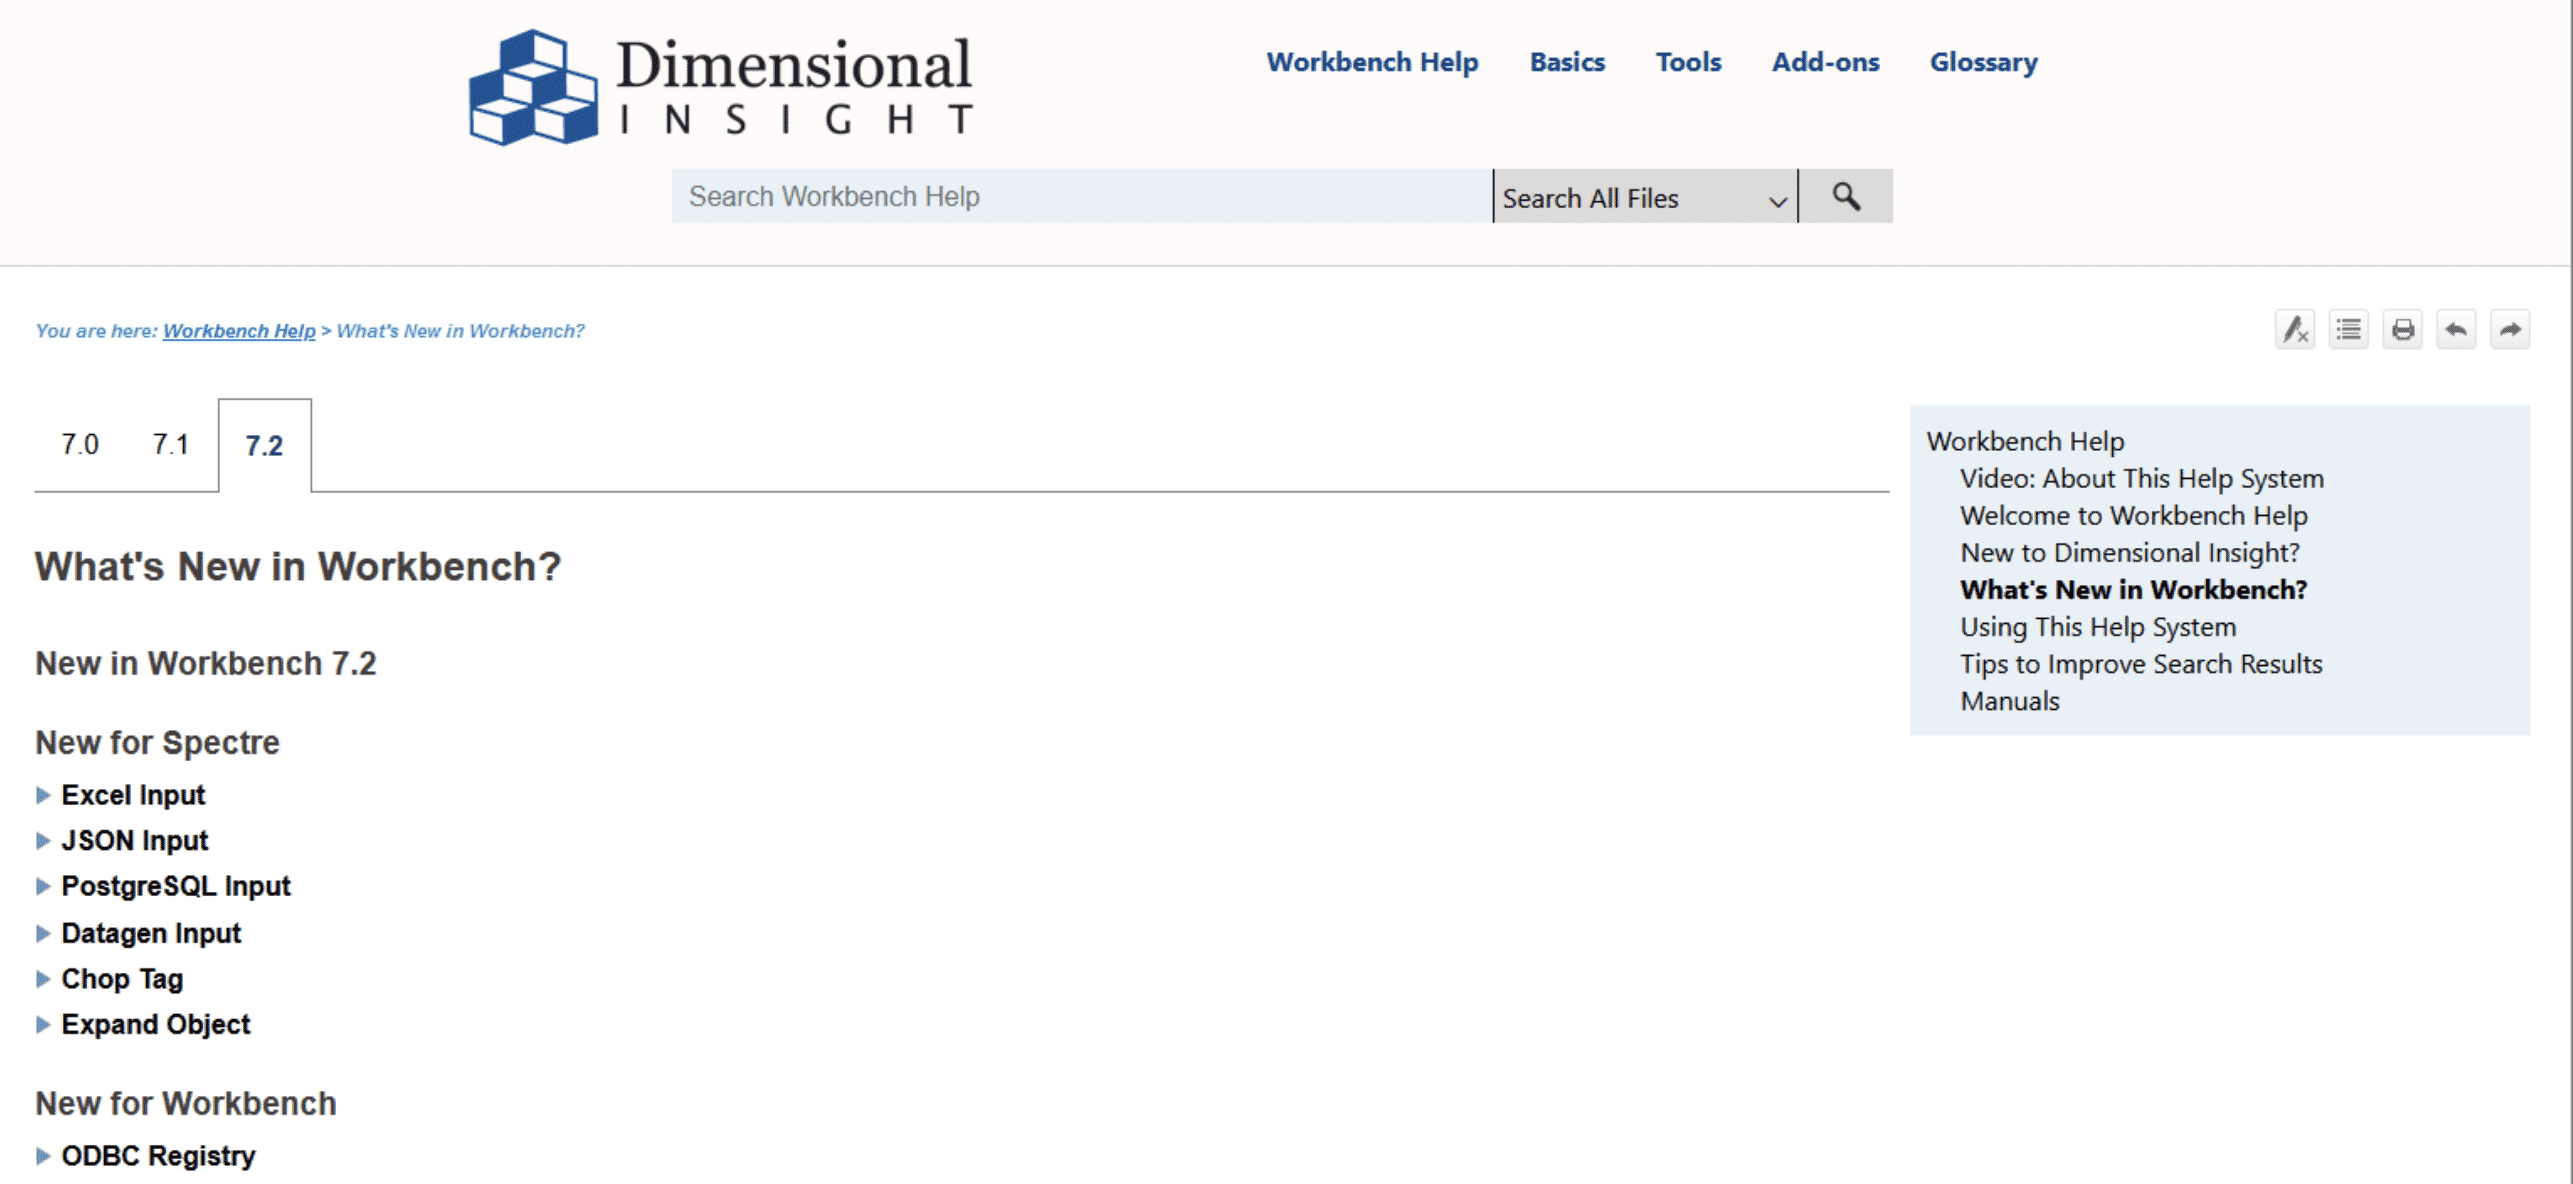
Currently the user is viewing the 7.1 version of What’s New in Workbench. By clicking either 7.0 or 7.2, the user is redirected to that version’s What’s New page, as seen in the example below.
Implementation
There are three major aspects to implementing this feature:
- Add a variable amount of buttons to the header of a topic (not all topics are in every version, so there are instances where there are only one or two buttons).
- Programmatically determine if other versions of the topic exist.
- Set the buttons to link to the other versions of the topic.
This requires some JavaScript, HTML, and CSS manipulation.
HTML and Styling
Before we dive into the really technical stuff, we’ll start with the HTML and CSS necessary to display the buttons.
Creating Buttons
The buttons are created in the master page so they propagate to every topic. By default, each button is set to display: none so that they only appear when a version exists with the corresponding topic. Each button contains an id for the version. These are highly extendable. If you want to add another version, all you have to do is add another button with the id tag set to the new version and, as you’ll see, the scripts will incorporate that new version seamlessly.
<div class="tab-container">
    <ul class="tabs">
        <li class="tab-link" id="70" style="display: none;"><a>7.0</a>
        </li>
        <li class="tab-link" id="71" style="display: none;"><a>7.1</a>
        </li>
        <li class="tab-link" id="72" style="display: none;"><a>7.2</a>
        </li>
    </ul>
</div>
Styling Buttons
This CSS is added to the stylesheet in Resources/Stylesheet. There are two classes that are styled using CSS:
- Tabs – This class surrounds the buttons and is set to have a horizontal line run across the screen until it impacts the TOC insert. The :after pseudo-element creates the line that runs across the topic header and under the buttons.
- Tab-link – This class is for each individual button and has a consideration for if the button represents the current version. The <a> tag is styled here as well, with syntax ensuring that only <a> tags nested within a tab-link class are styled in this way.
/*Tab Version Selector*/

.tabs
{
    list-style-type: none;
    margin: 0;
    padding: 0;
    overflow: hidden;
    position: relative;
    z-index: 0;
}

.tabs:after
{
    position: absolute;
    content: "";
    width: 100%;
    bottom: 0;
    left: 0;
    border-bottom: 1px solid grey;
    z-index: 1;
}

.tab-link
{
    display: inline-block;
    float: left;
    margin-bottom: 0;
    position: relative;
}

.tab-link > a
{
    display: block;
    color: black;
    text-align: center;
    padding: 14px 16px;
    text-decoration: none;
}

.tab-link > a:hover
{
    background-color: #e3f1f7;
    font-weight: bold;
    color: #783fad;
    cursor: pointer;
}

.tab-link > a:active
{
    font-weight: bolder;
}

.tab-link.current
{
    border-right: 1px solid grey;
    border-top: 1px solid grey;
    border-left: 1px solid grey;
    border-bottom: 0px solid white;
    background: white;
    z-index: 100;
}

.tab-link.current > a
{
    color: #4b0082;
    font-weight: bold;
}
The tabs element is manipulated here to remove everything that normally makes a ul element look like a list. Our team wanted a line to separate the version buttons from the rest of the content, so the :after pseudo-element lets us transform that list into a line that runs across the bottom for the entire length of the element.
The tab-link element is mostly just being changed to have some hover effects and an outline around the current version to signify which button is which.
URL Considerations
We’re going to dig into the technical side of this implementation. The backbone of this entire process involves knowing what your URLs look like once your HTML5 targets are built. In our case, for the What’s New example above, here are the URLs for the three available versions:
- https://www.dimins.com/online-help/workbench/72/common/whats-new.html
- https://www.dimins.com/online-help/workbench/71/common/whats-new.html
- https://www.dimins.com/online-help/workbench/70/common/whats-new.html
They look very similar, with the version number being the only difference. Determining what is different in each URL is important for us to be able to create a script that can programmatically find each of these URLs. Before you begin implementing this solution, ensure you know what parts of your URL are the same between versions and what parts are different. That information is necessary to modify the regular expression in the script that breaks the URL into pieces for your help system.
It should be noted that if you preview this implementation locally (by using Flare’s preview tool or displaying an HTML file from your machine) you will not be able to see the buttons as there is no server for the script to make requests on.
Connecting Links and Buttons
We create a loop with the number of iterations based off the number of tab-link tags on the page. This means you can make as many or as few buttons as you would like and the solution will scale with your choice. Each loop uses the element’s id to find that element and create an <a> tag with the constructed link.
Scripts
We can break the scripts for this implementation down into a few parts:
Collecting each button and placing their ids into an array.
var items = document.getElementsByClassName("tab-link");
//If there are no tabs (perhaps this is a page that hasn't implemented them yet), nothing happens.
if (items.length == 0) {
    return;
}
Since the only elements on the page with the class name tab-links are the buttons, we can use the getElementsByClassName function to get an array containing each button as a modifiable element.
Separating the page URL into three parts:
- The portion that matches the id field of each button.
- The portion of the URL before the id.
- The portion of the URL after the id.
//This regular expression breaks down the URL into three elements: the URL before the version number, the version number, and the rest of the URL.
var URLBreakdown = /(.*\/[^\/]*)(\d\d)(\/.*)/.exec(window.location.href);
var currentVersion = URLBreakdown[2];
We use a regular expression to do the URL separation and use capture groups to ensure that there are three discrete sections to the result.
Constructing a URL with each possible id.
for (var i = 0; i < items.length; i++) {
        var itemVersion = items[i].id;

//This is going to construct a URL featuring the version number provided by each HTML element in the list.
        //Then it checks that URL to determine if the page exists (gets a 200 response) or if it doesn't (gets any other response).
        var client = new XMLHttpRequest();
        client.timeout = 0;
        client.open("HEAD", buildURL(URLBreakdown, itemVersion));
        client.send();

        client.onreadystatechange = function() {
Here we use a for loop to iterate through the list of buttons. For each button, we check if that version’s URL exists, and if it does, we create a link and attach it to the button.
Adding a link to each button with the corresponding constructed URL.
if (this.readyState == 4) {
    const responseVersion = /(.*\/[^\/]*)(\d\d)(\/.*)/.exec(this.responseURL)[2];
    //If the URL exists, an <a> tag is added to the button featuring the constructed URL.
    if (this.status == 200) {
        document.getElementById(responseVersion).getElementsByTagName("a")[0].setAttribute("href", buildURL(URLBreakdown, responseVersion));
        document.getElementById(responseVersion).style.display = "block";
        //By default, each list element is set to not display, this is just an insurance measure to ensure that a user doesn't see a version option that isn't real.
    } else {
        document.getElementById(responseVersion).style.display = "none";

    }
When we check the URL, a 200 status means the page exists, so we use that as our signal to create an <a> tag with that link and assign it to the button.
Putting It All Together
The full JavaScript code is below:
//For each possible version (at time of writing 7.0, 7.1, 7.2), what we do is take the URL and use cross-origin calls to determine if a page exists with each other version, since
//all we have to do is change the version number in the URL. If the page exists, great, we build a URL for it and assign it to the tab attributes.
//Should note, CORS doesn't work when running locally, so if you're doing any local testing, you won't see any other tabs because they'll all fail to find and therefore disable.
function loadedAction() {
    var items = document.getElementsByClassName("tab-link");
    //If there are no tabs (perhaps this is a page that hasn't implemented them yet), nothing happens.
    if (items.length == 0) {
        return;
    }
    //This regular expression breaks down the URL into three elements: the URL before the version number, the version number, and the rest of the URL.
    var URLBreakdown = /(.*\/[^\/]*)(\d\d)(\/.*)/.exec(window.location.href);
    var currentVersion = URLBreakdown[2];

    for (var i = 0; i < items.length; i++) {
        var itemVersion = items[i].id;
        //This is going to construct a URL featuring the version number provided by each HTML element in the list.
        //Then it checks that URL to determine if the page exists (gets a 200 response) or if it doesn't (gets any other response).
        var client = new XMLHttpRequest();
        client.timeout = 0;
        client.open("HEAD", buildURL(URLBreakdown, itemVersion));
        client.send();

        client.onreadystatechange = function() {
            if (this.readyState == 4) {
                const responseVersion = /(.*\/[^\/]*)(\d\d)(\/.*)/.exec(this.responseURL)[2];
                //If the URL exists, an <a> tag is added to the button featuring the constructed URL.
                if (this.status == 200) {
                    document.getElementById(responseVersion).getElementsByTagName("a")[0].setAttribute("href", buildURL(URLBreakdown, responseVersion));
                    document.getElementById(responseVersion).style.display = "block";
                    //By default, each list element is set to not display, this is just an insurance measure to ensure that a user doesn't see a version option that isn't real.
                } else {
                    document.getElementById(responseVersion).style.display = "none";
                }
            }
        }
        //If the version is the current version for the page, set it to be current and look nice.
        if (itemVersion == currentVersion) {
            items[i].classList.toggle("current");
            items[i].style.display = "block";

        }

    }

}

//We outsource to this function mostly for readability. There's a lot of weird, tricky stuff in the above function, might as well reduce cognitive load where we can.
//This just takes in a version number and the URL breakdown and constructs a URL. This is used for checking URLs and for adding them to <a> tags.
function buildURL(URLBreakdown, version) {
    var newURL = URLBreakdown[1] + version + URLBreakdown[3];
    return newURL;
}
With the scripts and the HTML running together, all you have to do to implement this into your project is to set your master page to include the buttons, and the script will take it from there. This is not an out-of-the-box solution as some pieces need to be customized to work with your help system, but once those customizations are made, this implementation is simple to maintain and extend.


