


For most numbering purposes, you may find that an ordered list perfectly meets your needs. However, for certain documentation, you need something a bit more complex that allows you more control over indents and the actual method of numbering.
MadCap Flare offers the ability to define your own numbering schemes and to lay them out exactly as you want. This post discusses the method of using MadCap Flare's auto-numbering instead of ordered lists. While this topic can be polarizing among readers of the MadCap Software forums, for those who require numbering that is a bit different, this is a great option.
In the first post of this series on auto-numbering, I will begin by showing how to achieve legal numbering which can be done using ordered list functionality. As a foundation, it is a good way to learn about auto-numbering using a scheme that is widely used in legal and engineering documentation.
Custom Paragraph Numbering
To successfully number paragraphs, you should use two numbering styles as well as a style for any paragraphs that form part of an already numbered section. This may sound convoluted when you first think about it. The reality is that once you have set the styles up, they are there for you to use at any time.
In my example I have three levels of numbering, and three indent styles for paragraphs that do not require a number. Choose your style names carefully in order to view the styles together in the Styles pane and the Style Editor. You can also add a comment to the style to act as a reminder of its purpose.
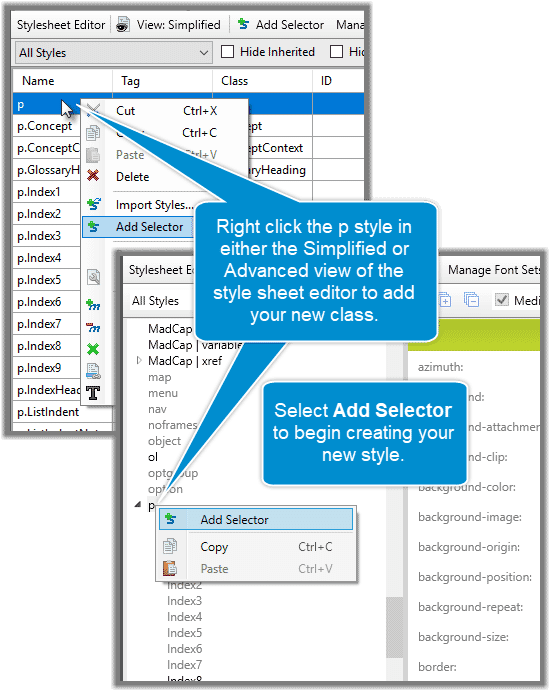
My auto-numbered styles will all be based on the p paragraph style. Open the main stylesheet and find the p style. It does not matter how you are viewing the stylesheet. You can create a new class (selector) from both views.
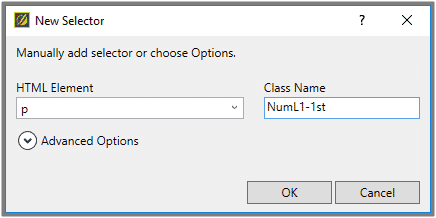
When you find the p class, right click it and select Add Selector. The New Selector dialogue opens and you can type in a name for your class. I have NumL1-1st in the sample screenshot below, but you can use any naming convention you want.
First Paragraph Number Style
The first style I set up was my first paragraph number style:

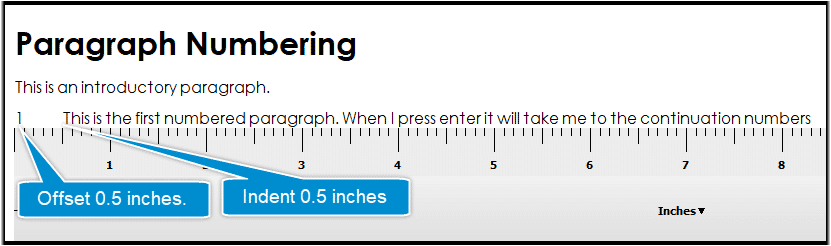
In this style, I force numbering to start at 1 by adding {n=1} to the sequence. I have also defined that I want the number outside the main body of the paragraph and that I want a space of half an inch to allow for the number.
To accommodate the space needed for numbering, I have set an indent on the paragraph tab of the Stylesheet Editor as half an inch on the left. Paragraph styles can be set at any variation, but whatever indent you set should be large enough to accommodate the number. Be mindful of the need to cater for larger numbers, as you may eventually deal with documents containing subparagraphs going into the hundreds.
The screenshot below shows how the indent and offset work together to position your number and text:
If you want your style to automatically switch to another style when you press Enter (such as in Microsoft® Word), you can manually edit your CSS to include the following instruction:
mc-next-class: <em>name of class</em>; <em> </em>The code sample below shows the class with the mc-next-class command at the end. I use Notepad++ to manually edit my stylesheet when needed. For example:
p.NumLevel1First
{
      mc-auto-number-format: '{n=1}';
      mc-auto-number-position: outside-head;
      margin-left: 0.5in;
      margin-right: 0.5in;
      margin-top: 6pt;
      margin-bottom: 6pt;
      mc-auto-number-offset: 0.5in;
      mc-next-class: NumLevel1Plus;
}
There it is! You have your first level style defined.
Following Paragraph Number Style
In this style, we need to increment the number. We will not use the mc-class-next feature because you will want your paragraph numbering to stay on the paragraph style.
To begin, I create a new paragraph style, remembering to give it a sensible name. I then add the code to increment the number by 1; {n+}. This is shown in the screenshot below:
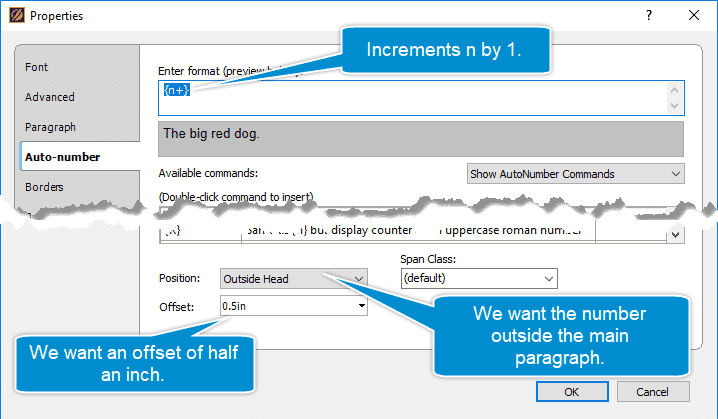
I have set an offset of half an inch and then on the paragraph tab, the left and right indents are set to half an inch to match the settings of my first paragraph style. Other style settings can be added in the tabs on the left of the Properties screen.
p.NumLevel1Plus
{
       mc-auto-number-format: '{n+1}';
       mc-auto-number-position: outside-head;
       margin-left: 0.5in;
       margin-right: 0.5in;
       margin-top: 6pt;
       margin-bottom: 6pt;
       mc-auto-number-offset: 0.5in;
}
Additional Paragraphs Without Numbers
I often need to include following paragraphs which are part of the section that is already numbered. A style can be applied to these paragraphs, which includes auto-numbering instructions that do not display.
Again, I begin by creating a new paragraph style. I set the position and offset to match my other two styles, and add a left indent to the paragraph.
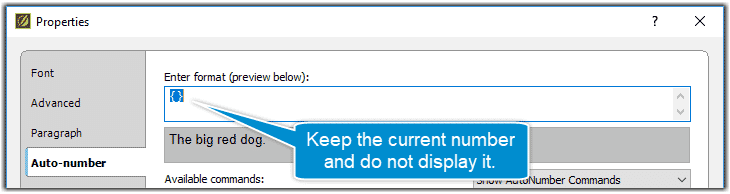
In the sequence numbering box I add { }, which keeps (but does not display) the current number.
Here’s the code I added into the field:
p.NumIndentL1
{
      mc-auto-number-format: '{ }';
      mc-auto-number-offset: 0.5in;
      margin-left: 0.5in;
      margin-right: 0.5in;
      margin-top: 6pt;
      margin-bottom: 6pt;
}
Level Two Paragraph Styles
To create a level two numbering scheme, you need to create a set of styles for each level of numbering. Starting with similar styles created for level one styles, I adjust the indent to one inch whilst keeping the offset at half an inch.
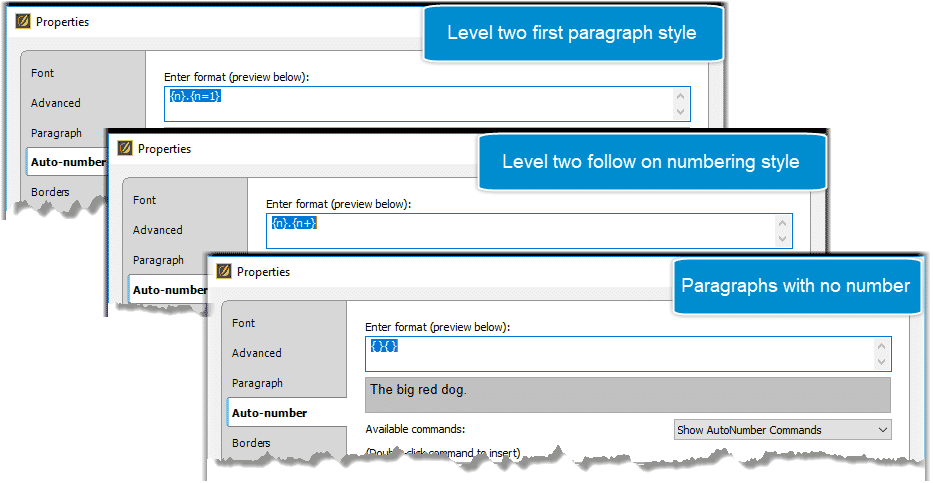
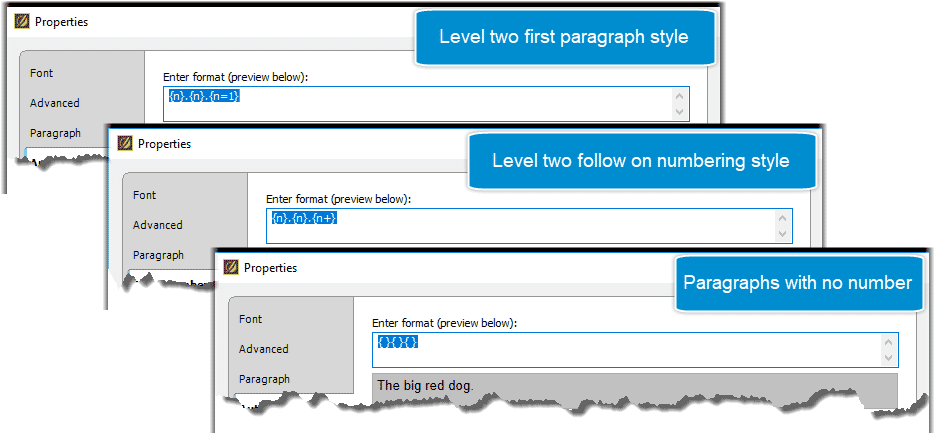
From here, the sequence numbering code is a little different. I add {n}., which tells Flare to display the level one number with a dot after it. I then add {n=1} to set up the level two numbering. For the following paragraphs, this code changes to {n+1} to increment the numbers.
Here is the raw code which you can copy and paste into your CSS:
p.NumLevel2First
{
      mc-auto-number-position: outside-head;
      mc-auto-number-offset: 0.5in;
      margin-top: 6pt;
      margin-bottom: 6pt;
      margin-right: 1in;
      margin-left: 1in;
      mc-next-class: NumLevel2Plus;
      mc-auto-number-format: '{n}.{n=1}';
}
p.NumLevel2Plus
{
      mc-auto-number-position: outside-head;
      mc-auto-number-offset: 0.5in;
      mc-auto-number-format: '{n}.{n+}';
      margin-left: 1in;
      margin-right: 1in;
      margin-top: 6pt;
      margin-bottom: 6pt;
}
 p.NumIndentL2
{
      margin-top: 6pt;
      margin-bottom: 6pt;
      mc-auto-number-offset: 1in;
      mc-auto-number-position: outside-head;
      margin-right: 1in;
      margin-left: 1in;
      mc-auto-number-format: '{ }{ }';
}
Level Three Paragraph Styles
Creating level three styles is similar to level two, except that the indent and offset are further increased to accommodate a longer number. In my example, I have set the indent to 1.75 inches and the offset to 0.75 inches. We also have the addition of the third level of numbering, set up in the Auto-number tab.
The numbering code is a little different. I add {n}., which tells Flare to display the level one number with a dot after it. I add {n}., which tells Flare to display the level two number, then I add {n=1} to set up the level three numbering as starting from 1. For the following paragraphs this code changes to {n+1} to increment the numbers.
Here's the sample raw code:
p.NumLevel3First
{
mc-auto-number-format: '{n}.{n}.{n=1}';
mc-auto-number-position: outside-head;
margin-top: 6pt;
margin-bottom: 6pt;
margin-left: 1.75in;
margin-right: 1.75in;
mc-auto-number-offset: 0.75in;
mc-next-class: NumLevel3Plus;
}
p.NumLevel3Plus
{
margin-left: 1.75in;
margin-right: 1.75in;
margin-top: 6pt;
margin-bottom: 6pt;
mc-auto-number-position: outside-head;
mc-auto-number-offset: 0.75in;
mc-auto-number-format: '{n}.{n}.{n+}';
}
p.NumIndentL3
{
margin-left: 1.75in;
margin-right: 1.75in;
margin-top: 6pt;
margin-bottom: 6pt;
mc-auto-number-position: outside-head;
mc-auto-number-offset: 0.75in;
mc-auto-number-format: '{ }{ }{ }';
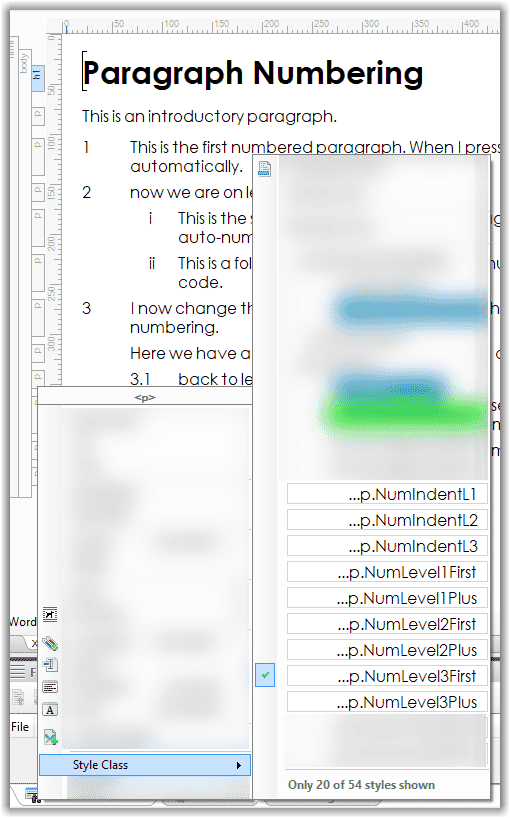
}Once you have set up all your numbering styles, you will be able to see them when you right click and click on Style Class on any of the p bars in the CSS structure on the left of the screen. If you just want to see the current style, hover your mouse over the p bar and the style name will appear in a tooltip.

Here’s an example of how paragraph numbering styles appear within the context menu:
Naming
Naming is important because it sets the order of the styles in style lists. In the screenshot above, my unnumbered paragraph styles group together at the top of the numbered styles list. I have named my styles this way because I use the unnumbered styles in more than one scheme of numbering. You may prefer to name them so they appear as a third tier in the style list.
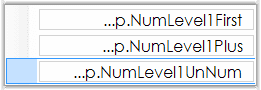
Example: Naming your styles like this…
p.NumLevel1First
p.NumLevel1Plus
p.NumLevel1UnNum
causes your menu to display like this:
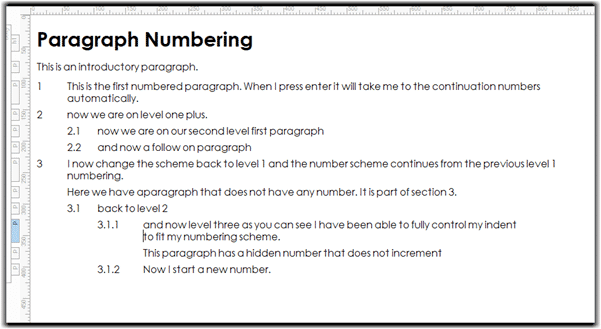
With auto-numbering set up as described in this post, you can achieve a standard legal layout as shown below.
You now have a set of styles that allow you to fully control your numbering and format. If you have added these to your main stylesheet you will have them to use whenever you want.
Conclusion
With MadCap Flare’s auto-numbering feature, you can gain control on how numbering displays in documentation, and opens up options for customization. In my next post, I will talk about how to nest auto numbering sequences, which enables you to change numbering within an existing numbered sequence while retaining the existing sequence. I will also talk about creating custom numbering schemes that include roman numerals and letters of the alphabet.


