


This guest blog post was written by Jonathan Kangisser (AKA JK) who works as the documentation team leader for HARMAN OTA & Cybersecurity business unit in Israel. JK has been using Flare since 2015 and in the last year has been incorporating JavaScript and creative CSS techniques in MadCap Flare. Outside of work, JK is a passionate supporter of Liverpool and the South African rugby and cricket teams.
We use MadCap Flare’s side navigation to generate our documentation (docs) portal, a technical asset for our global customers (automakers, from Mercedes-Benz to Jaguar Land-Rover, Great Wall Motors, FCA, and others). Using a two-tier horizontal tile menu on the home page enables us to segment our docs portal and provide quick access to specific areas and to the most important content. The horizontal menu shown here can be used for top navigation as well.
The menu had to be developed in-house to match the UX design. The menu is responsive, uses standard HTML, CSS and JavaScript, so it’s supported on all browsers and screen sizes, however, our docs portal is not designed for mobile use. The user accesses content by clicking (or hovering over) a tile, which presents the submenus applicable to that tile.
This is our home page with the default and selected states of the tiles.

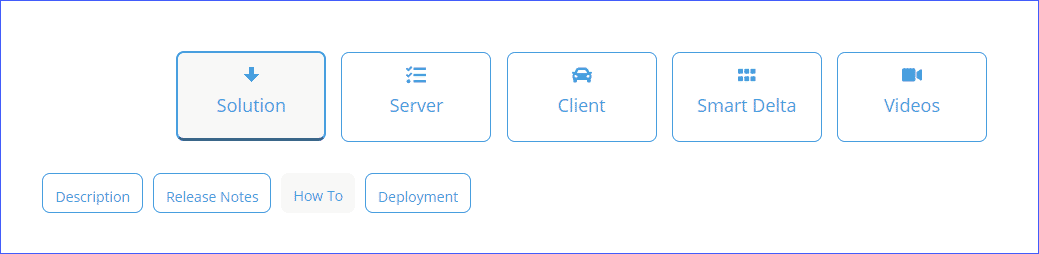
On mouseover, the graphic changes to an arrow, and the color of the tile changes to indicate the second level (submenus) and the selected option. Clicking a submenu takes you to a specific area in our doc portal.
For the tile menu to work, you need the following:
- HTML: For the names of the tiles and the URLs.
- CSS: Styling for the menus.
- JavaScript: To change the graphic on mouseover.
HTML
See the HTML area in the codepen for the required code here.
NOTE: The menus will not work correctly until you add the images to the menus and the image for the arrow in the JavaScript. The images are all 24 x 24 pixels. You can download the images here.
Adding the HTML
Add the HTML to your home page (front page) in your project. Make sure your startup topic is listed in the General tab of your Flare Target.
About the HTML
The <nav> element represents a section of a page whose purpose is to provide navigation links. In this example, a <nav> block is used to contain an unordered list (<ul>) of links. With the appropriate CSS, this can be presented as a menu.
The li class includes two JavaScript events:
- Onmouseover: The event occurs when the mouse pointer is moved onto the main tile.
- Onmouseout: The event occurs when the mouse pointer is moved off the main tile.
In the li class after the JavaScript events and just before the closing </a> tag of the href enter the text to display on each menu (i.e., in my example “Solution”, “Server”, “Client”, “Smart Delta”, and “Videos”).
The HTML code for the Solution menu is displayed next:

NOTE: The main menu items are not linked to any content, but if required you can add hyperlinks or cross-references instead of the # in the href.
img src contains the reference to the image that is displayed on each tile. You need to add the appropriate image from your Flare project. The easiest way to do this is to locate the image in the Content Explorer and then drag-and-drop the image in the correct location using Flare’s XML editor.
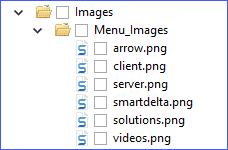
The images for my menus are located under Images/Menu_Images:
In the following li tags enter the names to appear on the submenus, again just before the closing </a> of the href i.e., for the first submenu under the ul class “liverpool1” I used the text “Description”, “Release Notes”, “How To”, and “Deployment”.

After you add the text you can use the Insert > Hyperlink or Insert > Cross-Reference commands in Flare to add the links to each submenu.
CSS
The CSS adds the styling and control for the menus. See the CSS area in the codepen for the required code.
Adding the CSS
Add the code to the <head> section in your home page:
<link href="../Resources/Stylesheets/homeMenu.css" rel="stylesheet" type="text/css" />
I used a separate CSS for the horizontal tile menus (homeMenu.css), but you can also copy the styles to an existing CSS file (e.g., home.css).
About the CSS
| Styles for the first submenu in a list. |
|---|---|
| Styles the odd-numbered submenus. |
| Styles the first tile including background color, margins, width and height. |
| Styles the area for the first submenu. The width can be increased to add space for additional submenus and to manually position the menu. You can do the same for the other submenus i.e., #tileNav ul.tottenham1, #tileNav ul.everton1, #tileNav ul.chelsea1, and #tileNav ul.leeds1 |
| Controls what happens when the width of the screen reaches a certain size. |
|---|---|
| Defines a flex container for all its direct children. NOTE: If you receive a warning about Flex in Flare i.e., |
| Positions the images on the main tiles. |
| Removes the default bullets from the list. |
JavaScript
JavaScript is used to replace the images on the main menu and add a down arrow instead of the tile images on mouseover. When the user moves off the menu the original image returns.
See the JS area in the codepen for the required code here.
NOTE: Don’t forget to update the path in the JavaScript file to where your arrow image is located in your Flare project.
Adding the JavaScript
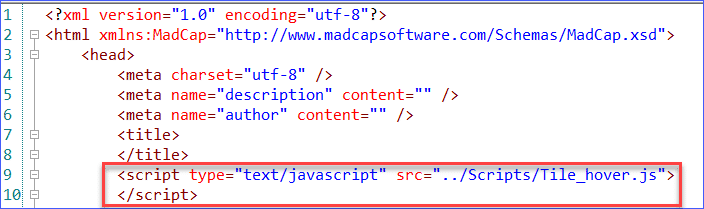
Add the JavaScript code to the <head> section in the master page.
NOTE: If the menu will only be used on the front page, you should add this to the master page used for the home page.
<script type="text/javascript" src="../Scripts/Tile_hover.js">
</script>
The script needs to be added to a subfolder called Scripts under the Resources folder.
When you generate your Flare project, the tiles and submenu should all be working now. You can add additional menus in the HTML, change the look in the CSS and add additional functionality in the JavaScript file.
Good luck!


