


Want to make your cross-references look and act like hyperlinks in your online output and display appropriately (e.g., with page numbers) in your print-based output?
Totally do-able. It's easy to style your cross-references to behave differently depending on which output you place them in. Here's how:
Formatting the cross-reference style
- First, we’ll style our hyperlinks. From the Content Explorer, open the stylesheet that you want to modify.
- In the local toolbar of the Stylesheet Editor, make sure the Medium is set to (default) and make sure the first button displays Simplified View (which means that the Advanced view is currently shown in the editor).
- In the upper-left corner of the editor, click in the Show Styles field and select Show Link Styles.
- In the Styles section, select MadCap|xref.
- From the Show drop-down list on the upper-right side of the editor, select Show: Assorted Relevant Properties.
- Expand the Font property group and do the following:
- Click in the field to the right of color.
- Select More Colors. The Color Picker dialog opens.
- In the # field, type 003366 and click OK.
- Click in the field to the right of font-weight and select bold.
- Click in the field to the right of text-decoration and select underline
- Click in the field to the right of mc-format. The Cross-Reference Format dialog opens.
- In the Enter format field, type {para}
- Click OK.
- In the Styles section, expand the MadCap|xref style.
- Expand (Pseudo Classes).
- Select hover. Now we’ll change the color of the cross-reference when users hover over it in online output.
- Expand the Font property group and do the following.
- Click in the field to the right of color.
- Select More Colors. The Color Picker dialog opens.
- In the # field, type c0c0c0 and click OK.
- Now let’s specify settings for print outputs. In the local toolbar of the Stylesheet Editor, make sure the Medium field is set to print.
- Select MadCap|xref again.
- Expand the Font property group and do the following.
- Click in the field to the right of color.
- Select More Colors. The Color Picker dialog opens.
- In the # field, type 000000 and click OK.
- Click in the field to the right of font-weight and select normal.
- Click in the field to the right of text-decoration and select none.
- Click in the field to the right of mc-format. The Cross-Reference Format dialog opens.
- In the Enter format field, type “{para}” {pageref}. Note: The second command in this format, {pageref}, is the key to making the cross-reference change for the PDF output. Depending on how far away the target content is from the link, this command might display any number of possibilities (e.g., See “Other Topic” on page 15, See “Other Topic” on the next page, See “Other Topic” on the previous page, See “Other Topic”above, See “Other Topic” below).
- Click OK.
- Save your work, and you are done!
Now let’s inset a cross-reference in a topic and see what it looks like in both print and online outputs.
- Right-click the place where you want to insert the cross-reference and select Cross-Reference.
- In the Link to field, select Topic in Project and select the topic file you want to link to.
- In the XRef Class: field, select MadCap:xref and click OK.
Your cross-reference will look like this online:
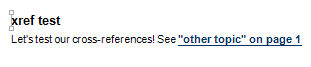
And it will look like this in print:


