


Note: This article was posted before the release of Flare 9, which includes native right-to-left-language support. The information below is still helpful if you are using an older version of Flare.
We have been asked for tips on how to add support for right to left languages in Flare’s WebHelp. Thanks to input from several people, the steps below walk you through a process of preparing your project files for translation, and what steps to take once the project is returned from the translator.
If you have any issues, tips or feedback, please feel free to let us know.
Note: If you have content hard coded in topics or the stylesheet to align or float left, they will not be affected by the RTL settings. You will need to find that content and remove the formatting.
Before Sending the Project for Translation
- Make a copy of your project and add it to a folder that you know will be for RTL.
- Create and/or edit the following.
- Master Page
If you do not have one in the project:
- Select Project>New>Master Page.
- (Optional) You can remove or keep any proxies in the master page.
3. If you have an existing master page or have just created one:
- Open it in the Internal Text Editor or open it in another text editor (e.g., Notepad).
- Add dir="rtl" to the <html> tag. Example:
- dir="rtl" xmlns:MadCap="https://www.madcapsoftware.com/Schemas/MadCap.xsd" MadCap:lastBlockDepth="2" MadCap:lastHeight="131" MadCap:lastWidth="883">
- Save all and close all instances of the master page.
- WebHelp Skin
- If you do not have one in the project:
- Select Project>New>Skin.
- Select a skin template using the WebHelp format
- Name the skin.
- If you have an existing skin or have just created one, open the skin in the Skin Editor and do the following:
- General Tab
- If you do not have a caption and want one, enter the string to be translated (source language) or just enter the translated string (translated language).
- WebHelp Setup Tab
- Change the Navigation Pane Position to the Right.
- Select the option to Exclude Accordion Title
- Styles Tab
- You need to have Flare add the Labels and Tooltips for each WebHelp Control (except the Toolbar items, they will only need tooltips). Even if the Value fields on this tab display text, it is not good enough to simply leave it at that; otherwise, no text for these fields will be included in the file the translator receives. You must make a manual change in each field you want to include in the output. To accomplish this, you can do one of the following:
- You can paste the desired translated strings into the Value fields.
OR - You can “dirty” the strings (e.g., add a random character at the end of each string) and then fix them (e.g., remove each random character and save).
- (Optional) Other Settings: There are other settings that you may want to change. You may want to change the order and some of the images for the items in the WebHelp Toolbar and Topic Toolbar tabs. For example, the Next Topic and Previous Topic buttons—as well as the button arrow graphics—will be backwards for RTL languages, unless you change them.
- General Tab
- Stylesheet
Certain controls will have strings for them stored in the CSS. In order for these to be written to the CSS so that they can be translated, do the following:
- Open the stylesheet in the Stylesheet Editor and make sure that the Medium is set to (default).
- Make sure you are working in Advanced View in the editor.
- Set the Editor to Show: Assorted Relevant Properties.
- Select the desired style. Following are some of the styles you may want to choose, but it depends if your project uses the features.
- MadCap | breadcrumbsProxy
- MadCap | conceptLink
- MadCap | keywordLink
- MadCap | relatedTopics
- MadCap | relationshipsHeading
- MadCap | xref
- Similar to the skin, you need to have Flare add these strings to the stylesheet file. You must make a manual change in each field you want to include in the output. To accomplish this, you can do one of the following:
- You can paste the desired translated strings into the property value fields for each style.
OR - You can “dirty” the strings (e.g., add a random character at the end of each string and click on another property) and then fix them (e.g., remove each random character and save).
- You can paste the desired translated strings into the property value fields for each style.
- WebHelp Target
- If you do not have one in the project:
- Select Project>New>Target.
- In the Output Type drop-down select WebHelp.
- Name the target.
- If you have an existing WebHelp target or have just created one, open it in the Target Editor and do the following:
- General Tab:
- Pick the skin that you created or altered in the previous steps.
- Pick the TOC you want to use for the output.
- If you have multiple stylesheets, select the one that you altered in the previous steps.
- Advanced Tab:
- Select the master page that you created or altered in the previous steps.
- General Tab:
Send the Project for Translation
- Be sure to include the usual files, the CSS, and the skin file.
After the Project is Translated and Received Back from the Translator
Generate WebHelp output for the returned project, and edit the following files in the output folder.
- Browse to the output folder.
- Using Notepad or another text editor, open the following files and add dir=”rtl” to the <html> tag. For example: <html dir=”rtl” class=”no-feedback right-layout” data-mc-runtime-file-type=”Default”>
- Skin folder
- BrowseSequences.htm
- Favorites.htm
- Index.htm
- Navigation.htm
- Search.htm
- Toc.htm
- Toolbar.htm
- Content Folder
- Glossary.htm
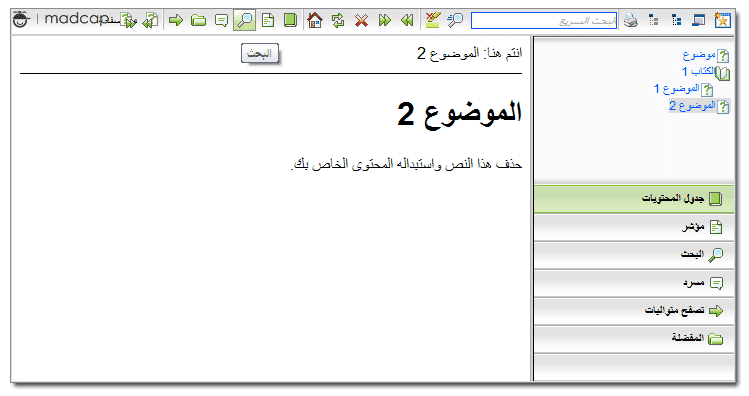
You should now be able to open the WebHelp output and see everything translated and RTL. If you generate it again you will have to repeat the steps in the "After the Project is Translated and Received Back from the Translator" area above.
Linked is a Flare V8 Project with two topics that is already set up. If you download it and generate the WebHelp, you still will have to post process the output using the steps in the "After the Project is Translated and Received Back from the Translator" area above.
Note: The translations were done using Google Translate on the web and are for demo purposes only.


