


In Flare V8 there were a few new settings added to the index as well as a 'better' default look out of the box. In this post, we will outline the new index features as well as take a look at some of the existing styles that you can change in a print index.
The first thing that was done in Flare V8 is, by default, the index page numbers are now left aligned. This is so that the default settings are more aligned with the industry standards. Two new styles were also added to the index:
- mc-reference-initial-separator: Allows for the setting of characters or spacing between the index term and the page numbers
- mc-multiline-indent: Allows an intent to be applied any line that wraps as a result of a long index keyword.
The last new feature added to the index is the ability to sort a keyword as something else. This can be useful when a keyword begins with a symbol or an accented variety of a letter.
Index Styles:
Below are the more common styles used in changing the appearance of an index. What you see in the screenshot below are the defaults that Flare ships with, so you may not need to make any changes at all.
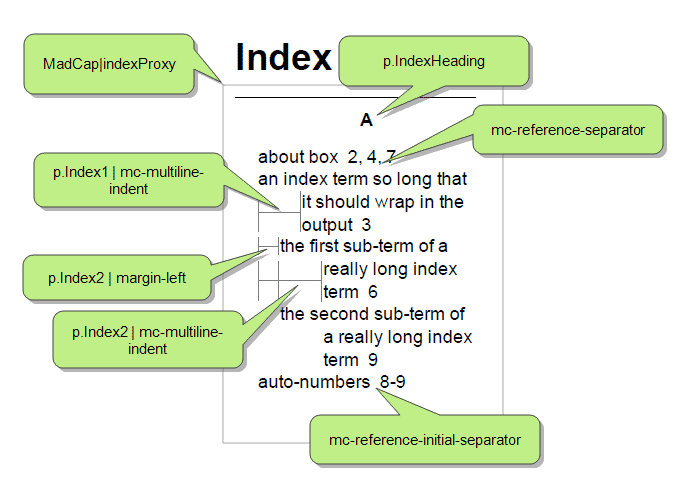
- MadCap|indexProxy: This is the 'container' style for the index. from here you can set things on the proxy such as border, margin padding, number of columns, whether or not you want heading letters, etc. You can also set things that will affect all of the index terms, such as font, color, margins, separators, etc.
- p.IndexHeading: This class for p style is to fine tune the index heading (the letter that comes before each alphabetical section in the index. You can set things like font, font size, color, text alignment.
- p.Index: This class increments by "1" for every sub-keyword (p.index.1, p.index2, etc), as seen in the screenshot above. This class gives you more control over each 'level' of keyword and will take precedence over anything set in the MadCap|indexProxy style. You can set things like font, font size, color, margins, mc-multiline-indent, etc.
- mc-reference-separator: This property can be set on the MadCap|indexProxy style or the p.Index class. It allows you to control the separator between the index pages. By default, they are set as",".
- mc-reference-initial-separator: This property is new in Flare V8, and it can be set on the MadCap|indexProxy style or the p.Index class. It allows you to control the characters or spaces between the index term and the page number.
- mc-multiline-indent: This property is also new in Flare V8. It allows you to control the indent on keywords that are longer and wrap to more than one line. The indent is not applied to the first line, it is applied to every 'wrapped' line in that term.
Index Sort As:
As mentioned above, this feature allows you to sort an index keyword as something else.
Let's say you add <html> as an index keyword. Normally, without the "Sort As" feature, the keyword would be placed at the top of the index list, before the alphabetized keywords. Now you can have <html> be sorted and appear in the index with the "H" terms.
This feature is part of the index link set functionality, which is used to create “See” and “See also” index links. Therefore, a new option is now available in the Properties dialog that opens from an index link set. Note: This feature is available in all output types.
Steps:
Create some index keywords in a project.
You can use your own project or use these quick steps to get a new project started and add some index keywords to it.
- Create a new project in in Flare using the 'Book Template' and selecting PDF as the output.
- In the Content Explorer open the CH1a.htm topic from the CH1 folder
- Go to the View Ribbon and select the Index Window
- In the topic place the insertion point in the word "Heading2" and press [F10]. This will create an index term for Heading2. Repeat this process with the words, "template", "demonstrate", "create", and "Layouts".
- Save All. You will notice that the terms now appear in bottom of the Index Window.
- Open any other topic (or just use the same one) and type "<html>" on a new line or in a paragraph.
- Highlight "<html>" and press [F10]
- Save All and notice that the html tag has been added to the Index Window
Create an Index Link Set and add a 'Sort As Link'
You can add an Index Link Set manually to your project, add one automatically or add to an existing one. For this example we will have Flare automatically create one for us.
- Right-click on the <html> keyword in the Index Window
- Select "Edit Sort As" from the menu
- The Add File dialog should appear with Index Link Set selected. You can name the file or leave the default name. If you were to do this for production, you would most likely want to name the file something descriptive.
- Click Add
- The Index Link Set editor will open up in the MDI with the Index Link dialog presented. The dialog will already have the "<html>" keyword filled in as well as the link type set to "Sort As". All you have to do is type the keyword that you want <html> to be sorted as. In this example "html".
- Click OK and Save All
- Optional: You may want to remove the line in the Index Link editor that you didn't create. It will cause a warning on compile. If you do, Save All after you are finished.
- Now you can see the <html> keyword sorted in the Index Window.
