In The Press
Advanced Use of Condition Tags and Single-sourcing
This webinar is now over. A recording is available here.
Single-sourcing and condition tags allow you to customize multiple documents. Because of this, the project that I have recently developed has many different output types all from just one TOC, which was a challenge. First, the web application that was developed had many features available to users. However, some of those features were proprietary to specific clients; therefore, these features were not seen by the other clients. Second, because of these proprietary features, the product manager asked me to produce online help and training guides for each possible combination of features so that the users would see only what they had permission to see. To achieve this, I used single-sourcing, condition tags for each feature and the different outputs, and targets for each possible combination of features or user types. From the software side of things, the software developer points to 23 online help systems that represent each user type.
Single-sourcing
Single-sourcing is a simple concept that is often misunderstood. Most of the time people think single-sourcing means that the online help and user manuals must be identical in terms of content. This is an incorrect assumption. Actually, single-sourcing is creating a single content source then producing different types of documentation from it. For example, you might have a documentation set for your customers and a separate documentation set for internal support personnel that has overlapping content. This is why it is important to remember that single-sourcing takes into account for the differing needs of all of your audiences.
It was important for me to take into account the differing needs of my audience for the project that I have recently developed. One reason for this was that the biggest customer has two features specific to them; therefore, the other existing customers and future customers will not see these features. From the software side of things, this means that at the time a user is set up in the system, their username is associated to one or more features giving them their "user permissions." These user permissions allow them to see the features that they are only allowed to see. For example, User A was given access to Feature A and Feature C (Figure 1), but User B was given access to Feature B and Feature C (Figure 2). Therefore, single-sourcing played a large part in the final deliverables of the content for this particular project.

Figure 1. User A - Features A and C

Figure 2. User B - Features B and C
A great example of single-sourcing is in the use of warnings and cautions in documentation for hardware devices such as circuit boards or generators. These cautions and warnings can be standardized and used across the different product documentation that might have an overlap of similar content in addition to the content that is unique. For example, a medical device company might have five generators that all have their own product documentation. Because the FDA regulates medical device companies and will often approve the verbiage of warnings and cautions for the product documentation, these warnings and cautions can be reused across the product documentation using single-sourcing. Therefore, instead of creating five different documents, you can create the content (i.e., the warnings and cautions) once and use it in the different product documents from that single source.
In general, single-sourcing is a development strategy that enables writers to develop centralized information modules (i.e., chunks of information), then map them to distinct audiences, or media, or both without recreating the content for the other document formats. For technical writers, this means modular writing (i.e., non-linear writing), condition tags, and mapping the information. Rather than developing information for a given format in a linear fashion, such as a novel, writers develop information modules at the element level (i.e., topics, snippets, or paragraphs). The rule of thumb with modular writing is to write the module small enough to be reused but is large enough to be understood when read alone.
Condition Tags
NOTE: Keep in mind that condition tags are not supported in the DITA output type because it cannot include (display) or exclude (hide) condition tags. Therefore, condition tags are disabled in the DITA target. However, if you import from a DITA source, the DITA-specific condition tag attributes are preserved.
Condition tags are a single-sourcing feature and can be thought of as "markers" used to display (include) or hide (exclude) text when a condition that you define is met. Think of condition tags as a filter for the different types of targets (i.e., outputs). In other words, with the use of condition tags you can specify what content goes in the different targets. At a high level, for example, if Topic A in the TOC should only be in the training guide and not in the online help, then it will appear in the training guide only. Additionally, you can display certain topics of your online help or print output to User A and not to User B. This is what I have done with my particular project, as shown in Figure 1 and Figure 2.
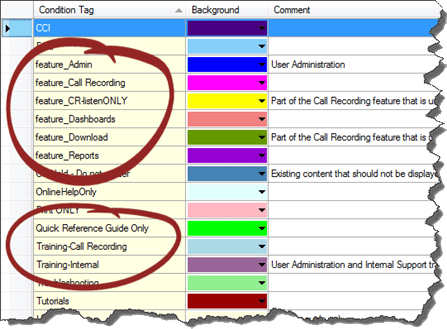
The most important thing to remember about condition tags is that before you begin your project (preferably during the planning phase) is make a list of the possible conditions that you may need to set up. For example, the condition tags in my project are based on the features of the web application and the different guides produced, as shown in Figure 3.

Figure 3. Conditional Text - Defined Condition Tags
I also made a list of the possible topics that were to be included or excluded from the online help, Quick Start Guide, and training guides.
- Tutorials
- Troubleshooting
- FAQ
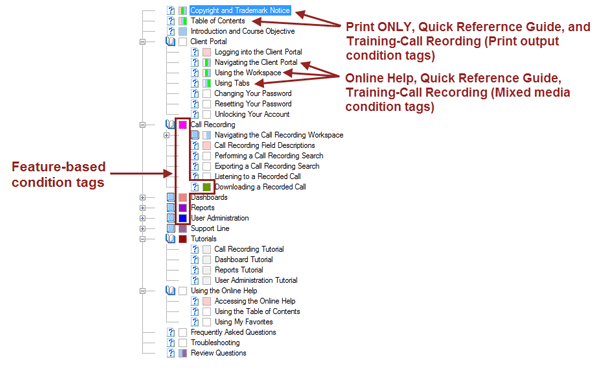
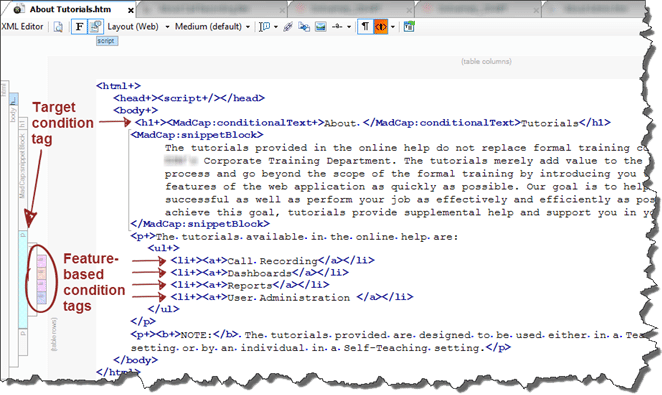
After you have defined the conditions, you can start applying the condition tags to topics, images, full paragraphs, text within paragraphs, sentences, table rows and columns, TOC entries, and index keywords markers, as shown in Figure 4 and Figure 5.
NOTE: It is important to remember that if you rename a condition tag that you have applied, you must reapply the condition tags to those areas. For the purpose of this example, if you were to rename the Quick Reference Guide Only condition tag to Quick Start Guide, then you will need to go back and reapply those conditions to the TOC entries, topics, and so forth.

Figure 4. TOC with Condition Tags Applied

Figure 5. Topic with Condition Tags Applied — XML Editor
Next, you will need to associate the condition tags with your defined targets. When doing this, the rule of thumb is to ask if you want to include the condition or exclude it from the particular target. For the purpose of this example, since the OnlineHelp_CR-RPT output should not have content for feature_Admin or feature_Dashboards these condition tags have been EXCLUDED from the target, as shown in Figure 6.

Figure 6. Condition Tags Associated with Target for User A

Figure 7. Condition Tags Associated with Target for User B
Another feature that Flare has for condition tags is to unbind the conditional text. Unbinding does not get rid of the condition tag itself; it just merely ignores the condition defined and its target association. In other words, if you have content (i.e., a word or phrase) that will be in both the online help and the printed output, but the content has a hyperlink to another topic, you can unbind the hyperlinks. For the purpose of this example, in the About Admin topic, I have one phrase that has the feature_Reports condition tag applied to it, but it also has a hyperlink to the topic. Since I did not want the hyperlink of this condition tag or any other hyperlinks to display in the printed output, I used the unbind feature to remove the hyperlink from the printed output. The following shows how to unbind the condition tag in WYSIWYG, XML Editor, and Text Editor.
WYSIWYG
To unbind a hyperlink using the WYSIWYG view, as shown in Figure 8, do the following:
- Select the condition tag or the hyperlink.
- Right-click and select Conditions from the context menu.
- (Optional) Select any other condition tag(s) to be applied to the text.
- Click Unbind to select it.
- Click OK.

Figure 8. Unbinding Hyperlinks for Print Out — WYSIWYG View
XML Editor
To unbind a hyperlink using the XML Editor, as shown in Figure 9, do the following:
- Select the condition tag by clicking on the
<MadCap:conditionalText+>tag or the hyperlink by clicking on the anchor<a+>tag. - Right-click and select Conditions from the context menu.
- (Optional) Select any other condition tag(s) to be applied to the text.
- Click Unbind to select it.
- Click OK.

Figure 9. Unbinding Hyperlinks for Print Out — XML Editor View
Text Editor
If you're comfortable in the Text Editor, then you can manually enter the condition tags, as shown in Figure 10.
<MadCap:conditionalText MadCap:conditions="Default.feature_Reports,Default.Training-Internal"
    MadCap:excludeAction="unbind">
    <a href="Users/Giving Users Access to Reports.htm"
    title="Giving Users Access to Reports" alt="Giving Users Access to Reports"
    MadCap:conditions="Default.OnlineHelpOnly" MadCap:excludeAction="unbind">
    giving them access to reports
    </a>,
</MadCap:conditionalText>
Figure 10. Unbinding Hyperlinks for Print Out — Text Editor View
Conclusion
To conclude, single-sourcing simply means: Write once, reuse many times! It gives you the ability to customize multiple documents from a single source and increases consistency across all documentation sets. In addition, single-sourcing saves your time—that is, there is just one source to update rather than multiple sources. One way to take advantage of single-sourcing is to use condition tags. Remember to think of condition tags as a filter to specify what content goes in the different targets. Both single-sourcing and condition tags will save you time and money in the end. Savings can also be substantial in the areas of layout work, desktop publishing, and quality assurance.
About the Author
Patti Short
Sr. Technical Writer
Independent Consultant
As an independent consultant, Patti has over 13 years of experience in all phases of information development with an emphasis in policy and procedures (SOPs), comprehensive online help systems, interactive e-Learning modules and training guides, user's guides, installation and configuration guides, system and implementation requirements, technical text books, knowledge bases, and white papers. Patti is also the co-author of Excel 2010 In Simple Steps (ISBN: 0 27 373613-2).
The majority of our content will come from users just like you. If you would like to become a contributing writer for a future MadNewz article, please email madnewz@madcapsoftware.com.


