


This guest post was written by Scott DeLoach, a certified Flare consultant and trainer. Scott has provided consulting and training for over 100 companies and government agencies around the world. He is the author of MadCap Flare: The Definitive Guide, HTML5 to the Point, and CSS to the Point, and he manages the MAD for Flare certification program. Scott holds a master’s degree in Technical and Scientific Communication from Miami University (Ohio), is a Certified Talent Development Professional (CTDP), and an STC Fellow. You can email Scott at scott@clickstart.net.
In this blog post, I will share advanced options and techniques for formatting a table of contents (TOC) for print targets. In a follow-up post, we will set up and design chapter title pages that contain a chapter-level TOC.
Design Goals
Our goal TOC design is below. It includes several advanced design elements.
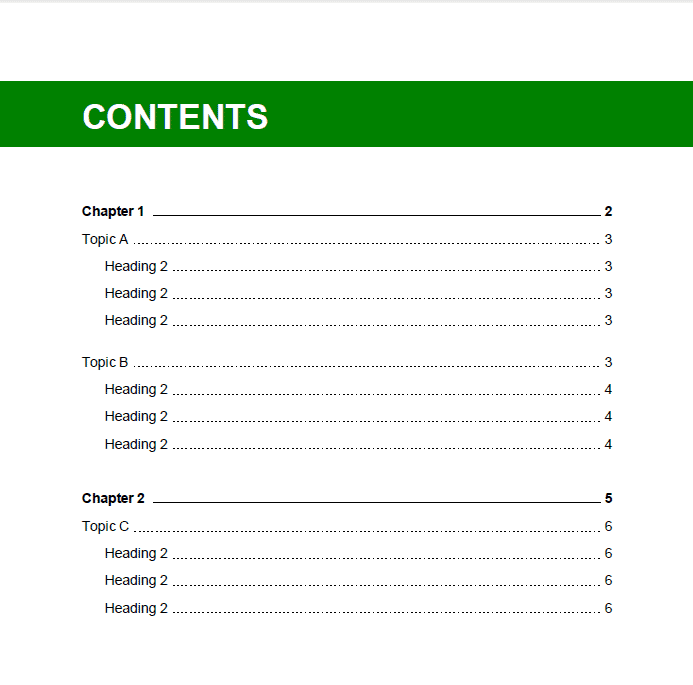
To set up and design this TOC, we will need to:
- Create a “TOC” topic
- Format the “CONTENTS” heading as uppercase but sentence case in the bookmarks pane
- Format the “CONTENTS” heading with a full bleed green background
- Include the “Contents” heading in the PDF bookmarks pane but not in the TOC itself
- Remove the default border above the TOC
- Format TOC levels 1 and 2
- Remove the leader from TOC level 1
- Exclude heading levels 4-6 from the TOC
Creating a “TOC” Topic
There are two options for including a TOC in a print target: using the “Generate TOC proxy” in a target or creating a topic that includes a TOC proxy. The Generate TOC proxy option is the easier option: you only need to enable the “Generate TOC proxy” option on the Advanced tab in your print target. However, you have less control over how the TOC and its heading is formatted. Since we want to format the TOC’s heading, we will need to create a TOC topic.
To Create a “TOC” Topic:
- Select File > New. The Add File dialog box appears.
- For File Type, select Topic.
- For Source, select the TopicForTOC template. The new topic will include a TOC proxy.
- Type a File Name and click OK.
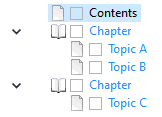
- Add the new TOC topic to your TOC file (TOC files are stored in the Project Organizer in the TOCs folder).
Formatting the “CONTENTS” Heading
Our TOC topic’s heading should be “CONTENTS” (all caps). However, we don’t want all h1s to be all caps, and we don’t want it to be all caps in the PDF bookmarks pane. We will need to create a style class for the “CONTENTS” h1 to use. If we set this style class to be all uppercase, the other h1s will not be all uppercase. And, if we use a style class to change the capitalization (rather than just typing it using all capital letters). It will not appear as all caps in the bookmarks pane.
To Create a Style Class for the “CONTENTS” Heading:
- Open the new TOC topic.
- For the h1’s text, type Contents.
- Open your stylesheet. If the stylesheet opens in the Simplified View, click View: Simplified.
- In the list of styles, highlight h1.
- In the Stylesheet Editor toolbar, click Add Selector. The New Selector dialog box appears.
- The HTML Element should be set to h1. If not, select h1.
- For Class Name, type TOC.
- Click OK.
To Format the “CONTENTS” Heading:
- Open the stylesheet.
- In the list of styles, select h1.TOC.
- To make the heading all uppercase, set the text transform property to uppercase.
- Format the “CONTENTS” heading with a full bleed green background
Adding a Full-width Background Behind the “CONTENTS” Heading
Our “CONTENTS” heading had a green background that spans the full width of the page. We would like to use the same design for multiple page layouts, so we don’t want to add a green frame to every page layout. Instead, we will add a div to our TOC topic and format it to span the full width of the page and appear underneath the TOC page’s heading.
To Format a Full-width Background Div:
- Open the stylesheet.
- In the list of styles, select div.
- In the Stylesheet Editor toolbar, click Add Selector. The New Selector dialog box appears.
- The HTML Element should be set to div. If not, select div.
- For Class Name, type TOC.
- Click OK.
- Select the new div.TOC class.
- Set the style properties as follows:
- background-color: green
- height: 5rem
- left: -2in
- margin-top: 2rem
- position: absolute
- width: 10in
- z-index: -1
To Add the Div Behind the “CONTENTS” Heading:
- Right-click the TOC topic and select Open With > Internal Text Editor.
- Add a blank line after the “CONTENTS” heading.
- Paste the following:
<div class="TOC"> </div>Note: You can also create a div in Flare by selecting Home > Group.
Including the “Contents” Heading in the Bookmarks Pane But Not in the TOC
All headings are included in the TOC by default. For example, all h1s will be included in the TOC and will use the “TOC1” style class. Our goal is to include the “CONTENTS” heading in the Acrobat’s bookmarks pane (as “Contents”), but not in the TOC. First, we will set the TOC style class to use its own TOC level style. We’ll use level 9, since it’s not being used. Then, we will format the TOC9 style class to be very small and transparent and to not have a leader. Technically, it will still be in the TOC, which means it will be included in the bookmarks pane. However, it will be very small (and transparent), so the user will not see it.
To Include the “Contents” Heading in the PDF Bookmarks Pane But Not in the TOC:
- Open the stylesheet.
- In the list of styles, select h1.TOC.
- Set the mc-heading-level property to 9.
- In the list of styles, select p.TOC9.
- Set the style properties as follows:
- color: transparent
- font-size: 1pt
- mc-pagenum-display: none
Removing the Default Border Above the TOC
The TOC proxy is formatted using the MadCap|TOCProxy style. By default, it includes a solid black 1px top border. Our design doesn’t include a border, so we need to remove it.
To Remove the TOC’s Default Top Border:
- Open the stylesheet.
- In the list of styles, select MadCap|TOCProxy.
- Since our TOC proxy will only be used in print targets, set the Medium to print. Setting the medium will organize our print-specific formatting together in the stylesheet.
- Set the border-top-style property to none.
Formatting TOC Levels 1 and 2
Our design removes the default indentation (left margin) for TOC items and
To Format TOC Levels 1 and 2:
- Open the stylesheet.
- In the list of styles, select p.TOC1.
- Set the style properties as follows:
- font-weight: bold
- margin-top: 3rem
- margin-bottom: -1rem
- margin-left: 0
- mc-leader-format: underline
- page-break-after: avoid
- In the list of styles, select p.TOC2.
- Set the style properties as follows:
- margin-top: 2rem
- margin-left: 0
- page-break-after: avoid
Changing the TOC Level 1 Leader
By default, the “TOC” styles (TOC1 through TOC9) include a dotted leader between each TOC item and its page number. Our design uses a solid leader for level 1 rather than a dotted line.
To Change the Leader for TOC Level 1:
- Open the stylesheet.
- In the list of styles, select p.TOC1.
- Set the mc-leader-format property to underline. If you want to remove the leader, you can set it to none.
Excluding heading levels 4-6 from the TOC
We plan to use multiple heading levels in our topics, but our design only includes three TOC levels. We need to set h4, h5, and h6 to not be included in the TOC.
To Exclude h4-h6 From the TOC:
- Open the stylesheet.
- Since the TOC setting only applies to print targets set the Medium to print. Setting the medium will organize our print-specific formatting together in the stylesheet.
- In the list of styles, select h4.
- Set the mc-heading-level property to 0.
- Select h5 and h6 and set the mc-heading-level property to 0.
Sample Project
You can download a sample project at https://bit.ly/MadBlogFormatTOC.


