


This guest blog post was written by Homer Christensen, an Information Architect, MadSkills consultant, and an award-winning tech writer and UX designer. He consults with companies large and small to architect and design new content sites and evaluate, re-structure, and refine existing content systems. He’s especially enamored of how snariables are both simple and powerful. His clients include Rivian, Nestlè, and Microsoft.
If you localize or translate content among audiences and use metric or imperial measurements, you’ll find this snariable invaluable. Snariables, by the way, are snippets that use variables to customize the content.
This process allows you to add a snippet, set four variable values, and when published, show the measurements in the units set by your target’s condition tags. The measurements could be imperial values only, metric values only, imperial with metric in parentheses, or metric with imperial in parentheses.
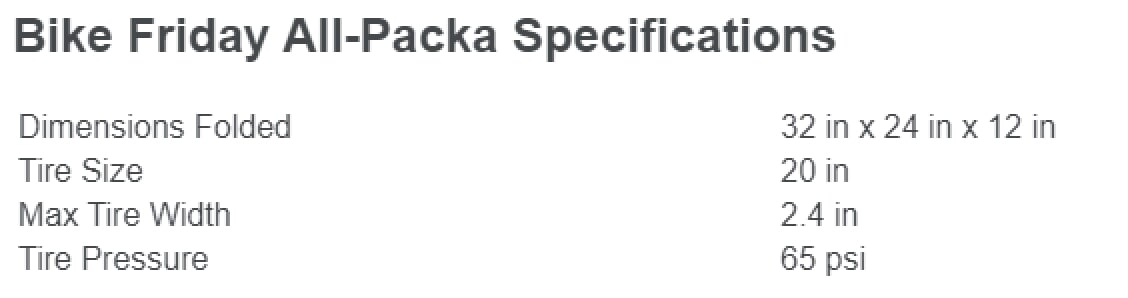
For example, here’s a sample of a specification list for a folding bicycle for an American audience:
For an international audience, the target’s conditions are set to include metric measurements:

Reasons to Use the Measurement Snariable
The measurement snariable is a suite of three snippets that use a common variable and condition set.
- measurement.flsnp handles the majority of use cases (and is used in the examples below).
- measurement-temperature.flsnp is used for temperature measurements. There is no space between the degree symbol (°) and the value, but there is one before the unit. This snippet adds the special character for the degree symbol, so the writer doesn’t need to.
- measurement-single.flsnp is used with single entries, such as one that lists only the units.
For example: Temperature is measured in degrees Fahrenheit (Celsius).
Why you’ll want to use this snariable:
Ease of use. No need to add and condition each variation of the measurement whenever you add a set of measurement values. Simply add a snippet and set four variables.
Consistency. You can set the units in the variable list as dropdowns, so writers see and choose km, for instance, instead of needing to check usage to see if it should be KM, kilometers, or Kilometers.
Accuracy. If values change, you can change the variable rather than make the change three or four places.
Formatting is handled by the snariable. The snippet already includes a non-breaking space between the value and the unit whenever it appears. If you rename condition tags or reformat the way the measurements are shown, do so in the snippet and the content updates wherever the snariable is used.
Ease of reading in the text editor view. Rather than a bunch of conditioned statements in the text editor view, you can quickly parse the variables entered.
Steps to Create the Snariable
The snippets use a condition tag set and a variable definition file. We’ll create those first. If you already have a condition tag defined, simply modify the condition names used in the sample snippet files (see the link at the end of this post). In addition, we’ll create a test file to check our work.
Add a Condition Tag Set
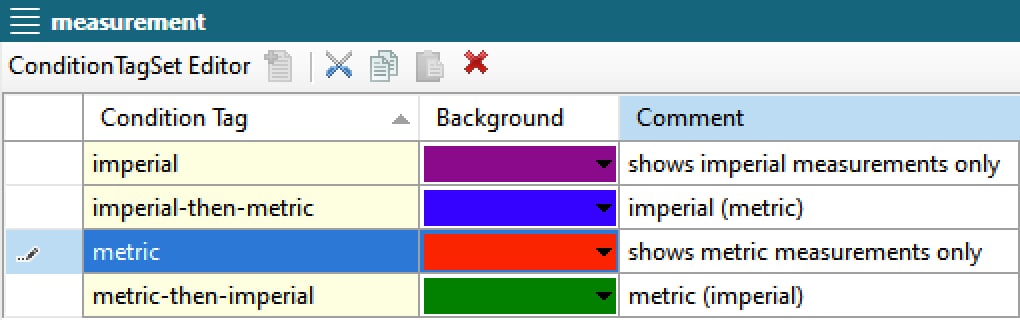
Create a condition tag set (measurement) with four values:
Add Variable Definition File (including drop-down lists)
We will create four variable definitions. However, the unit variables will have multiple variable definitions to create the drop-down list of approved units.
NOTE: Your list should contain the ones that you’ve set in your style guide.
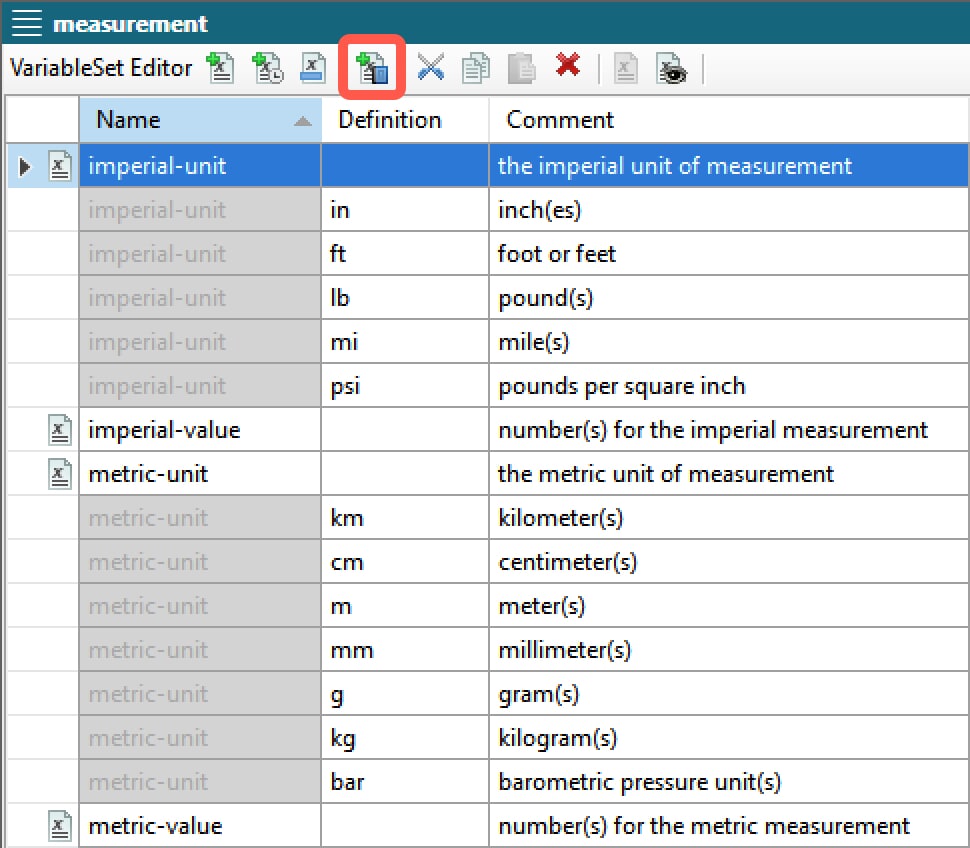
To create a variable definition drop-down list, first create a variable row, add the value for the Name field and leave the Definition blank. With the variable row selected, click the Add Variable Definition button (highlighted above) and add the Definition and Comment field text.
Once you have the condition tag and variable sets defined, you can create the snippet.
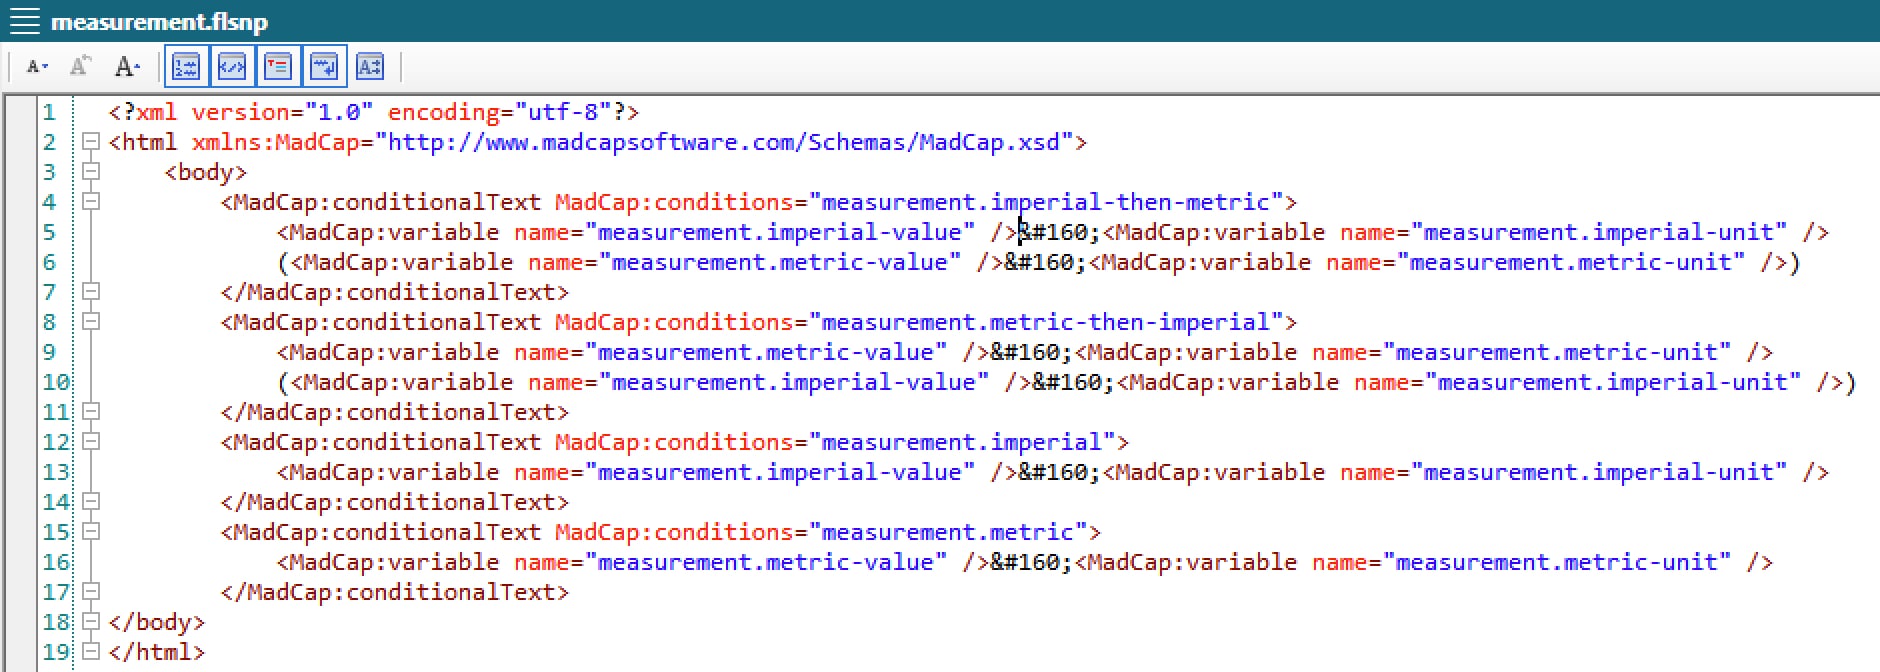
Add the Snippet
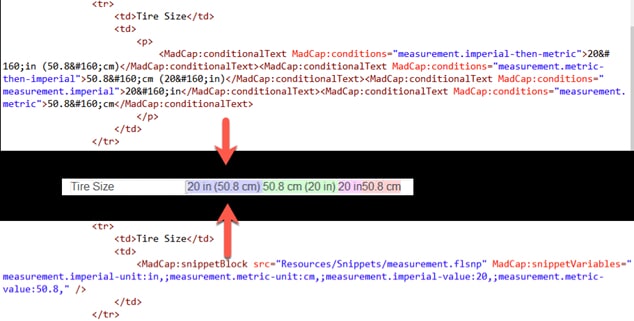
Below is the snippet I use the great majority of time. Notice that it does not have a paragraph tag that encloses the snippet. This way, it can be used inline within text. Likewise, it doesn’t have a space before or after it. This allows you to use it in a table or at the end of a sentence. You’ll add spaces and punctuation in context.
The snippet has line breaks within the XHTML for readability, but they do not appear in the published output.
Create a Test File
Once you’ve created the condition tag and variable definition files as well as the snippet, you’re ready to use it. It’s a good practice to create a test file where you can see how it performs within your content. Here’s a sample:
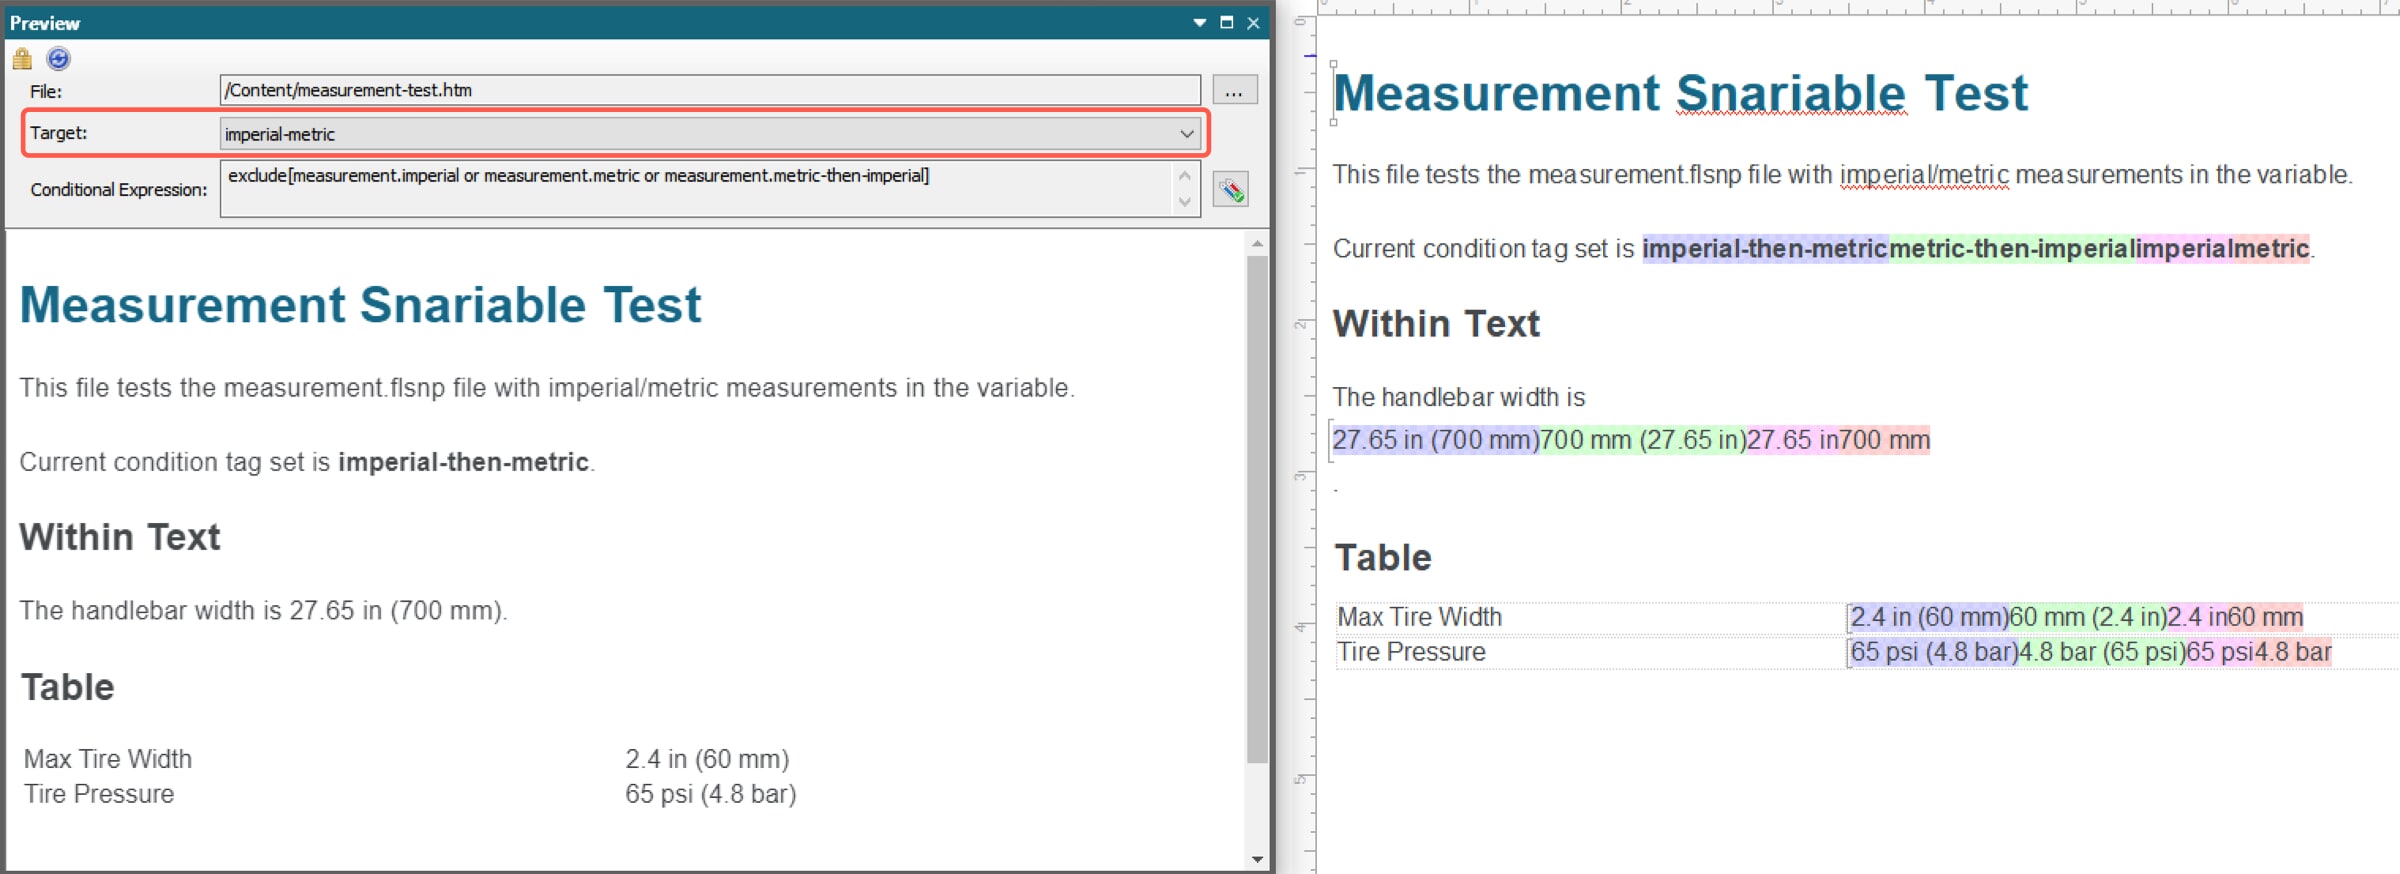
NOTE: You’ll need targets that use the measurement condition tags in order to test. You can use the Target dropdown in the Preview window to select the different targets to see the values change based on their condition tags. If you include the “Current condition tag set is:” text with the condition tag names conditioned for their respective tag, you can view the target’s applied condition.
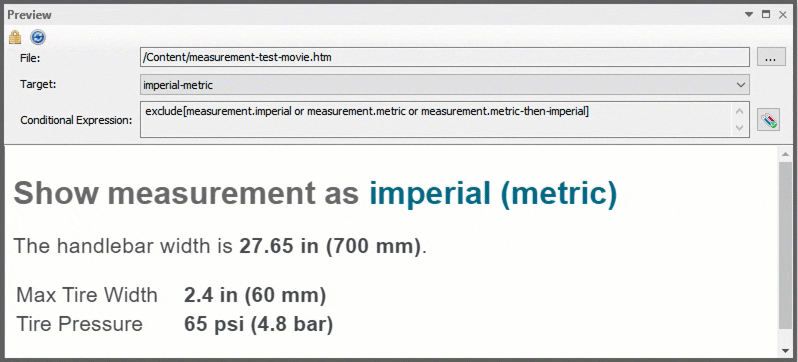
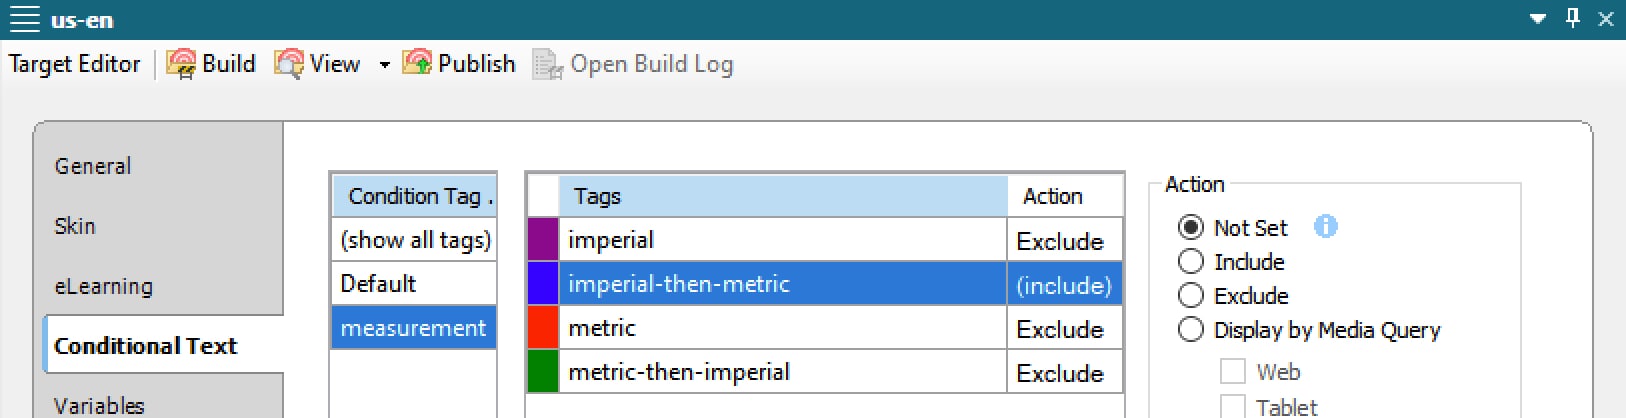
Here’s an example of a target’s condition tags set to imperial-then-metric:
Use the Snariable
To use the snariable, you simply insert the snippet where you want it and then add the variables.
After you insert the snippet, right-click it and select Snippet Variables..., and then enter the measurement variable definitions for the units and values.
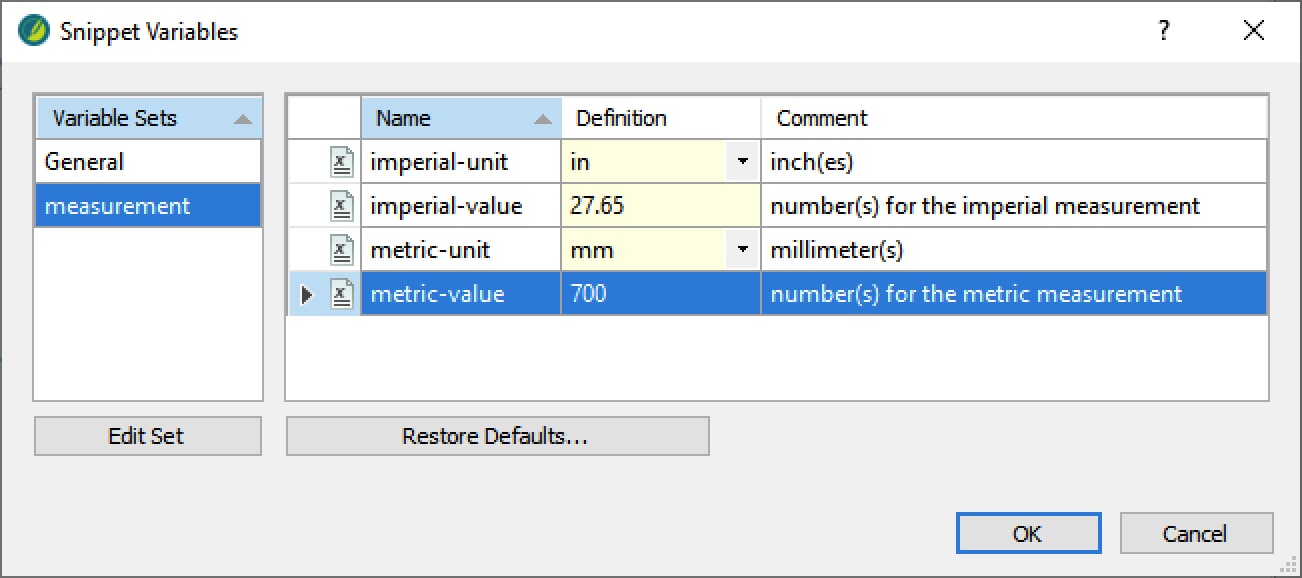
NOTE: Although the unit drop-downs contain the approved values, you can type any value in the Definition field. It won’t be saved in the drop-down list, but it will appear in the current snippet where it was added. It is useful, for example, when you need to spell out an abbreviation in the single snippet (miles instead of mi).
That’s it.
The files needed for this snariable are included in the link below. You’ll find the three snippets as well as the condition tag set and the variable set.
If you already have a condition set for distinguishing between metric and imperial, you may need to revise the snippet references to the condition names.
You’ll also need to have targets set up with the condition tags to test or use the snariable. Any target that uses shared files that uses the snariable will need to have those measurement conditions set.
I’ll include the test file I use that includes the snariable samples. Use that file to practice adding snariables and then preview it to see them in action.