


This guest blog post was written by Rona Kwestel, the head of technical communication at Axoni. She transitioned from software development to technical writing almost 20 years ago and hasn’t looked back since. Flare has been her tool of choice since first testing it out in the late aughts, and she especially likes to play with the interactive features that enhance the user experience.
Challenge
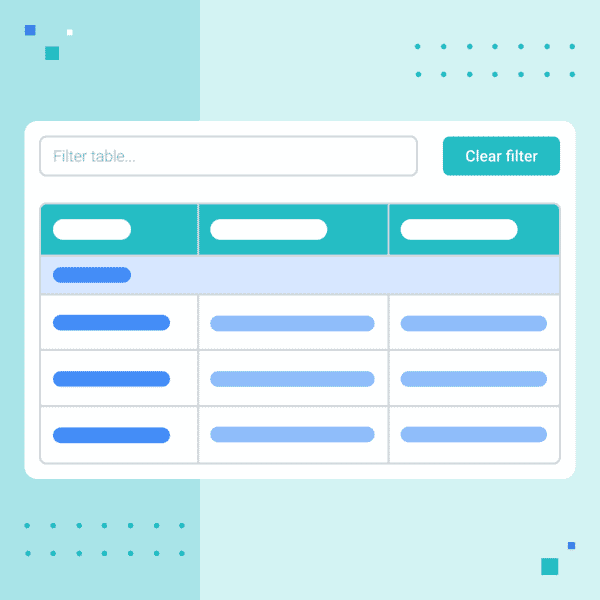
When using an HTML table to represent a large, complex, or unwieldy data set, it can be difficult for the reader to find the data of interest to them, especially when there is more than one way to think about the order and categorization of subsets of that data. To make it easier, it would be nice to have a simple filter mechanism to display only the data that matches a search string entered by the reader.
Demonstration
To demonstrate the filtering feature, I created a table of recipes grouped by course, such as Main Dish, and sub-grouped by type, such as Stews. Each row includes the recipe title linked to an actual recipe on the web, a short description, and a rough list of ingredients.
Whenever you try to categorize something, it invariably can fall into more than one category, depending on your organizational scheme. For example, Turkey Chili could be included under Poultry or Stews. When you consult a cookbook, the best way to find what you’re looking for is through the index, which can list recipes by single ingredient (yogurt), type of dishes (dips), or region (Persian), regardless of how the book is organized. In a tabular list of recipes, this indexing can be approximated by searching on any term that might show up in the table, with the understanding that it’s important for the data itself to include likely search terms. See how it works below.
Solution
A basic solution to this problem is readily available in the W3Schools How To site, and indeed, that was the starting point for the solution developed here to handle a slightly more complicated table as well as to handle searching all of the columns rather than just a specific one. The solution involves the following elements:
- the HTML defining the search box, the button, the table, and the TOC that indexes into the table
- the CSS used to style the HTML components
- the JavaScript needed to respond to user input - typing into the search box or clicking the button
- a Filtered Table Snippet to make it easy to create one of these filterable tables
One caveat of this solution is that it assumes a single filtered table per topic, though it seems reasonable to expect that a topic would ideally not contain more than one substantial table of data requiring filtering.
HTML
The key components of the HTML are the filter text box, a button to clear the filter, and the table itself. To make the table more navigable, a TOC is included above it and the table's category rows link back to an anchor tag above the TOC.
Navigation
The top of the HTML file includes a TOC made up of a borderless table of lists that link to the categories in the data table, and an anchor named top above it to enable the user to quickly jump back to the TOC.
<h1><a name="top"></a>Rona's Recipe Repository</h1>
<table class="noborder-fullwidth">
  <tbody>
    <tr>
      <td>
        <ul>
          <li><a href="#starters">Starters</a>
            <ul>
              <li><a href="#dips">Dips</a></li>
              <li><a href="#soups">Soups</a></li>
              <li><a href="#salads">Salads</a></li>
            </ul>
          </li>
        </ul>
      </td>
      ...
   </tbody>
</table>
Input Textbox and Clear Filter Button
In order to search on the table, the HTML needs an input textbox above the table, and it's also nice to provide a Clear filter button next to the search box to make it easy to restore the full table with a button click rather than having to manually clear the text in the search box. Both the input and button elements have an id so they can be targeted in t he CSS and JavaScript, and each specifies an event-driven function to define its behavior.
<input type="text" id="table-filter-input" onkeyup="tableFilter()" placeholder="Filter table..." />
<button id="table-filter-button" onclick="clearFilterInput()">Clear filter</button>
Table
In order to operate on the table, it is given an id, filtered-table, by which it can be targeted in the JavaScript. Further, the subheading rows are classed with subhead1 and subhead2, not only so they can be styled accordingly via the CSS, but so the JavaScript can retain those rows in the filtered table even if they don't match the search string. That way, the reader can see which category a row belonged to and which categories had no matching rows.
<table class="basic" id="filtered-table">
  <thead>
    <tr>
      <th>Name</th>
      <th>Description</th>
      <th>Ingredients</th>
    </tr>
  </thead>
  <tbody>
    <tr class="subhead1">
      <td colspan="3"><a name="starters"></a>Starters<a href="#top" class="back-to-top">top</a></td>
    </tr>
    <tr class="subhead2">
      <td colspan="3"><a name="dips"></a>Dips<a href="#top" class="back-to-top">top</a></td>
    </tr>
    <tr>
      <td><a href="https://cookieandkate.com/best-hummus-recipe/" target="_blank">Hummus</a></td>
      <td>Easy, creamy, and no plastic tub.</td>
      <td>chickpeas, baking soda, lemon juice, garlic, sea salt, tahini, ice water, cumin, EVOO, sumac, parsley</td>
    </tr>
    ...
  </tbody>
</table>
A few other things to point out here:
- The colspan attribute is set on the subheading cells so the category rows are only a single cell. This visually indicates that the row is a subheading and also allows the top link to float all the way to the right.
- To make it convenient to jump to a given category of recipes, each subheading cell has a named anchor tag so that the corresponding category in the TOC above the table can link to that row in the table.
- To make it easy to jump back up to the TOC above the table, each subheading cell has an anchor tag that links back to the anchor named #top inserted at the top of the page. The back-to-top class enables styling the link so that it aligns to the right of the cell.
CSS
The CSS used to style the table-filter-input textbox, the table-filter-button button, the subhead1 and subhead2 rows in the data table, and the back-to-top links is as shown below.
#table-filter-input {
     width: 50%;
     border-radius: 3px;
     font-size: 1em;
     padding: 12px 20px;
     border: 1px solid #ddd;
     margin: 18px;
}

#table-filter-button {
     border-radius: 3px;
     font-size: 1em;
     color: #00abf0;
     background-color: white;
     padding: 5px;
     border: 1px solid #ddd;
}

#table-filter-button:hover {
     cursor: pointer;
     color: white;
     background-color: #00abf0;
}

table > tbody > tr.subhead1,
table > tbody > tr.subhead2 {
     font-weight: bold;
}

table > tbody > tr.subhead1 {
     background-color: #52c9ff;
}

table > tbody > tr.subhead2 {
     background-color: #e1f6ff;
}

a.back-to-top {
     float: right;
}
JavaScript
The JavaScript is defined in a table-filter.js file in the Content/Resources/Scripts folder and referenced in the relevant template page in the Content/Resources/TemplatePages folder as follows:
<script type="text/javascript" src="../Scripts/table-filter.js"></script> The script defines the tableFilter function specified for the onkeyup attribute of the table-filter-input element, and the clearFilterInput function specified for the onclick attribute of the table-filter-button element.
/* Table Filter

   These functions allow a user to filter a table on any data in the non-sub-header
   rows of the tbody section of the table by simply typing into an input box, and
   to clear the filter with the click of a button to restore all rows of the table.

   The code assumes that subheader rows within the tbody section of the table are
   classed with either "subhead" or "subsubhead". Those rows are left alone so that
   users can see the context for the rows that match the filter. The row(s) in the
   thead of the table are also left alone so any header rows always appear.


   The following HTML should be added just above the table:

    <input type="text" id="table-filter-input" onkeyup="tableFilter()" placeholder="Filter table..." />

   <button id="table-filter-button" onclick="clearFilterInput()">Clear filter</button>


   The CSS should target the following ids to style the input box, the button, and
   the button in the hover state, respectively:

      #table-filter-input
      #table-filter-button
      #table-filter-button:hover
*/

function tableFilter() {
  var input, filter, table, tbody, tr, i, td, j, txtValue;
  input = document.getElementById("table-filter-input");
  filter = input.value.toUpperCase();
  table = document.getElementById("filtered-table");
  tbody = table.getElementsByTagName("tbody")[0];
  tr = tbody.getElementsByTagName("tr");

  // Loop through all table rows, then through all row cells,
  // and hide the rows where none of the cells match the filter
  for (i = 0; i < tr.length; i++) {
    if (!(tr[i].classList.contains("subhead1") ||
          tr[i].classList.contains("subhead2"))) {
      tr[i].style.display = "none";
      td = tr[i].getElementsByTagName("td");
      for (j = 0; j < td.length; j++) {
        if (td[j]) {
          txtValue = td[j].textContent || td[j].innerText;
          if (txtValue.toUpperCase().indexOf(filter) > -1) {
            tr[i].style.display = "";
          }
        }
      }
    }
  }
}

function clearFilterInput() {
  var input = document.getElementById("table-filter-input");
  input.value = "";
  tableFilter(); // force the table to reset since there is no keyup action here
}
Filtered Table Snippet
The FilteredTable “template” snippet in the Content/Resources/Snippets folder provides the basic structure needed for a filtered table. When inserted into a topic and converted to text, all you need to do is adjust the number of columns as applicable to your table and replace the instructional rows with your actual data, including any additional subheading rows, which can be copied from the existing ones in the table.
Of course, use of the snippet assumes that the corresponding CSS and JavaScript are already in place, and that the topic to which it’s added uses the template page that includes the JavaScript.
<?xml version="1.0" encoding="utf-8"?>
<html xmlns:MadCap="http://www.madcapsoftware.com/Schemas/MadCap.xsd">
  <body>
    <input type="text" id="table-filter-input" onkeyup="tableFilter()" placeholder="Filter table..." />
    <button id="table-filter-button" onclick="clearFilterInput()">Clear filter</button>
    <table class="basic" id="filtered-table">
      <thead>
        <tr>
          <th>Column 1</th>
          <th>Column 2</th>
          <th>Column 3</th>
        </tr>
      </thead>
      <tbody>
        <tr class="subhead1">
          <td colspan="3">Subheading<a href="#top" class="back-to-top">top</a></td>
        </tr>
        <tr class="subhead2">
          <td colspan="3">Sub-subheading<a href="#top" class="back-to-top">top</a></td>
        </tr>
        <tr>
          <td>Add <code><a name="top"></a></code> just after the <code><h1></code> tag of the page heading to enable the "top" link to work.</td>
          <td>For example: <code><h1><a name="top"></a>Topic Heading</h1></code></td>
          <td>Add more <code><tr class="subhead1"></code> and/or <code><tr class="subhead2"></code> rows as needed to subcategorize the table rows.</td>
        </tr>
        <tr>
          <td>Note that the filter text box doesn't display cleanly in the XML Editor, but looks fine when the output is built.</td>
          <td>Bookmarks can be added to the front of the subheading rows to facilitate a TOC at the top of the page with links to the headings within the table.</td>
          <td>An additional class such as <code>code_1_3</code> can be added to the table after the <code>basic</code> class to format specific columns (in this case, columns <code>1</code> and <code>3</code>) as <code>code</code>, though this may require adding a new class that matches your table's needs to <a href="../Stylesheets/CustomStyles.css">CustomStyles.css</a>.</td>
        </tr>
      </tbody>
    </table>
  </body>
</html>
Download the Flare project and try it for yourself.