
Since adding the ability to create HTML5 Top Navigation outputs to MadCap Flare, we’ve seen our customers create amazing online help sites with Flare. Just take a look at our Customer Showcase and you’ll see dozens of companies with stunning documentation portals, help centers, product manuals, knowledge bases, and more. If you’ve ever browsed the Showcase and wondered, “How can I create a modern-looking online Help or support site?”, there's a solution for you.
Along with the release of MadCap Flare 2017 r3, we've also created new Top Navigation project templates that provide an easy starting point for users. View the templates in action here.
These templates are free to download and use for your MadCap Flare projects. Note: the templates are supported in Flare 2017 r2 and above.
How to Easily Customize the New Templates
The new project templates provide an easy way to create a fully responsive Top Navigation site, without the need for additional CSS or design resources. They can be quickly implemented into a MadCap Flare project, and are designed to be easily branded with your own company logo, colors, company information, and so on.
Here are a couple of customization tips that will help you make the most of the project templates:
1. Changing Logos
Logos can be changed in every template. Resize your logo to proper dimensions before selecting it in Flare. The dimensions of the placeholder logo are 229 x 55 pixels.
Changing the Logo in the Top Navigation Skin
- Open the HTML5 - Top Navigation Skin, which can be found through the following path: Project Organizer > Skins > HTML5 - Top Navigation Skin.
- Open the Styles tab.
- Go to: Header section > Logo > Background > Image.
- Select the button to browse and open the image that will be used as the logo.
- Save the file.
Changing the Logo in the Home Master Page
- Open HomePage, with the following path: Content Explorer > Content folder > Resources folder > MasterPages folder > HomePage.flmsp.
- Right-click the placeholder logo and select Image Properties.
- In the Image Properties window, select the browse button to browse and open the image that will be used as the logo.
- Save the file.
Note: Changing the logo in the home master page is supported in all templates except the Torrey Template.
2. Changing Template Colors
Template colors can be easily modified on all templates to match the look and feel of your own brand or organization.To update the colors in a template, they need to be updated in multiple files. Before starting, determine the hex values for your starting and ending colors. Then, use Find and Replace in Files to replace the current colors.
- Open Find and Replace in Files, which can be found by going to Home Ribbon > Find and Replace in Files.
- In the Find field enter one of the colors to be changed. The following are the main colors used for the templates:
Torrey Template:
#AD00AD is the primary color. (First gradient background color, top navigation menu background colors, menu proxy border, etc.)
#F59405 is the secondary color (Second gradient background color, hover over link color on tile titles, drop-down text color, etc.)
Soledad Template:
#19b9f3 is the primary color. (Tile titles, highlighted text color, etc.)
#004863 is the footer gradient color on the home page.
Ivanhoe Template:
#ECECEC is the background-color on the home page and other topics pages.
#4F7476 is the primary color (first tile on the home page, top navigation bar, menu proxy, etc.)
#5C6783 is the color for second tile header on the home page.
#7E869A is the color for third tile header on the home page.
#669A69 is the color for fourth tile header on the home page.
Balboa Template:
#7469b9 is the primary color.
#7469b9 is the secondary color.
- In the Replace with field enter the hex code of the new color.
- Make sure the following options are set:
File Types is set to All Files
Find in source code is enabled
Search type is set to Regular Text
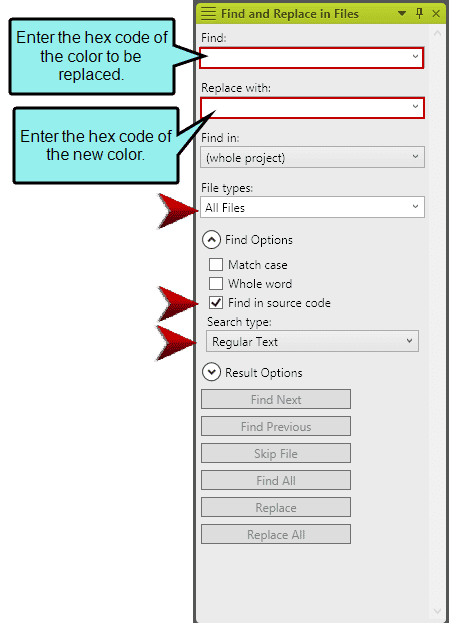
- Select Replace All.
- Build Target and View changes.
Note: A message will appear that will notify you that this could result invalid XML. Ignore this if you are working solely in the template project. If you have imported other files into the template project those files will be affected.
3. Changing Hero Images
The hero image is the banner image that spans across the screen of the home page. There are two templates that use hero images: the Balboa and the Soledad template. Hero images in these templates are changed in StylesForHomePage.css.
To change a hero image, do the following:
- Open StyleForHomePage.css. This can be done through the following path: Content Explorer > Resources Folder > Stylesheets Folder > StylesForHomePage.css
- If you're in the Simplified view of the Stylesheet Editor, switch to the Advanced view. To switch to the Advanced view, select the button in the local toolbar of the Stylesheet Editor.
- In the Advanced view, set the style filter to Paragraph Styles.
- Find and expand the div group.
- To change the first hero image on the home page, select topic-hero and change the background-image to your own.
- To change the second hero image on the home page, select info-container and change the background-image to your own.
Note: The size of the images included in this template project are 1200 x 800 pixels. Since this template includes white font color overlay on the hero images, a darker image will look best.
4. Changing Contact Information and Social Media URLs
Want your users to be able to reach out with questions or comments? Contact information and social media URLs can be easily changed in all templates, in the General variable set.
- Open the General variable set. This can be done through the following path: Project Organizer > Variables Folder > General
- In the Variable Set, edit definitions to replace with your own contact information and social media URLs.
- Save the variable set.
5. Using Templates in a Pre-existing Flare Project
In order to use this template, files need to be imported into your already existing Flare project. Before starting, make sure you create a backup of your existing Flare project, which can be done by selecting Project Ribbon > Zip Project.
Importing the Template Project
- Open the existing Flare project.
- Go to Project Ribbon > Import > Flare Project.
- Select the button to browse and open the template project.
- Select Next.
- In the Include Files field, copy and paste one of the two options:
To include the image library included with the template (extra social media images, arrows, icons, etc.):
*.png;*.jpg;*.flmsp;*.css;*.fltar;*.flvar;*.flskn
OR
To only include the files that are necessary to display the template layout as is:
*.jpg;*.flmsp;*.css;*.fltar;*.flvar;*.flskn - Enable Auto-include linked files.
- Select Finish.
- The Accept Imported Documents window will appear. Review the files that will be imported into your Flare project. If there are file names that are the same in your existing project, you’ll want to rename files from within Flare in order to maintain links between files.
- Select Accept.
- Build and View the imported HTML5 - Top Navigation target.
Note: After importing the template project, imported files will have an icon overlay. This means that a link is maintained with the imported project. If you do not want to keep the link and want to remove the icon overlay, delete the import file. To do this, use the Project Organizer and go to the Imports folder, then delete the Balboa file.
Upcoming Webinar: Get a Live Look at the Templates
Want to see the templates in action? I hosted a webinar on November 16th, showing how to integrate the new responsive project templates into your Flare projects. In addition, I also provided some customization tips (such as the ones above) that you can apply to make the most of the templates.
Have you tried these templates for yourself? Got any questions or tips on how to customize the templates? Leave a comment below!