

One of the most wonderful things about my job is talking with MadCap Software customers! I get to learn about all the creative ways they are putting MadCap Flare to use, the problems the software solves, and the innovative ways content is presented so end users can find what they need quickly and easily.
In fact, if you view our Customer Showcase page, you can see a small sampling of amazing sites authored and published from Flare. One of the formats in Flare that gives these sites their panache is HTML5 Top Navigation. As you can see from the examples, there is a lot of opportunity for creativity.
A Top Navigation skin is a file that contains information about the appearance of an online output window, so that you can customize the following features, including:
- Logo used in the header for branding
- Size of the header area where the logo is placed
- Look and feel of the TOC
- Appearance and size of the search bar
- Search results page
- And more
For this post, I am going to focus on sharing a tip on how you can customize the search results page.
In addition to the Top Navigation skin, there are also several smaller skin component files that can be used to control the look, feel and behavior of some of the features above.
One example of this is a file called the HTML5 Search Results skin component.
Why Bother with the Search Results Skin Component?
When you look at the styling options in this skin component, you will notice that they are the same as those used in the Top Navigation skin. So why bother?
One reason is that you may want custom content to appear every time a user performs a search, such as tips to make the most of the search functionality. For example, maybe you have incorporated search filters with your site, and you want to remind visitors to use them to help refine search results. Maybe you want to encourage users to try using quotations with terms to focus on results.
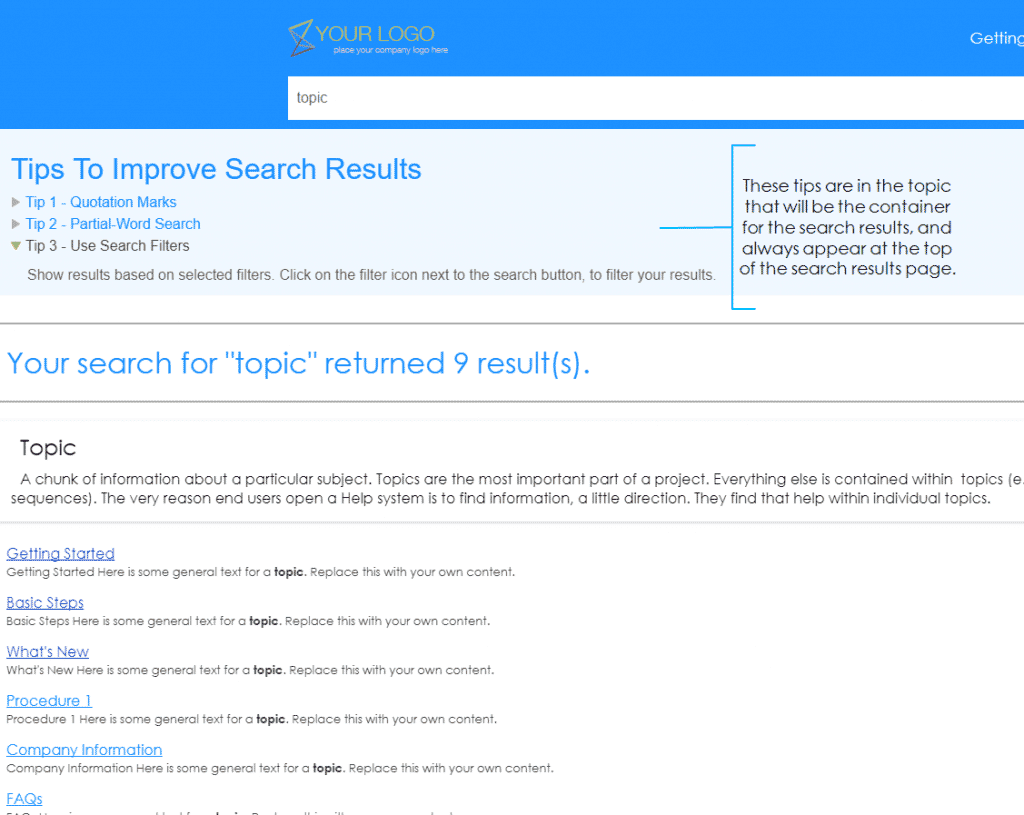
You can use the Search Results component skin in conjunction with a proxy to design a custom container to display search results in a topic file. When it all comes together, the proxy is replaced with your generated search results, and your custom content is also displayed. The search results may look like this:
Ingredients
To achieve something like this, you will need the following ingredients:
- One topic that will hold the search results
- One Search Results skin component
- Lots of creativity (to taste)
Before we start mixing everything together, let’s talk a little more about the ingredients.
The Topic
Use the topic as the container for the custom content. In the example above, three search tips with a drop down text effect appear at the top of the page, every time a user performs a search. You could also design a master page that has custom footer information to match your corporate website. Always remember to have a dash of creativity on hand when designing the container topic.
The Search Results Skin Component
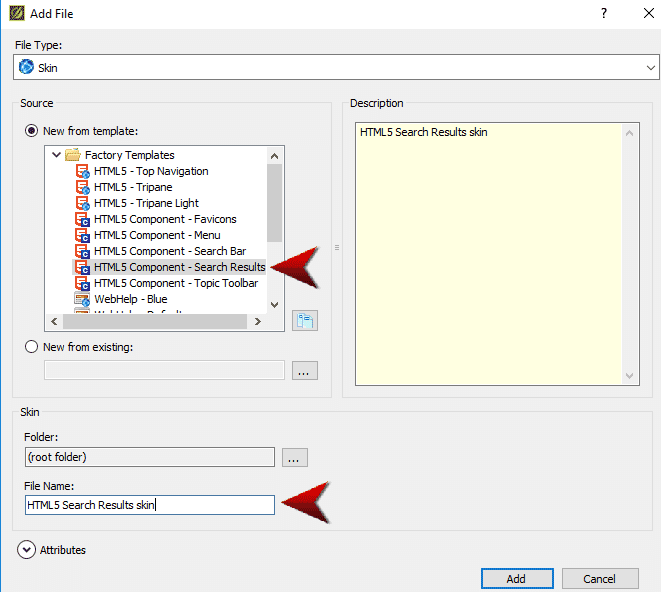
If you don’t have a Search Results skin component in your project, it’s really easy to add one.
Go to the Project Organizer, right-click the Skin folder, and choose Add Skin. In the New from Template section, select the HTML5 Component – Search Results skin, and give it a name:
Once you add the skin, it will open in the Search Results Skin Editor where you can start fine tuning the look and feel of the search result styles. Maybe you want the search result link, abstract and path to be a certain color or font. If you are including a glossary in your output, maybe you want to style the box that displays your glossary terms if that term is a search result.
Tip: There are a ton of design options to play with in the Skin Editor. To focus in on the area you want to customize, try using the Highlight button in the toolbar to quickly find the style you need to change:

This is another area where you get to add a healthy dash of creativity.
Putting the Ingredients Together
- Open the container topic with the custom content, which will also hold the search results.
- Place your cursor where you want the search results to be shown in the output.
- Select Insert > Proxy > Insert Search Results Proxy. The Search Results Proxy dialog opens.
- Use the Skin File field to select the Search Results skin component to associate with this proxy:
- Click OK.
Now that the proxy is added to the topic, the topic may look like this:
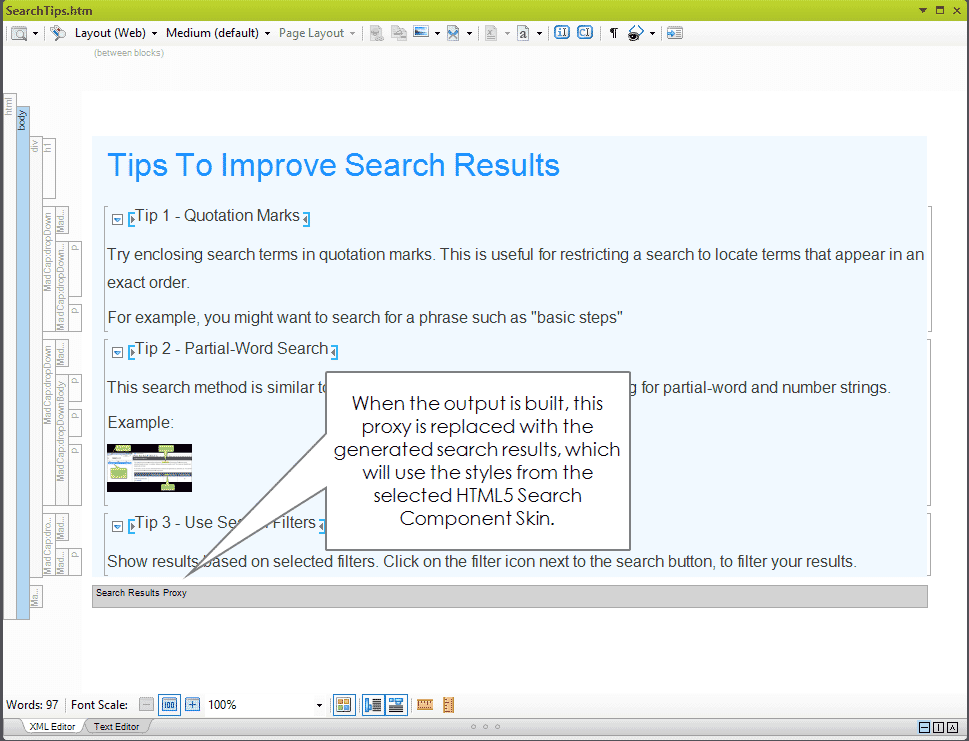
Tip: If you don’t see the gray box that represents the proxy, check the editor to see if the option to “Show Markers” is enabled. On the local toolbar of the XML Editor, click the down arrow of the Show tags button and select Show Markers:

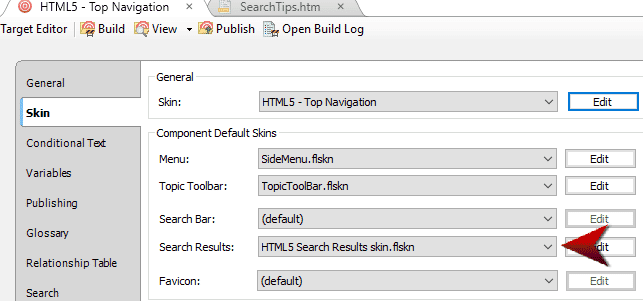
6. In the target, select the HTML5 Search Results skin component:
After you adjust the other settings in your target, do a build to see how it looks and test it. Don’t forget to keep adding creativity to taste! You may need to turn a few knobs in the Skin Component Editor or in your container topic to get the final look you want.
Have you used this or a similar approach to help your users get the most out of your documentation? We would love to hear your creative ideas!