

A major benefit of MadCap Flare is that it lets you take control of the look and feel of your outputs, creating and maintaining consistency through all your help files. But what do you do when you need to use custom fonts (such as Google Fonts) in your Flare outputs? Maybe your company requires you to use a custom font in MadCap Flare to match with the overall brand? Here’s a quick, easy guide on how to use custom fonts in your Flare outputs.
PDF Output
In order for custom fonts to work in PDF output, they must be installed on the computer building the output.
- Install the font.
- In Flare, select your new font in your stylesheet.
- Build the PDF.
When viewing the PDF from any computer you will be able to see the custom Font.
HTML5 Output
If someone is viewing your HTML5 output and they do not have the font installed on their computer, they will not see your custom font. In order for end users to see the font, you must include the font file within your output. Here’s how to add custom Fonts to your output.
- Download the custom font.
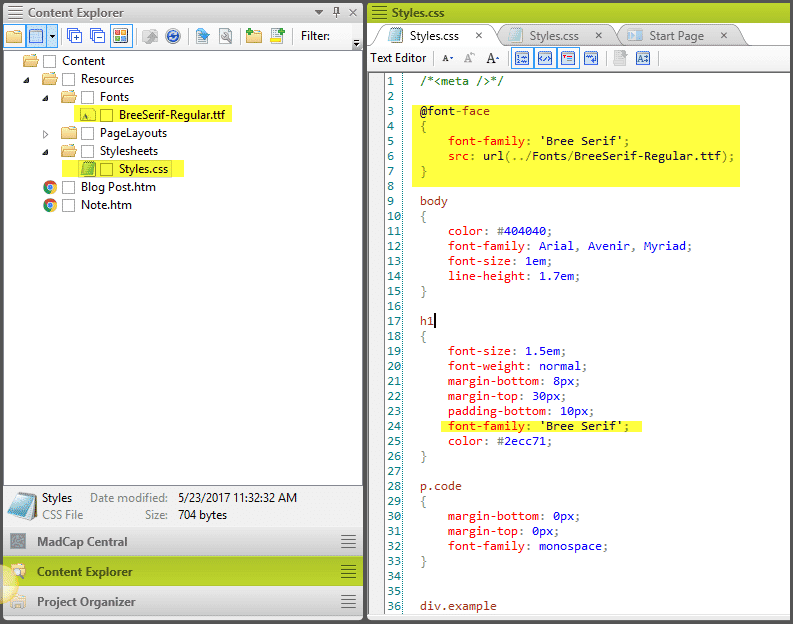
- Create a “Fonts” folder in your “Resources” folder.
- Drag the font file you downloaded into the Fonts folder. (You can do this outside of Flare within File Explorer)
- In Flare, open your Stylesheet in the Text Editor view (Right Click > Open With > Internal Text Editor)
- At the top of your stylesheet add the following code:
@font-face
{
   font-family: 'Bree Serif';
   src: url(../Fonts/BreeSerif-Regular.ttf);
}- Use the name of the font in the elements you would like to have use this font. Example:
h1
{
   font-family: 'Bree Serif';
}- Build and view output.
You will see your custom font in your output when viewing it on your computer. To verify that everything is working correctly, try viewing the output on another computer that doesn’t have the same font installed.
Notes
- The font-face property allows you to name a font and point to where the font file is located. For more on the font-face property please visit the following URL: https://www.w3schools.com/cssref/css3_pr_font-face_rule.asp
- The @font-face rule can have “font-family” defined as any name. However, I recommend using the default name seen in Flare. You can find out what name Flare is reading the font by going to the Home Ribbon and selecting the Font dropdown. The reason I recommend this is because if the font name is different than what appears in the dropdown, the PDF outputs will have to point to a different font name than your HTML5 outputs.
- In the @font-face rule, make sure the “src” points to the path where the font file is located. This path may change depending on where your stylesheet is located with respect to where you have placed your font file. For more on file paths please visit the following URL: https://www.w3schools.com/html/html_filepaths.asp
- Make sure Flare is closed before installing the custom Font. If you’ve installed the font while Flare is open, you may notice it cannot be selected within the Flare UI. If this is the case, close and reopen Flare.
If you have any questions about using custom fonts or want to see this in action, feel free to reach out!