
This blog post was converted from a document sent to us by Robin Kanowitz.
Robin is a technical communicator in Scandinavia and is based in Copenhagen, Denmark. He has worked in the technical communication industry for more than two decades, and has been using MadCap Flare since Beta 0.9. If you have any questions regarding this document, Robin can be contacted on the MadCap Software forum via his user name rkiskan.
Introduction
Resumé
Conditions in MadCap Flare projects can significantly increase the reusability of your project content. Besides simply including or excluding conditions in your project's targets, you should be aware of the basic issues when working with conditions. This document explains some of the most significant issues when starting‐out with MadCap Flare conditions.
Audience
This document is targeted at MadCap Flare users that define and manage Flare projects, the content therein and the generating of project targets.
Before you start...
This document ‐ Top Tips when using Conditions in MadCap Flare ‐ is supplementary to the earlier document Maximizing Productivity with MadCap Flare Conditions. This document does not explain the implications of applying conditions to project content, but it explains the issues that need to be considered when defining and managing these conditions. All the descriptions in this document are based upon MadCap Flare v.7.2.0.
Sample project
The examples used in this document are based upon a very simple Radio stations MadCap Flare project. The project has several topics. In its most simple form the content and ToC appears as follows:

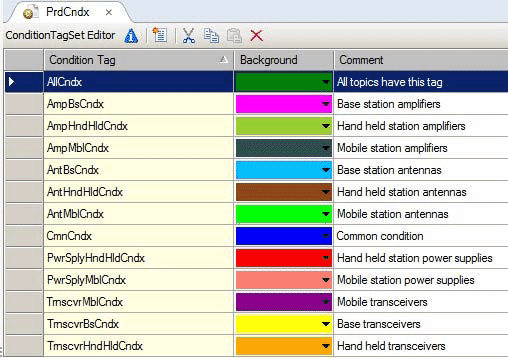
A set of conditions have now been applied, these are defined in the PrdCndx condition file. There are thirteen conditions. This may seem a lot of conditions to manage, but the following sections explain how easy this is to comprehend when using an appropriate content approach. The conditions are applied at topic level and the condition set and topics now appear as follows:
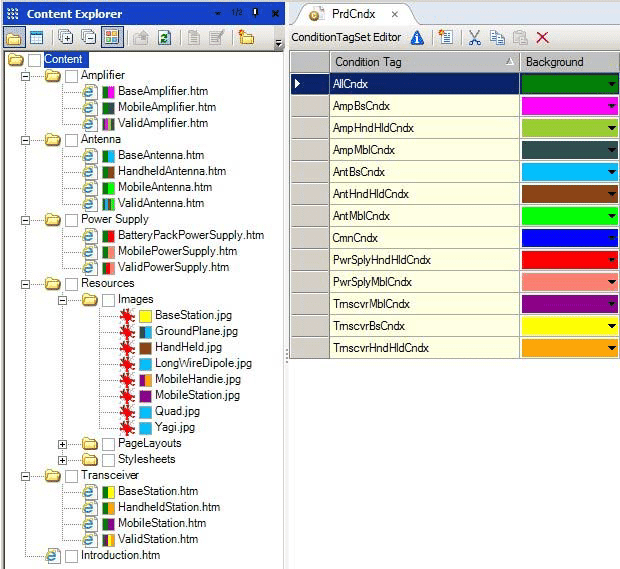
The main focus will be on file and ToC conditions and the inclusion of multiple topics is simply to provide a project with some content. Later sections in this document include examples where actual topic content is conditioned.
Tips & tricks
1. Backup your work
Whenever you create conditions, apply conditions or rename conditions, ensure that you have a backup of your project prior to making these changes. Unraveling the effects of tagging, and even worse a search and replace, can be extremely time consuming and frustrating. It is often much easier to revert back to a previous saved version than undo changes. If you are using a version control system on your project then you can use it to full advantage here.
2. Use rock‐solid names for your conditions
When creating a condition set, in our example PrdCndx, make every attempt to use timeless and unique condition tag names. Avoid the common pitfalls when naming your condition tags, for example:
- Do not use generic words as condition tag names
Using Introduction, Basic, Advanced etc. for condition tag names can be problematic. If you later decide to rename this condition tag with a Search and Replace function, then you may be swamped with multiple hits of the these words in your project content and may erroneously replace this content. - Do not use condition tag names that are subsets of other condition tag names
For example, if you have a condition named SysAdv, then do not create a tag named Sys. If you decide to perform a Search and Replace on the Sys tag by searching for Sys, then you may inadvertently change the name of SysAdv tag. - Do not use product names as condition tag names
No matter how much we like to believe that they are immortal, products have limited life and sooner or later you may find yourself using outdated and nonsensical condition names in your Flare product structure. Rather base your condition names on well‐established concepts and/or functionality. - Avoid NOT in condition tag names
Avoid conditions with NOT in their names. For example if a condition is named NOT_Trnscvr, then using an Exclude NOT_ Trnscvr in a target can be extremely confusing. How does this compare to Include NOT_ Trnscvr, Exclude Trnscvr and Include Trnscvr. Use simple positive condition tag names and exclude or include these as necessary in the target.
This may sound easier than done, but the following is an example on how to satisfy these criteria.
Firstly, use non‐vocal condition names appended with a suitable identifying suffix such as Cndx (for Condition). For example, if you need a condition to identify radios, then you may be tempted to use the word Transceiver as the condition tag name. This may be a very common word and appear in the topic content, which can create problems when performing a find and replace on the condition tag name. Rather use a limited‐vowel version such as TrnscvrCndx - this is still readable as Transceiver Condition. Your readable project content would probably never have the word TrnscvrCndx in it and you thereby avoid the risk of replacing Transceiver in the standard content at a later time.
Secondly, if you know that there are various types of transceivers, then create and name tags TrnscvrMblCndx (for mobile radios), TrnscvrBsCndx (for base station radios) etc. This avoids using condition names that are subsets of other condition names.
Compliance with these first two issues can be seen in the following tag set:
Thirdly, if we have a radio product called Satellite Super One we do not create a condition tag named Satellite Super One and apply it to all content relevant for that specific radio. This may work in very simple projects, but it is a short‐term solution as usually more products will be added and the conditioning for multiple models will be overlapping and confusing. Rather let the tags be named according to functionality that define the content possibilities, for example, if it is a mobile radio, then the topic has the TrnscvrMblCndx tag. The following example is the MobileStation.htm topic.

The topic itself is tagged with the TrnscvrMblCndx tag. The See also section has three bullets, each tagged with relevant tags, AmpMblCndx, AntMblCndx and PwrSplyMblCndx. This means we can create targets for mobile radios that suite each model according to their functionality - include or exclude mobile amplifiers, mobile antennas and mobile amplifiers. If we did not do this and if only some mobile radios support amplifiers, antennas and/or power supplies, then we would be forced to tag the bullets with conditions based upon each product model being considered and add modify these taggings whenever new products were developed, modified or removed.
Fourthly, do not define functionality via NOT tags. We do not create a NOT_ TrnscvrMblCndx and apply that to base station radios. We simply identify base stations with the TrnscvrBsCndx tag and we include and exclude it as necessary. When creating a target for a mobile radio we simply exclude the TrnscvrBsCndx tag and include the TrnscvrMblCndx tag. This is described in the following point.
3. Let targets define the product
Your Flare project is usually delivered for a particular product or service. As mentioned previously, conditions should be used to tag relevant types of functionality or concepts. They should not be used to define products. This means that a specific model of radio, for example Super Satellite One, a mobile radio that supports mobile amplifiers, mobile power supplies and mobile antennas has a target that includes and excludes the topics via inclusion or exclusion of the relevant conditions.

The project targets - one for each model or product - include or exclude the appropriate content. The targets can be seen as self-documenting, that is they document the product makeup, rather than you trying to include product-named conditions in the content itself. The target is a straight-forward indication of what the product includes and excludes.
4. Change condition names in all relevant files
If you need to change the name of a condition, then you can change this in the condition set definition, however this only affects the content of the .flcts file. Typically you need to apply the changes in the .fltar,.htm and .flsnp files. These are not automatically updated when the condition name is changed. In brief:
- Condition sets
You can change the name of the condition in the .flcts file with the condition editor. You can also edit this file manually, for example by using Windows Notepad or the Flare internal text editor. The following image depicts the underlying content of the condition tag set file. Note that each condition is included in a ConditionTag which contains the tag's color, name and content.

- Targets
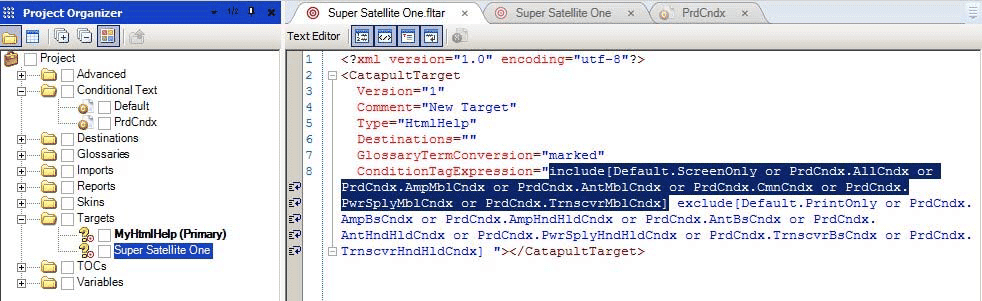
The use of the condition in the various .fltar files must be updated. The name of the condition is updated when the name in the .flcts file is modified, but the Include and Exclude selections need to be redone as they will be cleared. This implies redoing the selections in each target file, but can also be done using Windows Notepad or the Flare internal text editor. The following image depicts the underlying content of the Super Satellite One target. The highlighted section shows the included tags. Note, the condition names in the .fltar file are prefixed by the condition set name, in this example Default. and PrdCndx.
- Topics and snippets
You can change the condition name in .htm (topic) and .flsnp (snippet) files by manually retagging the content, though using the Search & Replace function in Flare is far more effective. The following image depicts how condition tags can appear in topic content. They can appear at html tag level (for the entire topic) or at paragraph or even at character level. They can also appear in table definitions as well as other places. In this example topic there are four condition tags. When using the Find and Replace function, ensure that Find in is set to (whole project) so that all occurrences of the condition tag name tag in the project are considered. Find what would be set to the old condition tag name and Replace with to the new condition tag name. The same approach is relevant when considering snippets (.flsnp files).

- Indexes
If you have applied conditions to index entries then these also need to be considered. Simply changing the condition name in the condition set does not modify the condition name on the index entry (in the topic or snippet). They must be modified as part of topics and snippets as mentioned earlier.
- Table of contents
If you have applied conditions to entries in a Table of Contents, then the ToC (.fltoc) files also need to be considered. Simply changing the condition name in the condition set does not modify the condition name on a ToC entry. You can manually retag the ToC entries, however the old tag name will still be associated with the ToC entry. It is best to manually edit the underlying XML in the ToC files, for example by using Windows Notepad or the Flare internal text editor. - Images
If you have applied conditions to images then the content of the .props file for each affected image must be modified. The .props files are not apparent in the Content Explorer, but can be seen, for example, in the MS Windows Explorer.Each tagged image file has a corresponding .props file, for example HandHeld.jpg has HandHeld.jpg.props. The content of this particular .props file appears as follows:
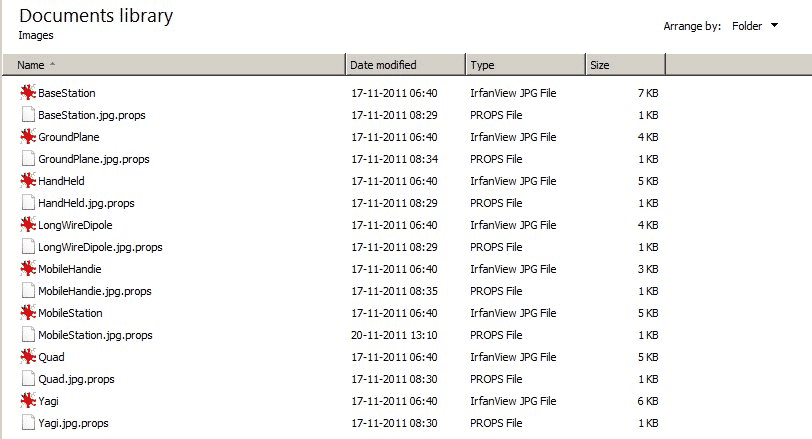
Each tagged image file has a corresponding .props file, for example HandHeld.jpg has HandHeld.jpg.props. The content of this particular .props file appears as follows:
<?xml version="1.0" encoding="utf-8"?>
<fileProperties conditions="PrdCndx.AntHndHldCndx" />
Simply changing the condition name in the condition set does not modify the condition name in the .props file. You can retag the image, however the old tag name will still be associated with the image. It is best to edit the .props files manually, for example by using Windows Notepad or the Flare internal text editor.
There are other types of project‐level files where conditions can be applied, for example Import files, Skin files, Variable files, Glossary files etc. These files can be accessed from the Project Organizer and would be managed similar to those mentioned above. However, whether or not you have used these files depends on the nature of your specific project.
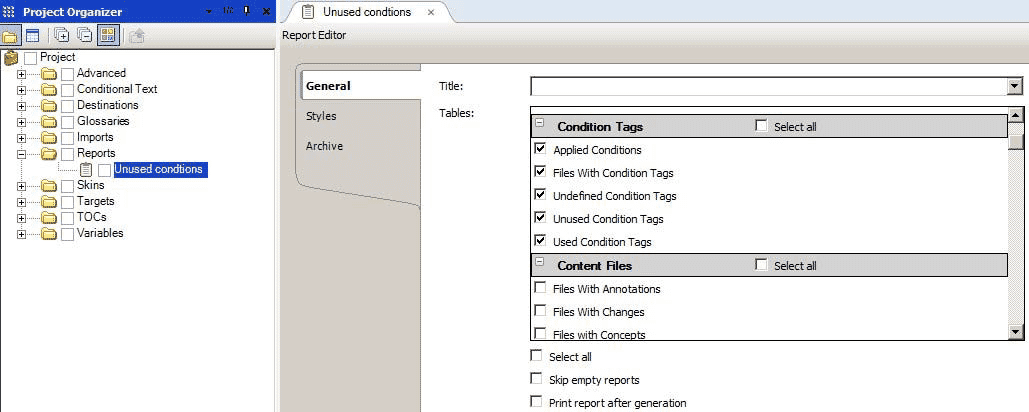
5. Use Flare reports to identify relevant conditions
The previous step explained the implications of modifying tag names. Even after making such changes, old unused tag names may still exist in the content and new tag names may not have been applied where required. Flare includes a series of reports that are extremely useful to identify where conditions have been applied. These reports cover all files in the project, including those in the Project Organizer.
- Identify content where tags have not been renamed
If you have renamed a tag, then use the Applied Conditions report to quickly locate any content where the old tag name may be still be applied. The old tag name can appear if you used the Search and Replace function and inadvertently skipped some conditioned content. - Cleanup unused conditions tags
Use the Undefined Condition Tags report to remove unused condition tags from the project.
Note, even if you make condition changes to your content, simply rerunning a report may not reflect these changes. This is because Flare scans and analyzes the content at regular intervals, and only after such a rescan will the report provide the correct results. To bypass this limitation, simply close and reopen the project and then regenerate the report.
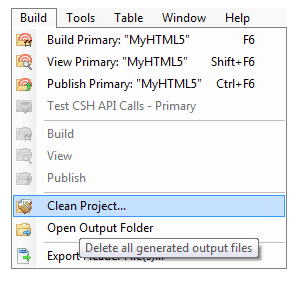
6. Clean the Build content before viewing the results of a condition change
Always use the Build > Clean Project function to remove old build content prior to generating a target, especially following condition changes. There can be caching issues in your computer that cause content from "old" conditions and taggings to appear.
7. Build reports show errors even when content is conditioned for exclusion
When a target is being built a first check ensures that all referenced files exist. Only when this check has completed are the conditions considered. For example, if you have a topic that includes a drop down section and:
- the drop‐down includes a snippet and
- the snippet is excluded by conditions and
- the snippet file is not in the project, for example it has never been imported.
You would expect this to be acceptable, namely the file need not be in the project because it is excluded by conditions. However, the build log lists this with a missing file error, even though the drop down content (snippet) is conditioned for exclusion and it is effectively an empty drop‐down.
8. ToCs in generated target give broken links unless conditioned correctly
Consider a book in a ToC that includes multiple topics. If one of these topics does not exist in the project, for example it was not imported as it would be excluded anyway, then the ToC will show the topic entry, but the link will be broken in the generated output. On the other hand, if all the topic files in a book are missing, then the book is effectively empty and empty books do not appear in the generated ToC.
You can avoid these broken links by ensuring that the ToC entries are tagged with the same condition name tags as the referenced topics. This will ensure that the ToC entry is excluded if the topic is excluded.
9. Import files do not always consider conditions on images
Conditions applied to images are saved in a .props file. For example an antenna.jpg has a corresponding antenna.jpg.props file with its conditions.
If you are using Import files in your project, and these are configured to import images, then changing conditions on images and reimporting the images does not prompt with image as an update candidate. To force the updated image (and conditions) into the target project you must manually select the image file in Accept Imported Documents window.
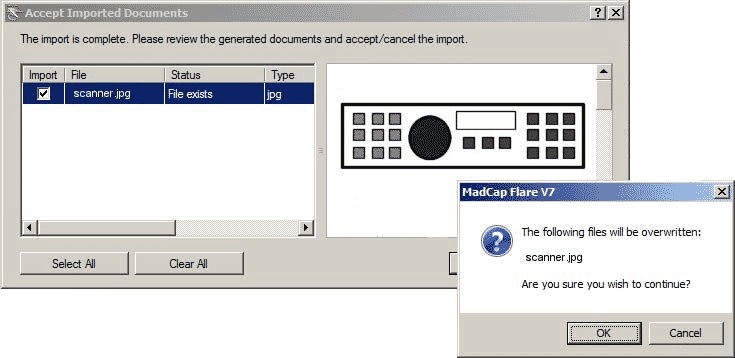
This will also update the .props files in the master project (the project being imported into). Note that due to caching issues the color code on the imported image may not reflect its new conditions, this sometimes requires a restart of the computer.
10. Use Import file names that reflect your conditions
If your project is constructed by importing various subprojects and these subprojects reflect the content for a specific condition, then for understandability purposes assign each import file a name that clearly associates it with the condition concerned. This makes the associations between conditions, import files and exclusion and inclusion of conditions in the project target(s) much more logical and understandable.
Concluding comments
The possibilities and alternatives with MadCap Flare conditions are vast. There is no single preferred approach, but experience will lead you to a strategy that is suitable to meet your needs. This document has attempted to outline some of the most basic issues encountered with MadCap Flare conditions, there are many more, but by prudently taking the first steps will put you on the right track to effective content management and production.