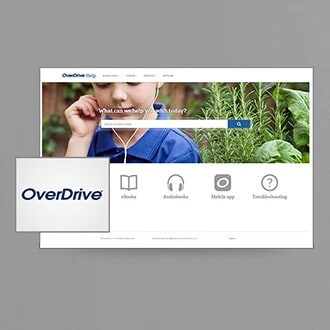
At Tenable Network Security, our team of writers currently supports six major help systems that are available via the documentation website. Each help system has multiple versions, some in tripane format, and some using top navigation output. So when I was tasked with creating a searchable site and implementing a local search function on our home page, one that could provide search results from our top nav and tripane documentation, the first thing I asked was, “How much do you want to spend?”
In addition to wanting the implementation to be as cheap as possible – free, ideally – we also wanted to use tools that were already available to us. Finally, we didn’t want to have to wait for the site to be indexed – the search results from day to day had to always be consistent and reflect the most up-to-date content.
An Obvious Candidate
The requirements immediately pointed me to an obvious candidate: MadCap Flare 12, the software we already used day to day to create our help systems. I knew that Flare 12 already had a comprehensive search feature, and since we were dealing with files created in Flare, could I use the software to create our local search?
To test the software as a possibility, I created a new Flare project, the Search Master, and copied the complete output of a couple systems, tripane and top nav, into the project’s Content folder. I set the project’s HTML5 target to not use a skin, and added the Search Bar Proxy to the default topic. And, happily, it worked! Well, it mostly worked. There were a few limitations that I encountered, from both a software and workflow perspective:
- While Flare supports runtime merging of tripane-format projects, it does not support the process with top nav, so we would need to do a little customizing for our solution.
- We do not use IIS to serve our website, so we could not leverage the advantages of the server-based output.
- Because the project outputs were already built, content that is not normally searchable was now being included in the results. For example, text from the default .htm file, the CSH.htm file, and breadcrumbs were all appearing. This meant I would need to adapt my workflow: only the topics we wanted to be searched could be included in the Search Master’s Content folder.
- Manually copying the topics that we wanted to make searchable was a workflow issue in itself. Because of the expansive nature of the website, I needed a way to quickly bring over only the topics I wanted.
- In the search results, when I clicked a link to a topic in a tripane output, only the topic appeared, no skin frame. I should have expected that. Because Flare wasn’t building the search results for tripane, the links went directly to topics, rather than the correct URLs for navigating the tripane. This wasn’t an issue for frameless top nav format, but would be problematic for our historical tripane documentation, as the projects had inconsistently enabled the Show navigation link... options in the skin.
Because of this issue, I also realized that the organization of the files in the Content folder would need to match exactly the folder layout of our website, so relative links would be correct in the search result URLs.
The Solution
This approach utilizes Flare’s client-based search functionality and assumes you have the ability to modify your website’s homepage. This approach also assumes that you have all top nav, or a mix of top nav and tripane outputs. If all projects are in tripane format, runtime merging may be a better solution for you.
Setting up the Search Master
Setting up the project that actually builds the search data files, the Search Master, is fairly straightforward. This explanation assumes a skinless approach, but you could also implement a local search using the top navigation format.
The Search Master requires at least one topic that includes the Search Bar Proxy.
If you want to customize the search results page, you must also create a topic that includes the Search Results proxy. For example, if you wanted a search bar to also appear on the search results page, you would add both a Search Bar Proxy and a Search Results proxy.
For the skinless implementation, the HTML5 target settings are the default with the exception of the following:
- On the Skin tab of the Target Editor:
• The Skin field is set to (none)
• The Search Bar and Search Results fields are set to the corresponding Search Bar and Search Result skin components.
• The Tablet Breakpoint and Mobile Breakpoint fields are set to 0. - On the Advanced tab of the Target Editor:
• Do not use “Content” folder in output is enabled. This prevents the search result URLs being modified to include the Search Master’s Content folder.
• Generate resized copies of scaled images is disabled.
• Remove MadCap styles is enabled. - You may wish to tweak search performance via the Performance tab of the Target Editor, such as enabling partial word searching, though it will affect how long the project takes to build.
Getting the Topics
In order to preserve the directory structure of your website, it’s key that the topics you copy into the Search Master be organized identically to the website. For example, if I have the following directory structure:
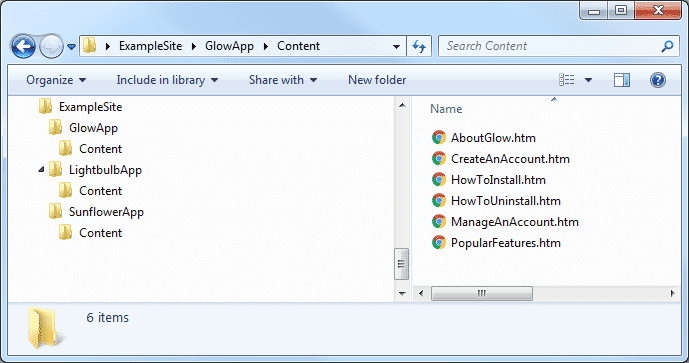
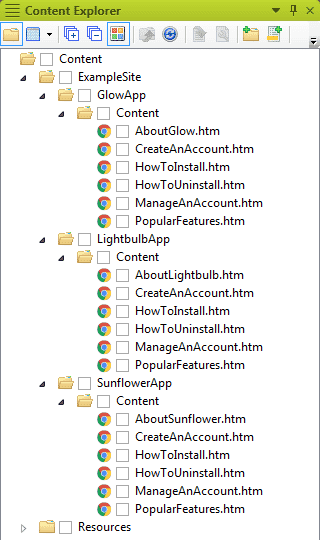
Then my Search Master’s Content folder should look like:
If you have a small or static directory structure, you can manually copy the files from your project output or website directory into the Content folder. I found it necessary to automate this process, creating a script that identifies topics, checks them against a blacklist of files to exclude, and copies them to the Search Master’s content folder with the appropriate directory structure. For those of you interested in scripting, a few quick ways to distinguish topic files from other files that Flare creates:
- By default, HTML5 topics have the .htm file extension. However, the <Default>.htm and <Default>_CSH.htm need to be excluded, as well as Search.htm (if the project is top nav) or any custom search results pages.
- For tripane outputs, if you read the file contents, topics can be identified by this unique string: data-mc-runtime-file-type=”Topic”
- For top nav outputs, the unique string is: data-mc-runtime-file-type=”Topic;Default”
After you have the Search Master’s target configured and the files copied to the Content folder, build the HTML5 target.
Fixing Search Results
If you want to exclude things like breadcrumbs and headings being in the descriptions of the search results, you must specify a description in the Topic Properties of each topic that you want searched. This is good practice in general.
If you have tripane content that is being searched, you can fix the URL structure in the output data files to accommodate how tripane URLs are constructed. I automated this also, though you could use an application like Notepad++ to do a find-and-replace operation across multiple files. To script this, you have to identify the files that are tripane (see the unique strings I mentioned previously), and modify the SearchTopic_Chunk.js and SearchUrl_Chunk.js files. A few notes about the structure of those files:
- A SearchTopic_Chunk file is a collection of JavaScript objects, made up of pretty standard name:value pairs. The u: property contains the URLs that you will need to check and modify.
- A SearchUrl_Chunk file is also a collection of objects. In this case, the key values are the URLs.
You can make some assumptions once you’ve identified the tripane files. For example, after I identify that ../appliance/4_1/Content/4.0And300/HardwareFeatures.htm corresponds to a tripane topic, I can assume that all files in the …/4_1/Content/… path are tripane topics. Because of that, I can globally replace ../appliance/4_1/Content with ../appliance/4_1/<default>.htm# (where <default> is the value of the Output File field in the HTML5 target, Default.htm if no value is specified) in both the SearchTopic_Chunk and SearchUrl_Chunk files.
Deploying the Search Files
To deploy the search to your website, you only need to copy the following:
- The topic that includes the search bar proxy.
- The search results page (usually Search.htm).
- The Data folder

If you have styled or included images in any of the topics in the Search Master, you may also need to copy the Resources folder.
The files and folders must be copied to the root (or the directory relative to the structure you set up in the Search Master) of your website.
Once the files are in place, your website should be good to go!