Neil Perlin, internationally recognized and certified technical writer, MadCap Advanced Developer, trainer and consultant, is the owner of Hyper/Word Services, a documentation training and consulting services company. Here, Neil shares his experience writing and publishing books using MadCap Flare.
Ever wanted to write a book that people can buy on Amazon? Perhaps a technical book, perhaps a book of family history, or anything in between.
In this post, I’ll discuss how to do that using MadCap Flare as part of a larger tool kit that lets you publish a book to Amazon in both print and ebook format at mind-boggling speed.
By way of background, I’ve written seven books in my career. The “Small Business Guide to Computers & Office Automation: A Comprehensive Overview of Computers and Modern Office Technology, and How to Select a System”, was published in 1985 by Knowledge Industry Publications. The second, an update of the office automation book, was published by an in-house press in 1989. The original book took about five months to write and almost as long to publish. The slow publication process made it hard to write a technical book because it was almost impossible to update the book once it entered the process even though the subject matter itself might be changing. And so I stopped writing commercial books.
Then, in 2010, two things happened.
First, the late Nan Fritz, president of nSight, a consulting company in Burlington, MA, said “Neil, you’re a consultant. You have to write a book.” I decided she was right and, after some thought, decided to take a MadCap Mimic course that I’d written several years earlier and repurpose it in book form. That meant that most of the writing was already done, in Word format.
Second, I found a blog post, now lost, that discussed why consultants should write books and why and how to self-publish. The gist of that post was that while it was prestigious to have a “real” publisher, the process was slow, publishers paid low commissions and no advance, and provided minimal marketing support. Self-publishing and “print on demand” technology made it possible to write a book and make it available on Amazon quickly and inexpensively but with a higher commission rate. There was still no advance and you were on your own for marketing, but that was like working through a real publisher anyway.
So I tried it. In the process, I put together a tool kit and workflow that I’ve used to write five books since 2011, all available on Amazon (blatant sales pitch warning). The books are “Essentials of MadCap Mimic 6”, “ Advanced and Unfamiliar Features in MadCap Flare 8”, “Advanced and Unfamiliar Features in MadCap Flare 9”, “Advanced Features in MadCap Flare 10”, and “Creating Mobile Apps Without Coding”. In the rest of this post, I’ll explain the tools, the workflow, and point out some lessons learned.
The Tools
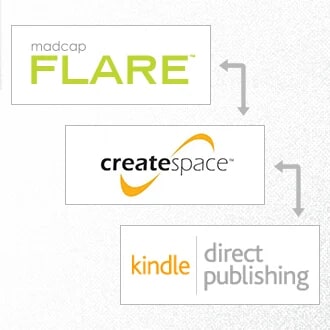
The tool kit consists of:
- Flare (www.madcapsoftware.com) to write the content.
- Amazon CreateSpace (www.createspace.com) to convert the Flare output into a print book and put it up on Amazon.
- Amazon Kindle Direct Publishing (https://kdp.amazon.com/), also known as KDP, to convert CreateSpace’s print output to Kindle format and put it up on Amazon.
The Workflow - Flare
The most efficient writing workflow was to treat the book like any Flare project. I also planned from the start to write multiple books using the same basic Flare settings, so I initially set up the page layout, CSS, and one table CSS for the Mimic book with a view toward reusing them.
- I set up the page layout using a custom size (6”x9”) and default 1” margins. (I used Flare’s 6”x9” because that was the CreateSpace size that I planned to use for the printed book and matching the sizes from the start meant fewer reformatting problems when publishing.) I added the book name in the header block and the “page n of N” page numbering template in the footer and that was that for the page layout. I could now re-use the page layout in multiple books by copying the flpgl file from project to project and simply changing the book name in the header.
- I set up a simple CSS, specifying h1, h2, h3, p (paragraph), Note, Tip, and Caution styles. I made all the settings in the default medium, then switched to and used the print medium. (Why not make all the settings directly in the print medium, since that was the medium I was going to use anyway? Most of my Flare work involves online outputs using the default medium and if I used the print medium as the “default” for the books, there was a risk of getting confused between mediums. Not as efficient an approach as simply designating the print medium as the default but with less risk of confusion.)
- I set up a very simple, black and white-oriented table CSS to ensure simple printing.
For each new book then, the overall workflow was this:
- Create the new project in Flare with MS Word as the primary target. (All the file conversions to print and Kindle take place in CreateSpace and KDP, not Flare.)
- Created the outline in Flare, with each section in the outline being a topic.
- Imported the page layout, stylesheet, and table stylesheet, making sure to change the heading in the page layout to the new book title. (I forgot to do that once and wound up generating a proof (final review) copy of the Flare 8 book that was perfect except that it used the Mimic title in the heading. A silly mistake but easy to fix.)
- Created a target called “ Word” and made it the primary target.
- On the XML Editor toolbar, set the Layout and Medium options to Print. (This may sound like a lot of work so far, but most of it was one-time for the first book. I could then copy those files to the new book project. The book-specific work took minutes.) I then started writing.
Several things to be aware of as you write:
- Bullets work fine in the print output generated by CreateSpace but not in the Kindle output generated by KDP. This is a problem if you’re writing a technical book because bullets are so common. You’ll have to find a workaround, such as changing your wording or indenting “bulleted” paragraphs.
- Watch your word spacing. In several cases, Flare inserted two spaces before a word but only showed one space until I saw the Word output.
- MadCap Capture works well for capturing screens and inserting them in topics. (You can use any screen capture tool. However, don’t draw highlight boxes on screen shots because the area within the highlight box will become opaque in CreateSpace.)
- Set the h1 style’s page-break-before property (in the PrintSupport group on the Stylesheet editor) to Always to avoid having a main heading at the bottom of a page and the text on the next page. However, if you have two short topics that both start with h1, you can wind up with two facing pages that are mostly empty and have to close up those two headings in Word.
- Rewrite your material to avoid having a paragraph that ends with a short line that runs onto the succeeding page. If this happens, you may wind up with a left-facing page that contains a single word and the next topic starting on the right-facing page. This is fine but looks odd.
The table of contents can take some finagling depending on the structure you want. There are too many options to cover in one blog post, so I’ll put out an open offer to answer any questions down the road.
When you’re done, generate the Word output. Two things to watch out for when you do:
- On the Advanced tab of the Target editor in Flare 10, select Generate TOC Proxy and Generate Index Proxy in the Output Options group. (You can also select Generate Glossary Proxy if you created glossary entries.) If you have an older version of Flare, you can generate the TOC and Index but you’ll have to do so using special-purpose topics. See the help article or my Advanced Features… book.
- On the Advanced tab of the Target editor in Flare 10 or before, select the Embed Images in Output option in the MS Word Output options group.
You can now review the Word file to make sure everything is right. If you need to change the content, you can make the change in Flare and re-generate the Word output or make the change in the Word output and separately in Flare. Also check for bad page formatting, such as having one line in the last paragraph of a topic on a separate left-facing page. When you’re satisfied, you’re done with Flare and ready to move into CreateSpace.
The Workflow – CreateSpace

CreateSpace is a book production, pricing, and distribution tool. It lets you set up your print book’s page size, color, and cover, plus distribution and pricing options for various Amazon channels. The process is step-by-step and you can perform all these tasks for free or pay for professional support. I did it myself and, while the results might have been better if I used the support, I thought they were good enough. (Part of the decision between do-it-yourself versus using a designer is the choice between time-to-market and aesthetics.)
When you finish laying out the book, including checking the layout in a page simulator, you can check a virtual copy or a printed proof copy. I recommend using the printed proof for two reasons. First, there’s just different feel between holding something tangible versus virtual. Second, you’ll want to see how your images look. (My main problem has been that the pixel density of my images is lower than CreateSpace prefers. CreateSpace will complain but let you ignore the problem. By getting the printed proof copy, I can make sure that the images really are okay.) Once you’re done, you submit the book for final review by CreateSpace.
After you fix or ignore any problems that CreateSpace identified, you give CreateSpace the go-ahead to put the book up on Amazon. CreateSpace will then slide you into KDP.
The Workflow – Kindle Direct Publishing
KDP is the ebook side of CreateSpace. KDP will take the files from the CreateSpace work and use them for the Kindle output. The process is almost effortless.
Two Obvious Questions
The first question is how long the whole process will take.
The writing part, in Flare, is up to you. Depending on how well you know the material, you might write the book in six months or, as I did for the Flare 10 book update, about a month.
The real time saving is on the publishing side with CreateSpace and KDP. The first time I did this, for the Mimic book, I worked slowly and thoroughly and the entire process took eight hours! (As opposed to nearly five months.) My book was on Amazon in print form and Kindle form the next day. As spectacular as I thought this was at the time, the publishing process for my latest book, “Advanced Features in MadCap Flare 10”, took an hour and a half! I ran through the process in the morning, the print version was on Amazon that afternoon, and the Kindle version the next morning.
This speed has totally changed how I write books. I can now write a book and time it for release with the software it’s describing without having to factor in months of lost time for production.
The second question is - why not write the book directly in Word rather than write in Flare and output to Word? There are two answers. First, I’m a MadCap certified Flare trainer and consultant, so it made sense for me to explore what Flare can do. More relevant is the fact that Flare’s control files, especially the CSS, table CSS, and page layout, provide a rigorous but almost invisible degree of control as I write. For example, by making the CSS the master CSS for the project, my content formatting takes place automatically. Basically, it’s a snap to set up the infrastructure of a new book, with better control than Word and without the quirks.
Summary
Writing a book will never be easy. But using Flare in conjunction with CreateSpace and KDP means that the writing phase is better controlled and the publishing phase is so quick as to be almost irrelevant in your planning. Try it. You’ll like it. I did.